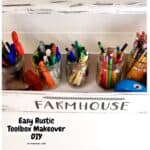
Thrift Store Toolbox Makeover DIY,
Thrift Store Toolbox Makeover DIY, a simple project for taking a wooden tool holder and turning it into something useful and attractive.
Materials
- Wood toolbox
- Sandpaper or sanding block.
- (White) chalk paint
- Black craft paint .
- Foam brushes.
- Decorative decals.
- Letter Stickers or Decals for words.
- Ribbon ⅜” wide (or of choice).
- Optional- drill and bit for adding ribbon strip, acrylic sealer and canning jars to hold items in.
Instructions
- Remove any debris, dirt, or objects such as stickers from the toolbox. Use a sanding block or sandpaper to even out the surface to make it smooth. Then use a wet rag or similar object to wipe down the box. Allow the box to dry.
- Paint the toolbox white (or color of your choice) using a sponge brush. Note: It may take several coats of paint depending on the original color of the box. Allow the box to dry in between coats.
- To create a rustic farmhouse feel to the toolbox, use a sponge brush dipped in black paint and then blotted on a paper towel, to add black to the inside and outside edges.
- Add the decals and stickers as desired. Also, add the ribbon as desired.
- Lastly, fill your canning jars with what you will be storing.