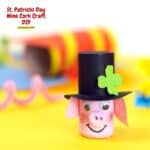
St. Patricks Day Wine Cork Craft DIY
St. Patricks Day Wine Cork Craft DIY, a simple do it yourself craft idea for most ages for turning a cork into an adorable piggy.
Materials
- 1 Wine Cork - see post for details
- 1 Pink Acrylic Paint
- 3 Construction Paper - black, pin, and green
- 2 Googly Eyes
- 1 Pom Pom - pink
Instructions
- With the pink acrylic paint, paint the cork, including what will be the bottom.
- To make the hat brim, first trace a larger circle using a small can or similar sized item
- For the center of the circle trace a wine cork . Cut out the larger circle and then the smaller circle.
- For the body of the hat, cut out a strip of black construction paper that is as wide as the cork is tall and is long enough to wrap around the circumference + overlap to glue, of the cork .
- To make the ears, on pink paper, trace a small coin to make a circle and then freestyle a triangle on top of the circle to make the points.
- Next, on the green paper, to make a clover, simply trace or draw four hearts so that the bottom angles all meet in the center. Cut this out.
- Once the paint on the cork has dried, you can assemble the piggy. Start by gluing on the googly eyes side by side about ⅓rd of the way from the top of the cork.
- Glue the pom pom (nose) just below the eyes. With the pink marker, draw on the cheeks and circle where the nostrils should be.
- With the black marker, add the eye lashes, mouth, and dots in the center of the nostrils.
- Glue on the pink ears on the sides of the cork, parallel to the eyes.
- Next, glue the hat brim on to the cork, then add the rolled up strip of black paper to make the body of the hat.
- Top the hat with the smaller black circle to cover the hole. Finish the piggie by gluing on the clover on the hat.
Video
Notes
See DiyandFun.com for details on this idea and to see the video.