
St. Patricks Day Wine Cork Craft DIY that is actually simple to make.
I like that this craft diy is suitable for most ages as well!

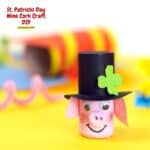
Adorable St. Patrick's Day Wine Cork Craft DIY
This cute piggy craft can have many uses including sitting on a shelf or a desktop.
You could also make this to give away to someone as a gift!
Did you see my Toilet Paper Roll Leprechaun Craft DIY ?
That TP Roll craft idea is another simple DIY upcycle idea for St Patricks day.
Both this wine cork craft and that TP roll craft are cute ideas for upcycled decorations.
Did you know that you can purchase unused wine corks in bulk? You can find a good selection of corks here.
Frequently asked questions about St. Patrick's Day Crafts.
St.Patrick's day is actually a religious holiday honoring an Irish patron saint. It is celebrated on March 17th.
These days the holiday is often celebrated by others whether or not they are Catholic or Irish. Some folks celebrate St. Patrick's day by wearing green, eating corned beef with cabbage, drinking green beverages, and also enjoying parades.
Wine corks are commonly collected after enjoying a bottle of wine.
While it may be fun to just collect them on a shelf or in a drawer, you can actually reuse, or upcycle, that wine cork.
What can you make with wine corks?
🔵 When glued together or on to a shape, you can make a home decor items such as a wreath.
🟡 Add the corks to a jar to use as a display (add in some string lights😉).
🟣 Make something cute using the cork such as a St. Patrick's Day piggy!

Tips for making this wine cork craft idea.
Most of the materials used in this project can be found at your local dollar store.
You may also be able to find additional add-on for your piggie while you are there.
More tips for you
- For St. Patrick's Day cork Piggies that will be displayed on a shelf, I suggest that you use a cork that can stand up on its own.
- If you are using a cork that once belonged to a bottle, make sure that the cork is fully intact.
- Using a clean cork is also recommended. Since the corks will be painted and have glue attaching elements to them, using a clean cork is essential.
- Allow the paint to fully dry before adding any of the elements. While the paint is drying you can make the hat for the piggie.
- Lastly, while this project is suitable for most ages, some folks may need assistance as needed. This is especially true when cutting and tracing is done.
Personalize this wine cork craft.
This St. Patricks Day winke cork piggie is really adorable just the way it is.
However, you can make yours even better.
Try one of these ideas.
- Make this into a pencil top. Carefully drill a hole in the bottom to make a spot to stick a pencil into.
- Make your piggie into a girl by adding yarn for long hair.
- Omit the clover and make this cork craft for any time or holiday in the year.


About this wine cork craft diy.
This is a simple craft idea for turning a wine cork into a piggie.
A hat with a clover on it is added to make this into a St. Patricks day craft idea.
Subscribe to DIYandFun
To make this project, we will first paint the cork pink.
While the cork is drying, we can make the hat, clover, and ears.
Then we will add the details to the finish the cork.

Materials needed to make a St. Patricks Day Wine Cork Craft DIY
- Wine Cork. Your cork should be clean from debris and dry.
- Acrylic Craft Paint. You will need pink paint for your piggie.
- Construction Paper. Black for the hat and green for your clover. Alternatively, you can use a black craft top hat and already made clover. Also, pink for the ears.
- Googly eyes. So piggy can see.
- Pom Pom. My piggy has a pink pom pom nose.
- Lastly, a black marker (lashes, snout, and mouth) and pink marker or crayon (cheeks and nose).

How to make a St. Patricks Day Wine Cork Craft DIY.
Step one: prepare.
- Gather all of your materials and prepare your work station.
- With the pink acrylic paint, paint the cork, including what will be the bottom.
- Allow the cork to dry.
Expert Tip👉 Refer to the video as needed for instructions on making this craft project.
Step Two: prepare the hat, clover, and ears.
- To make the hat brim, first trace a larger circle using a small can or similar sized item.
- For the center of the circle (what will be used to sit on top of the hat), trace a wine cork (adding about ¼" to the circumference) or use a similar sized item (like a coin).
- Cut out the larger circle and then the smaller circle.
- For the body of the hat, cut out a strip of black construction paper that is as wide as the cork is tall and is long enough to wrap around the circumference + overlap to glue (mine is about 2" by 4", you can trim as needed after gluing) .
- To make the ears, on pink paper, trace a small coin to make a circle and then freestyle a triangle on top of the circle to make the points.
- Next, on the green paper, to make a clover, simply trace or draw four hearts so that the bottom angles all meet in the center. Cut this out.
Step Three: assemble the cork.
- Once the paint on the cork has dried, you can assemble the piggy.
- Start by gluing on the googly eyes side by side about ⅓rd of the way from the top of the cork.
- Glue the pom pom (nose) just below the eyes.
- With the pink marker, draw on the cheeks and circle where the nostrils should be.
- With the black marker, add the eye lashes, mouth, and dots in the center of the nostrils.
- Glue on the pink ears on the sides of the cork, parallel to the eyes.
- Next, glue the hat brim on to the cork, then add the rolled up strip of black paper to make the body of the hat.
- Top the hat with the smaller black circle to cover the hole.
- Finish the piggie by gluing the clover on to the hat.
In case you missed it..
St. Patricks Day Wine Cork Craft DIY, a simple do it yourself craft idea for most ages for turning a cork into an adorable piggy.

St. Patricks Day Wine Cork Craft DIY
Materials
- 1 Wine Cork - see post for details
- 1 Pink Acrylic Paint
- 3 Construction Paper - black, pin, and green
- 2 Googly Eyes
- 1 Pom Pom - pink
Instructions
- With the pink acrylic paint, paint the cork, including what will be the bottom.
- To make the hat brim, first trace a larger circle using a small can or similar sized item
- For the center of the circle trace a wine cork . Cut out the larger circle and then the smaller circle.
- For the body of the hat, cut out a strip of black construction paper that is as wide as the cork is tall and is long enough to wrap around the circumference + overlap to glue, of the cork .
- To make the ears, on pink paper, trace a small coin to make a circle and then freestyle a triangle on top of the circle to make the points.
- Next, on the green paper, to make a clover, simply trace or draw four hearts so that the bottom angles all meet in the center. Cut this out.
- Once the paint on the cork has dried, you can assemble the piggy. Start by gluing on the googly eyes side by side about ⅓rd of the way from the top of the cork.
- Glue the pom pom (nose) just below the eyes. With the pink marker, draw on the cheeks and circle where the nostrils should be.
- With the black marker, add the eye lashes, mouth, and dots in the center of the nostrils.
- Glue on the pink ears on the sides of the cork, parallel to the eyes.
- Next, glue the hat brim on to the cork, then add the rolled up strip of black paper to make the body of the hat.
- Top the hat with the smaller black circle to cover the hole. Finish the piggie by gluing on the clover on the hat.