This easy file cabinet makeover project is easier to do than I would have expected it to be.
I like how amazing the file cabinet turned out!

Easy File Cabinet Makeover
This is the perfect project for anyone who has a metal cabinet that needs a bit of TLC.
Instead of tossing that old cabinet, you can turn it into something special!
Did you make my wooden book stack project?
That project is an easy décor project that would probably go nicely on top of this cabinet.
Even better, it is relatively cheap to make!
Are you looking for more upcycling ideas?
You can find some great motivational upcycling ideas here. You never know what will inspire you (something that I like to say).
This project is for anyone asking how can I make my filing cabinet look new.
I know exactly what it is like to hold on to something that should have been let go awhile ago.
Especially when that something is still functional.
Cleaning up that old file cabinet can really bring it back to life.
Painting that old file cabinet will also make your office (or room) look more fashionable.
I know that I tend to appreciate something once I have brought it back with a bit of elbow grease.

Tips for this upcycle filing cabinet project.
While I am showing you how to update a two drawer cabinet, any size cabinet should work.
Please note that this project is for a metal file cabinet and not necessarily for a wood or alternative kind of wood cabinet.
Here are some more helpful tips for you
- Cleaning the dirt off of your cabinet is essential for the success of this project. When cleaning your cabinet, soap and water should work. It is important that you allow this to fully dry as well.
- If you find that your cabinet has rust, try using sandpaper to remove the rust. If that does not work you can try using a paste made with lemon juice and borax (1:2). Allow the paste to sit for 15 minutes before scrubbing it off.
- Depending on the style of file cabinet you have you may need to remove or tape off hardware. Mine has drawer pulls that are part of the drawer so I was able to just paint them with the rest of the cabinet. If yours has drawer pulls that stick out, or a metal frame for drawer labels and you don’t want to paint them you’ll need to remove them or cover them with masking tape.
How to personalize your metal file cabinet makeover
This project uses chalk paint which is easy to use and offers a nice rustic farmhouse kind of feel.
However, using an oil based paint is another option. If you decide to use oil based paint please follow the directions provided with the paint.
Here are some more ways to personalize your file cabinet.
- Use stencils to create a pretty design.
- My frames are basic rectangular frames. You can use frames with details instead.
- Add a bit of decorative contact paper to the edges or the drawer fronts instead of painting them.
- Attach a cutting board, wooden board, or marble to the top of this cabinet.
You may also be interested in these ideas!
- Marshmallow Fluff S'mores Poke Cake
- The Best Oreo Peanut Butter Pie
- Cinnamon Sugar Churro Cheesecake Bars
- 2 Ingredient Cinnamon Roll Cobbler
- 13 Easy Summer Dessert Recipes that Don't Suck!

Here is what you will need for this easy file cabinet makeover
- File Cabinet
- Sandpaper 220 or 320-grit suggested
- Cleaning Supplies- soap and water for basic cleaning.
- Spray Primer
- Silicone Adhesive
- 8x10 Picture Frames- 2 (or as many as you need for your drawers)
- Chalk Paint- color of choice.
- And, Chalk Paint Wax
- Also, Chalk Paint Brushes
- File Cabinet Hardware, here is What I used (in 4 inch centers).
- Small pliers
- Pencil
- Electric Drill
- Screwdriver
- Paper

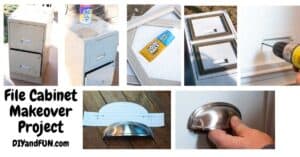
How to do this diy Easy File Cabinet Makeover
Step 1. The first step is to sand and clean up the filing cabinet.
Subscribe to DIYandFun
Depending on what kind of shape your file cabinet is in, you may just need to wipe it off with a wet towel or wipe. However, if your cabinet has rust spots like mine, you’ll want gently rub them with a medium grit sand paper until the spots are smooth and most of the rust is gone.
Then wipe down the file cabinet to remove any dirt or dust. You can use a spray cleaner and a rag, or cleaning wipes, whatever your preferred method of cleaning is.
Step 2. Preparing the cabinet.
Depending on the style of file cabinet you have you may need to remove or tape off hardware. Mine has drawer pulls that are part of the drawer so I was able to just paint them with the rest of the cabinet. If yours has drawer pulls that stick out, or a metal frame for drawer labels and you don’t want to paint them you’ll need to remove them or cover them with masking tape.
Step 3. Prime the cabinet.
Once the cabinet is clean , dry and taped, we can prime it. with a layer of spray primer. This helps seal in any rust spots as well as create a nice even base for painting. Please do this priming step in a well-ventilated area.
Depending on the style of file cabinet you have you may need to remove or tape off hardware. Mine has drawer pulls that are part of the drawer so I was able to just paint them with the rest of the cabinet. If yours has drawer pulls that stick out, or a metal frame for drawer labels and you don’t want to paint them you’ll need to remove them or cover them with masking tape.
Use even strokes to coat the entire file cabinet with primer. Make sure not to spray too heavily or closely so that you can avoid causing any drips. Allow the primer to dry completely.
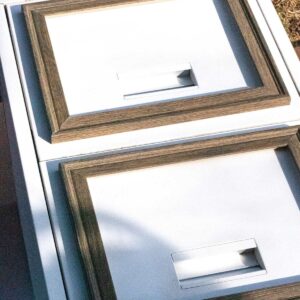
Step 4. Gluing on the frames.
The frames offer an easy way to add decorative detail to this project.
My file cabinet had a lock that would not allow the frame to sit flush against the drawer, so I opted to remove it. It is a simple process. Just open the drawer and on the back of the lock is a bracket that holds it into place. Simply pry it off with a pair of pliers and the lock will slip through the hole in the drawer. If your file cabinet is more heavy duty and the lock removal isn’t as simple you could also carve out a piece of the picture frame so that it can sit flush over top of the lock.
To affix the frame first carefully remove the glass. On the inside of the frame using a pair of pliers pull out the small metal pieces that hold the glass and back in place.
Lay the file cabinet on its back and place the frames where you want to affix them. Use a pencil to lightly mark the corners. This way you’ll be able to center the frames and be sure to place them correctly with the adhesive.
Squeeze a bead of adhesive around the edge of each frame and gently place it onto the filing cabinet (still laying on its back) and press it to affix it.
Let it dry according to the package directions until completely dry.
Step 5. Paint the cabinet.
Once your glue is dry it is time to paint! Using chalk paint coat the filing cabinet and frames with any color you choose. Depending on your color you might need to do 2 coats, allow the paint to dry between coats, according to your paint’s package directions.
Step 6. Wax the chalk paint.
Once the paint is dry use chalk paint wax to coat the file cabinet with one or two coats of wax, allowing them to dry according to the package directions.
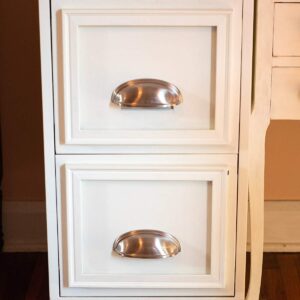
Step 7. Affix the hardware.
Once the paint and wax are dry it is time to place your new hardware. If your cabinet has existing drawer pulls be sure to measure the distance from the center of one hole to the center of another. This will give you the accurate size that you’ll need for replacement hardware.
Since mine didn’t have existing holes, I measured where I wanted the pull to sit and where I needed the holes to be. It turned out that I needed drawer pulls with 4-inch centers.
If you are replacing hardware, you can simply replace the old drawer pull with your new one. However, if you are installing a new one, you’ll need to drill holes to install your drawer pulls.
To make sure that I got them placed correctly I created a pattern by tracing them onto a lined piece of paper and marking where the screw holes were. I then held the pattern to the file cabinet and marked where the holes needed to be drilled.
Then we drilled the holes using a drill bit about the size of the holes.
Once your holes are drilled you can just attach your new drawer pulls with the screws that were included. My drawer pulls came with short & long screws if yours only include long screws (to go through wood) You may need to get shorter screws at your local hardware or home improvement store.
Step 8. Done!
Enjoy your new and improved, beautiful file cabinet!

Give your garage sale dumpster-dive worthy file cabinet a new life with this Easy File Cabinet Makeover diy project.

Easy File Cabinet Makeover
Materials
Instructions
- THE FIRST STEP IS TO SAND AND CLEAN UP THE FILING CABINET. Then depending on the style of file cabinet you have you may need to remove or tape off hardware.

- PRIME THE CABINET.Once the cabinet is clean , dry and taped, we can prime it. with a layer of spray primer. This helps seal in any rust spots as well as create a nice even base for painting. Please do this priming step in a well-ventilated area.
- GLUING ON THE FRAMES.The frames offer an easy way to add decorative detail to this project.

- PAINT THE CABINET.Once your glue is dry it is time to paint! Using chalk paint coat the filing cabinet and frames with any color you choose. Depending on your color you might need to do 2 coats, allow the paint to dry between coats, according to your paint’s package directions.
- WAX THE CHALK PAINT.Once the paint is dry use chalk paint wax to coat the file cabinet with one or two coats of wax, allowing them to dry according to the package directions.
- AFFIX THE HARDWARE.Once the paint and wax are dry it is time to place your new hardware. If your cabinet has existing drawer pulls be sure to measure the distance from the center of one hole to the center of another. This will give you the accurate size that you’ll need for replacement hardware.