I love an Easy Fall Garland Project because they are easy and they are fall inspired.
Even better, if you like them enough, they can usually be used again in the future.

Easy Fall Garland Project
This is a simple decorative project that is inspired by the fall season.
Most of the items used in this project can be purchased at a dollar store too!
Something that I really like to do is watch movies with my family.
I recently put together a listing of 25 Fall Family Movie ideas.
There are really movies for about every generation listed in that listing!
When you are done with this project, you can find more easy fall craft projects that are inexpensive to make. Here are inexpensive and easy fall projects that you can find online (including kits!).
This project is for anyone asking how do you make a bead garland.
Really, making a bead garland, such as this one, does not take a lot of steps to do.
Once you gather the items needed to make the project, you simply assemble the garland.
This bead garland project does take some painting if you cannot find your beads in fall inspired colors. Once the beads are dry you can put the garland together.
You may be wondering what kind of string do you use for bead garland.
Because this is a 'fall inspired' project, I am using jute twine.
Jute twin is easy to work with and it reminds us of hayrides and other fall activities.
For the beads, I suggest using wooden beads that already have holes drilled into them.
Those bead holes should be large enough to string your beads on to.
If the colors of the beads are wrong, it is easy to simply paint over them.

Tips for making this bead garland with tassel.
My instructions include painting beads in order to get the beads into that fall mood.
You can skip the bead painting by simply using already painted beads instead.
Here are some more helpful tips for you.
- While this project is fall inspired, feel free to use the colors of your choice. However, you can also paint your beads for other holidays such as red and green, red white and blue, or even orange and black, depending on the holiday.
- While these bead garlands look great when the beads are all the same size, varying the sizes of the beads can also make your garland more interesting too. Just make sure that you are purchasing enough beads in each size in order to do this.
- I am including one large tassel for each end of the bead strands. The tassels both help keep the beads in place and offer a decorative touch to the project. Feel free to add an extra tassel to each end or even use colored jute to make your garland tassels.
- Lastly, if the edges of your jute begin to fray enough to make it hard to string the beads, try twisting them. I even put a bit of tape on the edges to help me out sometimes (like shoelaces have).
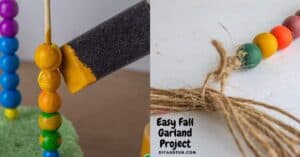
How to paint the wooden beads.
Painting the beads to get those autumn colors is easy thanks to a simple hack.
I also mentioned that you can purchase already painted beads and skip this step entirely.
Here is the hack for painting your beads.
Take floral foam and poke five skewers in it, leaving plenty of space between them for painting (you can use more than one foam). Place a spare bead or some kind of spacer at the bottom of each skewer and next to the foam. Then place the beads to be painted on top of the spacer.
👉Be sure to follow us on Facebook, Pinterest, and Instagram.
Subscribe to our Weekly Newsletter.
You may also be interested in these ideas.


How to make jute twine tassels for this project.
The jute twine tassels in this project give the garland a decorative feel as well as holding the beads in place. You can use the jute twine that you are using to hold the beads or you can use a colored (or colors) jute twine.
Steps for making the jute twine tassels.
- Cut off a four inch piece of twine and set it aside. This will be used to tie your tassel.
- Hold the end of the twine in one hand. Alternatively, you can use a piece of cardboard that is about six inches wide.
- Holding on to the end of the jute, wrap the jute around your hand, excluding the thumb, between 15 and 20 times, depending on how big you want this to be. Then you can cut the twine from the spool.
- With your free hand, pinch one side of the twine to hold the strands in place and pull it off of your hand.
- Hold the twine in place with the hand that it was wrapped around so that you can tie it into place.
- Using the four inch piece of twine from the first step, wrap the piece around the gathered twine ten times to form the tassel. Then tie the tassel about ¼-1/2" from the top of the twine where the loops are gathered together.
- For the second tassel, you can repeat this process. Feel free to make the second tassel the same size as the first or smaller if desired.

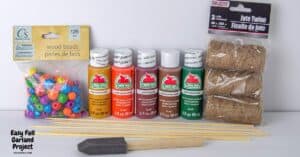
Materials Needed to Make this Bead Garland DIY
- Wooden Craft Beads - 25
- Wooden Skewers- 5.
- Floral Foam- 1 or two blocks.
- Craft Paint- Five colors such as:
- Paintbrush
- Jute Twine

How to make this bead garland with tassel.
Step 1. Make two tassels as indicated above. Set the tassels aside.
Step 2. Paint the beads as indicated above. Allow the beads to fully dry. Add additional coats of paint as needed for coverage allowing the coats to dry fully between painting.
Step 3. Cut off two feet of twine and tie a large knot in one end that is large enough for the beads to not slip off the twine and allowing about three inches of twine on one side of the knot.
Step 4. Begin sliding the beads onto the twine in a pattern of your choosing. (I did green, yellow, orange, red, and brown.) Continue the pattern until you have placed all the beads on.
Step 5. When the 25 beads are on the twine you can tie another knot in the twine, this time on the other end, that is large enough for the beads to not slide off of the twine.
Step 6. Attach the tassels to each of the ends.

Easy Fall Garland Project
Materials
Instructions
- Make two tassels as indicated in post. Set the tassels aside. Paint the beads as indicated in the post. Allow the beads to fully dry. Add additional coats of paint as needed for coverage allowing the coats to dry fully between painting.

- Cut off two feet of twine and tie a large knot in one end that is large enough for the beads to not slip off the twine and allowing about three inches of twine on one side of the knot. Begin sliding the beads onto the twine in a pattern of your choosing. (I did green, yellow, orange, red, and brown.) Continue the pattern until you have placed all the beads on.
- When the 25 beads are on the twine you can tie another knot in the twine, this time on the other end, that is large enough for the beads to not slide off of the twine. Attach the tassels to each of the ends.