This project is all about how to make wooden stacked books.
Wooden book stacks are a fashionable décor trend thanks to the rustic farmhouse look!

DIY Wooden Book Stack Project
This wooden book stack idea is popular thanks for the rustic farmhouse trend.
Considering how much wooden book stacks sell for, you may be surprised at how inexpensive it is to make one yourself!
Did you make my Easy DIY Kitchen Counter Stand project?
That project is a simple dollar store inspired kitchen stand idea that is also rustic farmhouse at heart.
This book stack project makes for a good shelf decoration or book stack topper.
This is a great project for using up scrap wood pieces.
However, if you do not have scrap wood pieces it is just as easy to use unfinished wood pieces used for crafts such as one of these.
This project is for anyone asking how do you make painted book stacks.
Painted book stacks have been around forever.
This is because the are interesting and look nice when used for decorating.
You will be pleasantly surprised at how easy this project is.
Possible the most difficult part of this project is getting your wood cut if you do not have scraps of wood left over from another project. But, to be honest, I would prefer purchasing my own unfinished wood because it is cheap, already cut to size, and sanded down for me in most cases!

Here are some tips for making your diy wood book stack.
I just mentioned that purchasing the wood already cut to size is a good idea. You can find the unfinished cut to size wood here or head to your local lumber store and ask around for some.
Here are some more helpful tips.
- The wood size used in this tutorial is 1 X 6 cut into 6" lengths. But, as we all know, not all books are the same size. Feel free to use the size of wood that you prefer or that fits your needs. Just make sure that the wood is all the same size.
- I know that just above I mentioned that the wood should all be the same size but, if you are more adventurous and perhaps, more confident, why not try using different sized pieces. Just be sure to put the larger pieces of wood in your stack on the bottom so that your book stand will stand up correctly.
- My book stack has been stamped with typewriter style HOME SWEET HOME stamps. Obviously, not everyone owns this. So, as an alternative. you can use stencils or maybe even decals that are well stuck on the wood.
More uses for personalized stacked books
Yes, this book stack project is based upon a décor element for book shelves.
However, there are more uses for wooden book stacks.
Personalize your book stacks with one of these ideas.
- Paint the books in holiday colors and make holiday décor for your home.
- Using blue and pink paint can make this a cute idea for a nursery.
- These book stacks can be personalized for gift giving!
- Cut a hole in the center of the top two pieces to make a holder for tissues, plants, or secret hiding place.
- Teachers love these kinds of things. This is a great teacher gift!
Subscribe to DIYandFun
About this homemade diy designer book stack décor project.
This mini book stack required scrap lumber and craft pain. Adding a personalized message thus makes this project even better!
I am providing you with the supplies that were used to make the book stacks as seen in my images.
Feel free to use the paint colors or wood sizes that you prefer to use.
This is because there are many ways in which you can make this project yours!

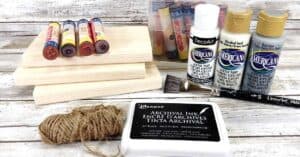
Supplies needed to make a wooden book stack.
- Lumber, 1 X 6" cut into 6" length. I have three pieces in my project. You can use any size lumber and number of pieces that suits your needs.
- Sanding Block.
- Craft Paint- I have White, Ivory, and Light Gray (can get all from a kit) paint which makes my project farmhouse rustic.
- Alphabet Stamps- Typewriter style. I mentioned above how you can personalize your project to your needs if you do not want the typewriter "Home Sweet Home."
- Ink Pad in Black for the stamps.
- Paintbrush.
- Scissors.
- Twine.
How to make a homemade diy wooden book stack.
Step 1. If your wood pieces are not sanded, please sand them down to make them smooth. You may want to gently go over an already sanded wood block just to be sure that it is ready to go. Make sure that you dust off the remnants from the sanding before proceeding.
Step 2. The white paint is used as a base coat. You only need to paint the top and the sides of the first block, the sides of the middle block(s), and the sides and optionally the 'bottom' of the bottom block. Paint your wood in a well-ventilated room with newspaper or something to work on top of while you paint. Allow the basecoat to fully dry.
Step 3. Use two small disposable cups or similar sized container to hold a small amount of paint that you will work with. The first cup will hold white paint and the second cup will hold ivory. Dip a paintbrush into both colors, taking care to not over-mix, and apply the paint over your white basecoat. Then you can allow this to dry.
Step 4. Dry brush light grey paint around the sides and edges of your wooden books, in places that wear would naturally occur. Then you can set the 'books' aside to dry.
Applying the wording to the books.
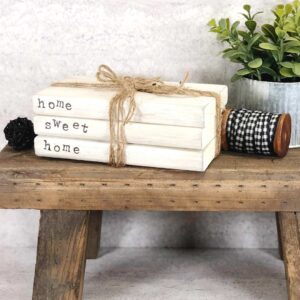
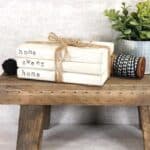
If you are using the typewriter style alphabet stamps, you should select the message HOME SWEET HOME. Place your wooden books spine up, tap each letter stamp in the ink pad and stamp on the spine. The irregularity of the stamped letters thus gives the project farmhouse charm
How to assemble the book stack.
You can glue the 'books' together although it is optional. However, it is something that I would do just to keep them together.
Now, stack your 'books' together and wrap with twine three to four times, securing the end with a knot and leaving the tails long. To create your bow, wrap the twine around your hand five to six times, trim the end and place in center of book stack. Then secure your twine in place by knotting the tails around the bow.
Don't miss these ideas!


DIY Wooden Book Stack Project, a simple project for making a trendy homemade rustic farmhouse decorating staple
DIY Bookstack Decor Project
Materials
- 3 Wood Craft Pieces
- 1 Sanding Block
- 3 Craft Paint
- Alphabet Stamps
- Stamp Pad
- Scissors
- Twine
Instructions
- Sand the blocks. Apply the base coat and allow it to dry, Then apply the top coat.

- Personalize your blocks. Then assemble them.