
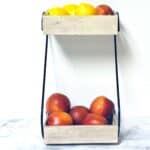
This Easy DIY Kitchen Counter Stand is made using items purchased from the dollar store.
I really like how easy this project is to make.

Easy DIY Kitchen Counter Stand
This is an easy project that really has a lot of potential.
I really like that this kitchen counter stand can hold anything from fruit to clutter that would normally be taking up space.
Did you try making my paint pour coasters?
I am bringing this up because that project is also something that is easy to make and useful in the kitchen. This do it yourself project is a bit easier than that one but, is just as useful in my opinion.
Family Movie Nights are one of our favorite ways to spend time together. You can find the most amazing tips and ideas for how to make a family movie night at home here.
This project is for anyone asking how can I hide my kitchen counter clutter.
Seriously, I think that everyone has been there at one time or another.
But, because everyone uses the kitchen, it is easy to see how things can gather in there.
This kitchen stand in made with rectangular boxes that have sides on them.
The sides on the boxes help to hold everything on the shelves, rather than things falling off the shelves. If you do not live by a dollar store or cannot find these boxes, you can use an unfinished wooden tray like one of these for this project.
You will also need a garden "S" hook for this project.
The "S" hook will hold the sides of the shelves on the stand. You can find garden "S" hooks here online if you cannot find them in your local store.
The "S" Hooks are what will also give this project an 'industrial' or minimal look or style
Subscribe to DIYandFun
If you cannot find the "S" hooks, there are other options that you can try.
Perhaps a couple of craft easels would work in this project.

Tips for making a dollar store storage stand.
All of these items that were used in this project were found at a local Dollar Tree.
Check your local craft store for similar items if you cannot find these using the links that I have or will provide for you in this post.
Here are some more helpful tips.
- This stand is put together using a glue gun with glue sticks. If you would like to use a sturdier glue, I suggest using another glue in addition to the glue gun process. That way the glue gun glue will hold the stand together while the other glue dries.
- Also, this stand is quickly painted to make it look pretty. If you think that your stand can possibly get wet, you can take the extra step to seal the wood before assembling the project. However, if you plan on using this stand to hold food such as fruit, use a sealer that can be used with food and certainly, read the label on the product for any warnings.
- Lining the shelves or trays is also an option. You can use a simple piece of fabric that can be easily cleaned. Or, you could use a shelf paper-like product that can be wiped down.
- The paint that we are using in this project is really meant to be a stain. It is mixed with water to help it dry quickly. Using another paint that is kitchen or food safe is an option for something more detailed. Again, read the labels on the product to make sure that they are safe.
What you will need to make this Easy DIY Kitchen Counter Stand
I mentioned that many of these items can also be found online. I will provide you with links to these products or similar ones when possible.
- Rectangular boxes- 2. This should be unfinished wood. Alternatives for this can be an unfinished wooden tray found in the craft department. The trays come in various sizes which is also nice!
- "S" Shaped Garden Hooks- 2
- Hot Glue Gun
- Apple Barrel Burnt Umber Acrylic Paint
- Paint Brush
- Cup that can be used with paint and some water

How to make a dollar store DIY Kitchen Counter Stand.
- Prepare your work space for an easy clean up. I like to spread a drop cloth or paper. Also, wear something over your clothes and gloves if needed.
- Start by filling a cup with water. Then add a few drops of paint to the cup. Mix the paint and water thoroughly. This will create a light stain (without the stain smell!)
- Use your paint brush to paint both of the boxes or trays with the stain mixture that is in the cup. Allow the boxes or trays to dry thoroughly before continuing (this won’t take too long around 20 minutes as the paint/stain mixture is very light). I would paint the top and let it dry and then the bottom and let that dry.
- For the next step, we will attach the "S" hooks to the sides of the painted boxes or trays, If you are concerned that they will not be evenly placed, you can use a pencil to mark a spot on each side to note where they should meet up.
- Place the 'S' hook on top of the two boxes (I placed the larger end on the bottom and the smaller end of the top). Apply a line of hot glue to the wooden boxes where the 'S' hook will go and apply the 'S 'hook and some pressure to make sure that it adheres. Be careful when using the hot glue gun as it is hot.
- Repeat on the opposite site. Allow to dry and then style!
- Optional- glue a felt piece or similar item to the bottom of the "S" hooks to protect your counter and make moving it easier for you.
You may also be interested in these ideas.
- Marshmallow Fluff S'mores Poke Cake
- The Best Oreo Peanut Butter Pie
- Cinnamon Sugar Churro Cheesecake Bars
- 2 Ingredient Cinnamon Roll Cobbler
- 13 Easy Summer Dessert Recipes that Don't Suck!

Easy DIY Kitchen Counter Stand
Materials
- 2 Unfinished wood boxes or trays
- 2 Metal "S" hooks
- Hot Glue Gun and Glue
- Apple Barrel Burnt Umber Acrylic Paint
- Paint Brush, cup and water
Instructions
- Prepare your work space for an easy clean up. I like to spread a drop cloth or paper. Also, wear something over your clothes and gloves if needed.
- Start by filling a cup with water. Then add a few drops of paint to the cup. Mix the paint and water thoroughly. This will create a light stain (without the stain smell!)
- Use your paint brush to paint both of the boxes or trays with the stain mixture that is in the cup. Allow the boxes or trays to dry thoroughly before continuing (this won’t take too long around 20 minutes as the paint/stain mixture is very light). I would paint the top and let it dry and then the bottom and let that dry.
- Place the 'S' hook on top of the two boxes (I placed the larger end on the bottom and the smaller end of the top). Apply a line of hot glue to the wooden boxes where the 'S' hook will go and apply the 'S 'hook and some pressure to make sure that it adheres. Be careful when using the hot glue gun as it is hot. Repeat on the opposite site. Allow to dry and then style!