
This project for easy paint pour coasters is quite a fun project.
I like that these beautiful homemade coasters are nice enough for gift giving too!

Easy Paint Pour Coasters
An easy do it yourself project that most anyone can do.
These coasters are perfect for gift giving or for keeping for yourself!
This project makes use of ceramic tiles.
While I am using 4 inch by four inch tiles, you can use the size of your choice.
You can find ceramic tiles for this project here.
Family Movie Nights are one of our favorite ways to spend time together. You can find the most amazing tips and ideas for how to make a family movie night at home here.
People ask what is paint pour.
Even if you do not know what paint pour actually is, you have probably seen it somewhere before. Perhaps you even own something in your home that was made using paint pour.
Paint Pour is really just what is sounds like it is.
It is a method of painting, using acrylic paint, by simply pouring.
The result of using the paint pour technique is a flowing design that is both colorful and unique.
You may be wondering what do you need for paint pouring.
Obviously, you will need acrylic paint.
Acrylic paint is made using a pigment that is suspended in acrylic polymer solution with acrylic resin.
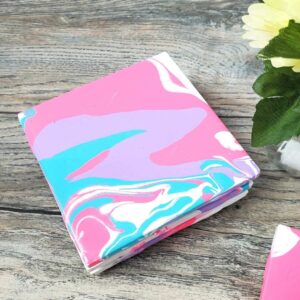
For this project, we are using four colors of acrylic paint.
The colors used in this project are Candy Pink, Wisteria, Bahama Blue, and Snow White. Feel free to use these colors or the colors of your choice.
You may be asking do I need a pouring medium.
A pouring medium is something that is used to help the acrylic paint flow better and thus, create better looking results. The pouring medium is mixed with the acrylic paint.
Subscribe to DIYandFun
Here is why you need to use pouring medium for this project.
Pouring medium helps to keep the colors separated so that you get a variety of colors in your flowing pattern. If you do not mix the pouring medium with the paint then your colors will probably blend into a brown.

Tips for pour painting.
If you have never paint poured before, I suggest that you start with a basic project (like this one) and keep your pouring method simple. It can take up to a few tries to see what kind of pour method and ingredient mix works best for your needs.
Here are some more helpful tips for you.
- Pouring one color at a time, aka 'clean pour', can help keep the colors separated. It also is nice for doing color-specific patterns.
- When you get more advanced, you can experiment with what is called a 'dirty pour'. This is where the colors are layered together and then poured at the same time. There are other more advanced techniques that I encourage you to learn about in the future.
- Getting the right consistency of your medium mixed with the acrylic colors is essential. If the consistency is too thick, it will take a longer time to dry.
- Experiment with objects that can help to make patterns. Toothpicks, straws, or stirs for example, can help create cool looking patterns with your paint.
- Lastly, think about the clean up before you make the mess. This means protecting your work surface, clothing, hands, flour, or anything else that can cause concern.
What you need to do this paint pour project.
If this was a recipe, I would call it the ingredient listing. This ingredient listing is for making paint pour coasters.
- Ceramic Tiles for crafts (4 X 4" suggested). Make sure that the tiles are clean.
- Pouring Medium
- Paint. I mentioned that The colors used in this project are Candy Pink, Wisteria, Bahama Blue, and Snow White. Feel free to use these colors or the colors of your choice.
- Disposable Plastic Cups. Think clean up and this will make it easier for you to do. Plastic is sturdy yet, disposable. You will need 8 for this project.
- Craft or 'popsicle' sticks. This is used to stir the paint. You can also use them to create designs in your poured paint.
- A spoon- tablespoon sized.
- Cork- this is for the bottom of the coaster. You can find cork on amazon.
- Scissors
- Glue- to glue the cork on to the coasters.
- Plastic drop cloth or similar item to protect your work space.
- Optional: Krylon Clear Glaze to seal project

How to make paint pour coasters.
- Prepare your work surface with your plastic drop. Make sure that everything that you need is ready to use.
- Add one tablespoon of pouring medium to 4 of the plastic cups.
- Next, add one tablespoon of each color paint to the pouring medium in each of the cups (one color per cup). Then use a stick in each cup to mix the paint and the medium until you see a solid color.
- Place the remaining four cups upside down on your work surface and set a ceramic tile on top (which is technically the bottom of the cup facing up) of each cup.
- Start by pouring the first color in a cup slowly onto each of the tiles. Use a toothpick or other item to help guide or design the paint as needed or desired. Repeat this process with the other three remaining colors, making sure you cover almost the entire surface of each tile.
- To make designs on the tiles you can lift each of the tiles, and tilt it to each side, to fill the entire surface with paint. When you do this it will also create the unique paint pour design. However, make sure the entire surface is covered in paint, as well as the sides. You may need to use your finger or craft stick to add a little paint on a side that has a bare spot.
- Allow you coaster tiles to dry for about 24 hours.
- If desired, you can seal the coasters with 2 coats of Krylon Clear Glaze, allowing 2 hours of dry time between each coat. Then allow the tiles to dry overnight.
- To make the cork bottom, cut the cork if needed to fit the entire size of the tiles (4 X 4 if using 4 X 4 tiles). Then attach the cork bottom to the bottom of each tile or coaster using your glue. You should also press down firmly on the glued cork to thus help seal the bond.


Easy Paint Pour Coaster Project
Instructions
- Add one tablespoon of pouring medium to 4 of the plastic cups. Next, add one tablespoon of each color paint to the pouring medium in each of the cups (one color per cup). Then use a stick in each cup to mix the paint and the medium until you see a solid color.

- Place the remaining four cups upside down on your work surface and set a ceramic tile on top (which is technically the bottom of the cup facing up) of each cup. Start by pouring the first color in a cup slowly onto each of the tiles. Repeat this process with the other three remaining colors, making sure you cover almost the entire surface of each tile.
- To make designs on the tiles you can lift each of the tiles, and tilt it to each side, to fill the entire surface with paint. When you do this it will also create the unique paint pour design. However, make sure the entire surface is covered in paint, as well as the sides. You may need to use your finger or craft stick to add a little paint on a side that has a bare spot.
- Allow you coaster tiles to dry for about 24 hours.If desired, you can seal the coasters with 2 coats of Krylon Clear Glaze, allowing 2 hours of dry time between each coat. Then allow the tiles to dry overnight.T o make the cork bottom, cut the cork if needed to fit the entire size of the tiles (4 X 4 if using 4 X 4 tiles). Then attach the cork bottom to the bottom of each tile or coaster using your glue. You should also press down firmly on the glued cork to thus help seal the bond.


Notes
- Ceramic Tiles for crafts (4 X 4" suggested). Make sure that the tiles are clean.
- Pouring Medium
- Paint. I mentioned that The colors used in this project are Candy Pink, Wisteria, Bahama Blue, and Snow White. Feel free to use these colors or the colors of your choice.
- Disposable Plastic Cups. Think clean up and this will make it easier for you to do. Plastic is sturdy yet, disposable. You will need 8 for this project.
- Craft or 'popsicle' sticks. This is used to stir the paint. You can also use them to create designs in your poured paint.
- A spoon- tablespoon sized.
- Cork- this is for the bottom of the coaster. You can find cork on amazon.
- Scissors
- Glue- to glue the cork on to the coasters.
- Plastic drop cloth or similar item to protect your work space.
- Optional: Krylon Clear Glaze to seal project