
DIY Wine Cork Bunny Craft is actually quite simple to make.
I really like how adorable the bunny is as well!

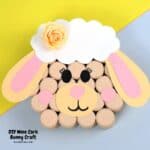
DIY Wine Cork Bunny Craft
This is a craft project for making a bunny using wine corks.
The wine corks are glues into place to make a fun decoration for spring and Easter!
Did you see my DIY Bunny Basket Craft idea?
That bunny basket is made using a used carton from milk or juice.
Both that bunny basket and this bunny cork project are fun do it yourself craft ideas for spring!
To make this project you will need wine corks. You can find a selection of new and clean wine corks here.
This project is especially for anyone asking what can you make out of wine corks.
I get that as we all know how wine corks can accumulate.
One you pop the corks from the bottles, it sometimes seems like a waste to throw them away.
This bunny face project makes use of that collection of wine corks.
By the way, I was surprised to see wine cork bunnies such as this one for sale on a certain website.
You are saving quite a bit of money making this cork craft project bunny yourself!
What can you do with a wine cork bunny?
This bunny craft is really cute so you will probably want to display it in some way.
You could just place the bunny on a shelf for folks to admire.
However, here are some more ways to display a wine cork bunny.
- Place a picture hanger on the back to hang the bunny face on a wall.
- Attach a few magnets on the back of the bunny to hang in on a refrigerator.
- Place a small dowel on the bottom to display the bunny in a plant or bouquet (you can find water-safe dowels here).

Tips for making a diy cork project.
Using clean and fresh corks are a good idea if you want a bunny face that is uniform.
However, using a variety of corks can give your bunny a more unique look.
More tips for you.
- Sometimes corks can come in different sizes. One way to remedy this is to carefully use a serrated knife or similar cutting tool to cut the the corks to size.
- I like to use corks that are clean and do not have dirt or anything sticky on them. Soapy water on a sponge can be used to clean the corks. However, make sure that the corks are dry before painting or gluing them for best results.
- My wine corks have been attached together using a hot glue gun. Feel free to use the glue of your choice although, I do recommend a glue that dries quickly.
Personalize your wine cork craft.
Yes, this bunny face craft is really cute.
However, you can make yours even better!
Try one of these ideas.
- Make more than one bunny face, glue the backs together and use them to make a centerpiece or decoration.
- Omit the ears and make this into a lamb face.
- Paint or color your wine corks a different before gluing them together to make a more colorful bunny face.
Subscribe to DIYandFun
You may also be interested in these ideas.


About this bunny wine cork diy craft project.
This is a simple do it yourself craft idea for making bunny face for spring or Easter.
The face is made with wine corks.
The number of corks needed depends on the size of the corks and the size bunny head you wish to make.
For best results, use wine corks that are of the same size or trimmed to be the same size.
The corks should also be clean of dirt and debris.

Materials needed to make a wine cork bunny,
- Wine Corks- as mentioned, the number of corks depends on the size of the corks that you have and the size of the bunny head that you intend to make. My bunny has 23 with one that has been cut in half to make the face shape more accurate .
- Acrylic Paint for the face. Beige or white.
- Construction Paper- pink (for inner ears, cheeks, and nose).
- White construction paper for head.
- Beige construction paper- for ears and face.
- Glue, marker, and a small craft flower or similar detail.

How to make DIY Wine Cork Bunny Craft.
Step One: prepare the corks.
Inspect your cork to make sure that they are intact.
The corks should be clean and of the same size.
Start by painting the corks.
Use the white paint and paint the sides and the top of the corks. Stand the corks up with the unpainted side on the bottom.
Step Two: Attach the corks together.
Once the corks have dried you can attach them together.
My bunny has a bottom layer of four corks that are glued side by side.
The next layer has five corks that are glued to the four corks on the bottom layer.
Glue the first cork in this layer in the center of the meeting of the two center corks from the bottom layer and then work your way out.
For the center cork layer, my bunny has four full corks and the one cork that has been cut in half with each half used as an end piece. The layer above the center cork layer is a repeat of the layer with the five corks. For the top layer, simply glue four corks on top of the last layer.

Step Three: add the detailing.
Download the template --> DIY Wine Cork Bunny Craft
Print out the template on a thick paper or cardstock. Then cut out the pieces and trace them to make the details.
Use a black marker to add the final details.
DIY Wine Cork Bunny Craft, Make and adorable Bunny for Spring or Easter using wine corks, a simple project for most ages.

DIY Wine Cork Bunny Craft
Materials
- Wine Corks-
- Beige or white. Acrylic Paint
- pink paper
- White construction paper
- Beige construction paper
Glue, marker, and a small craft flower or similar detail.
Instructions
- Start by painting the corks. Use the white paint and paint the sides and the top of the corks. Stand the corks up with the unpainted side on the bottom.
- My bunny has a bottom layer of four corks that are glued side by side.The next layer has five corks that are glued to the four corks on the bottom layer. Glue the first cork in this layer in the center of the meeting of the two center corks from the bottom layer and then work your way out.For the center cork layer, my bunny has four full corks and the one cork that has been cut in half with each half used as an end piece. The layer above the center cork layer is a repeat of the layer with the five corks. For the top layer, simply glue four corks on top of the last layer.
- Print out the template on a thick paper or cardstock. Then cut out the pieces and trace them to make the details. Use a black marker to add the final details.