DIY Bunny Basket Craft that is suitable for most ages.
This is a simple and adorable Easter or spring craft idea.

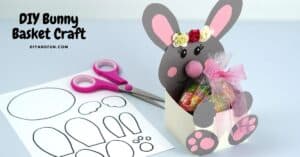
DIY Bunny Basket Craft
This is really how to turn an empty milk carton into a cute bunny basket.
This is a cute holder for candy and other items.
Did you try my Easter Bunny Circus Animal Cookies ?
Those adorable cookies are a fun dessert or snack for spring and Easter.
This bunny holder would look great with those cookies tucked inside.
To decorate the head of the bunny rabbit your will need small craft flowers. You can find a selection of small craft flowers here.
This idea is for anyone asking what crafts can I make for Easter.
Making a bunny themed craft is perfect for Easter.
Even better, this is a craft that is suitable for many ages.
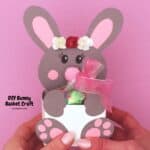
While this bunny is cute just the way that it is, you can also use it to hold items in the basket.
The easy item to place in the basket of this bunny is candy.
However, it could also hold other items such as a small plant or cookies.
People ask how do you make Easter baskets out of milk cartons.
Do it yourself craft projects are popular ideas during the spring and Easter season.
This is especially true for most ages.
Using an empty carton for a craft project is a great way to recycle.
Milk carton are sturdy enough to hold candy in.
They are also easy to decorate.

Tips for making an Easter bunny basket from an empty carton.
You can use a carton that is half gallon or quarter gallon in size.
The template used can be easily adjusted for your needs.
More tips for you
- While the instructions call for a milk carton, you could use a similar sized juice carton. However, you should wash it out well before using it in this project.
- If you do not have a beverage box you can use a similar sized box. You can find boxes that can work in this project here.
- Adults should cut the boxes down to size as needed. This should be done carefully.
- Use the images in these instructions to help guide you as needed.
Personalize this carton basket project.
These bunny boxed are cute just the way they are.
However, you can also make yours even more fun.
Try one of these ideas.
Subscribe to DIYandFun
- Instead of pink details, make yours another color such as blue.
- Omit the ears and use yellow paper instead of the gray paper to make this into a duck.
- Personalize the basket by using Easter themed stickers.
You may also be interested in these ideas.


About this homemade Easter craft project.
This is do it yourself craft project for turning a used milk carton into a bunny that holds a basket.
Once the carton has been carefully cut to size, about any age can partake in this project.
The basket can be filled with candy,
Use this cute bunny basket as a gift idea or decoration.
Or, these bunny baskets can be used to hold a plant or as décor for your Easter table.

Materials needed to make this Bunny with basket.
- Empty milk carton- 1. The carton can be a half or quarter gallon sized.
- The template for the bunny features.
- Construction paper- gray, white (optional), and pink.
- Details for decoration- my bunny has a small pink pompom, and small craft flowers. You can draw on the eyes or use googly craft eyes. Easter themed snack bags can be found here.
- Tools- ruler, pencil, scissors, glue, and marker(s).

How to make this DIY Bunny Basket Craft
Step One: prepare the carton.
Carefully cut off to top or open up the carton. Then wash the carton out and allow it to fully dry.
Once dried, you can cut the carton to size. Two and a half to 3 and a half inches tall are good sizes for this project.
Step Two: prepare the materials.
Download the bunnytemplate.PDF here.
On the grey construction paper trace the head, ears, and paws. Then cut them out.
Then on pink paper trace or draw the inside of the inner ears, cheeks, and the paw pads and cut them out.
Step Three: put the bunny basket together.
Glue the pink construction paper for the inside of the ears into the center and bottom of the gray ears.
Then glue the pink paw pads on to the round gray bottom paws.
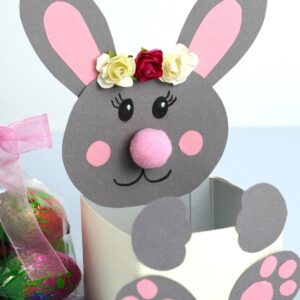
On the head:
- Draw eyes eyes on to the face.
- Glue the pompom nose in the center and the round pink cheeks on the sides.
- Use a marker to finish the details of the face.
- Attach the ears to the back of the head with the pink centers pointing to the front of the bunny.
- Glue on any remaining details such as the flowers.
- Use glue to attach the head, placing the glue on the bottom of the backside of the head and attaching it to the back inside of the carton.
Attach the paws to the bunny and you are done! Note: white construction paper can be used to cover and line the carton basket with to make it look nicer.
DIY Bunny Basket Craft, a homemade DIY craft idea for most ages turning an empty milk carton into an Easter Basket.

DIY Bunny Basket Craft
Materials
ruler, pencil, scissors, glue, and marker(s).
Instructions
- Carefully cut off to top or open up the carton. Then wash the carton out and allow it to fully dry. Once dried, you can cut the carton to size. Two and a half to 3 and a half inches tall are good sizes for this project. Download the bunnytemplate.PDF here.

- On the grey construction paper trace the head, ears, and paws. Then cut them out.Then on pink paper trace or draw the inside of the inner ears, cheeks, and the paw pads and cut them out. Glue the pink construction paper for the inside of the ears into the center and bottom of the gray ears. Then glue the pink paw pads on to the round gray bottom paws.
- .Draw eyes eyes on to the face. Glue the pompom nose in the center and the round pink cheeks on the sides. Use a marker to finish the details of the face. Attach the ears to the back of the head with the pink centers pointing to the front of the bunny. Glue on any remaining details such as the flowers. Use glue to attach the head, placing the glue on the bottom of the backside of the head and attaching it to the back inside of the carton.