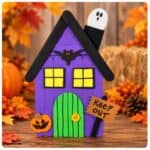
How to Make a Craft Stick Haunted House
How to Make a Craft Stick Haunted House (Easy DIY) with simple Dollar Store supplies
Yield: 1
Equipment
- Pencil
- Glue Gun And Sticks
Materials
- Craft Sticks Jumbo and Regular Sized
- Craft Foam White, Green Yellow, Orange, Brown, and Black
- Rhinestones For the bat's eyes
- Button To make the doorknob
- Acrylic Craft Paint Purple and Black. Optional for added detail; yellow, orange, and green.
Download the pattern from the instruction page.
Instructions
- Step One – Build the Base of the House Gather your supplies and protect your work surface with newspaper or a sheet of scrap paper. Line up seven jumbo craft sticks vertically, side by side, to form the front of the haunted house. Trim additional jumbo craft sticks to fit across the width of the house. Hot glue the trimmed sticks horizontally across the back to secure the seven vertical sticks together. To begin the roof, glue two jumbo craft sticks at an angle at the top of the house, allowing them to meet at the peak to create a triangle-shaped roofline.
- Step Two – Finish the Roof and Make the Chimney Flip the house over so the back is facing up. Arrange four jumbo craft sticks horizontally across the triangular gable area. Use a pencil to trace the angled edges of the roof onto the sticks. Trim the sticks along the pencil lines with scissors, then hot glue them in place to fill in the triangular gable. To make the chimney, cut two 2-inch sections from a jumbo craft stick. Place the pieces side by side and secure them together using a small piece of leftover craft stick glued across the back. Hot glue the finished chimney to one side of the roof. NOTE: Liquid craft glue can be used instead of hot glue; however, you will need to allow additional drying time between steps.
- Step Three – Paint the House Paint the front and sides of the house with purple acrylic craft paint. Set it aside to dry completely. Apply a second coat if needed for even coverage.
- Step Four – Paint the Roof and Sign Post, Paint the roof, chimney, and one regular-size craft stick with black acrylic craft paint. Allow the paint to dry completely, then apply a second coat if necessary.
- Step Five – Cut Out the Haunted House Decorations (if using mine). Download, print, and cut out the Craft Stick Haunted House Patterns from the materials list above.. Using a pencil, trace each pattern onto the appropriate color of craft foam: - Ghost – white - Door – green - Two windows – yellow - Pumpkin – orange - Sign and pumpkin stem – brown - Bat – black Cut out each shape with scissors, cutting just inside the pencil lines for clean edges. NOTE: Colored cardstock can be substituted for the craft foam. Craft felt is not recommended because it will not provide the same crisp shape and structure.
- Step Six – Add the Details Use a permanent black marker to add the decorative details to the foam pieces. Draw a face on the ghost and jack-o'-lantern, write KEEP OUT on the sign, add vertical lines to the door, and draw the frames and panes on both windows. Avoid using washable markers, as they can smear on craft foam.
- Step Seven – Assemble the Haunted House Hot glue the KEEP OUT sign to the black-painted regular craft stick. Trim the craft stick to the desired length to create the sign post. Using the finished project photo as a placement guide, hot glue the door, windows, ghost, pumpkin, sign, and bat onto the haunted house.
- Step Eight – Add the Finishing Touches Attach two orange self-adhesive rhinestones to the bat to create its eyes. Finish the haunted house by hot gluing an orange button onto the green door for the doorknob. Allow all of the glue and paint to dry completely before displaying your Craft Stick Haunted House.