
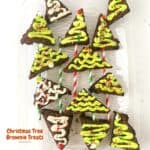
Christmas Tree Brownie Treats are so easy to make.
These brownie trees are the perfect addition to any holiday dessert table too!

Christmas Tree Brownie Treats
This is a cute holiday recipe idea for making decorated brownies.
Surprisingly, this is a simple thing to do too!
Did you try my Chocolate Covered Peanut Butter Candy Recipe?
That recipe is another easy holiday inspired treat that you can make.
Both this recipe for brownies trees and that recipe for candy would work well together on a holiday dessert table!
This recipe calls for Christmas straws or Christmas popsicle sticks. Please make sure that whichever you decide to use, that it is suitable for food as well.
This recipe is for anyone looking for what should be on a dessert table.
The secret to making a dessert table successful is to have a variety of food.
This is true for most any kind of a dessert table, not just during the holiday season.
There are several ways to have a variety of anything on your food table.
You should have variety of tastes, flavors, and food. Also, a variety of colors and a variety of textures.
Here is why these Christmas tree brownie pops are perfect as your holiday dessert or treat.
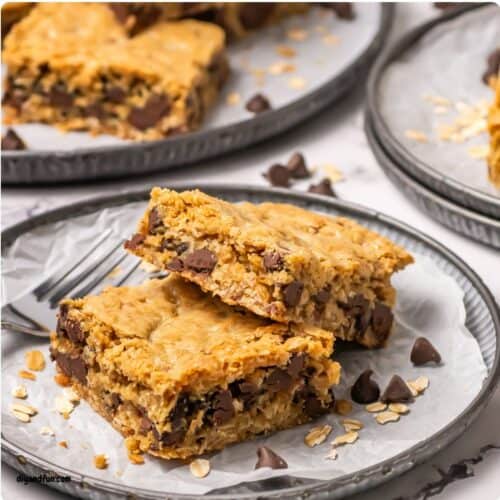
This is really a simple treat to make since most of the measuring of ingredient is already done for you.
Also, most people looking for a tasty dessert usually like a good brownie as well.
The tree brownies are also interesting to serve.
They are unique because they are shaped like a tree and can be eaten like a 'pop'.
Also, the decoration on each of the trees is a fun presentation.

Tips for these holiday brownies.
I mentioned that you can use popsicle sticks as a 'stem' for your trees.
Alternatives to these sticks include cake pop sticks or even candy canes!
More tips for you
- This recipe calls for a box of brownie mix. Feel free to use any kind of brownie besides the basic chocolate kind.
- You will need an 8X8" baking pan to make this recipe. Line the baking pan with parchment paper that overhangs the sides of the pan for easier transferring.
- It is important that you allow the brownies to fully cool as the directions indicate. This is to insure that they get properly cut rather than breaking apart on you.
Personalize your Christmas brownies.
These brownies are tasty and cute just the way that they are in the recipe.
However, you can take them up a notch.
Subscribe to DIYandFun
Try one of these ideas.
- Instead of vanilla extract, use a peppermint extract for peppermint brownie trees.
- Add crushed candy canes to the trees when you decorate them.
- Allow kids to help decorate the trees to make it fun for them too!
You may also be interested in these ideas.


About this recipe for Christmas Brownie Cake Pops.
There are really three parts to this recipe.
The first part is baking the brownies like a normal brownie recipe.
In the second part of this recipe, we allow for the brownies to fully cool.
Cut the brownies into the tree shapes once they have cooled.
Then we decorate the brownies and enjoy them!.

Ingredients needed to make Christmas Tree Brownies
- Brownie Mix- 1 box.
- Vanilla Extract- 1 teaspoon.
- Green Icing If you cannot find green then simply use white icing with a few drops of Green Food Coloring.
- Holiday Sprinkles.
- Popsicle Sticks (alternatives mentioned above).

How to make Christmas Tree Brownie Treats
Step One: make the brownies.
Line an 8X8" baking pan with parchment paper that overhangs the sides of the pan then spray the parchment paper with nonstick.
Prepare brownie mix according to package instructions, adding the vanilla and any sprinkles you desire to add. Then bake the brownies as indicated on the packaging.
Step Two: Cool the brownies.
Properly cooling the brownies is essential to the success of this recipe.
Allow the brownies to cool, while still in the pan to room temperature, for 45 minutes.
Then transfer the brownies to your refrigerator for an hour to finish cooling.
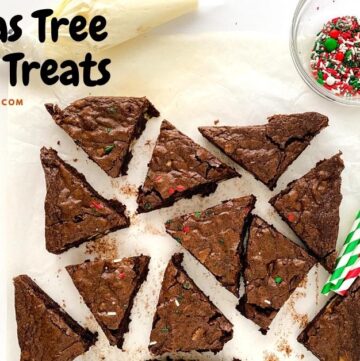
Step Three: Decorate the brownies.
Use the overhanging parchment paper to lift the cooled brownies from the baking pan. Then cut the brownies into triangles.
Use a skewer to poke a hole in the bottom of each triangle and then carefully stick a popsicle stick (or whatever you are using as a stem) into the hole.
Lastly, decorate the trees using your icing and sprinkles.
Christmas Tree Brownie Treats, an easy diy holiday inspired decorated chocolaty dessert recipe made brownie mix.

Christmas Tree Brownie Treats
Ingredients
Instructions
- Line an 8X8" baking pan with parchment paper that overhangs the sides of the pan then spray the parchment paper with nonstick.Prepare brownie mix according to package instructions, adding the vanilla and any sprinkles you desire to add. Then bake the brownies as indicated on the packaging. Properly cooling the brownies is essential to the success of this recipe. Allow the brownies to cool, while still in the pan to room temperature, for 45 minutes. Then transfer the brownies to your refrigerator for an hour to finish cooling

- Cut the brownies into triangles. Use a skewer to poke a hole in the bottom of each triangle and then carefully stick a popsicle stick (or whatever you are using as a stem) into the hole. Lastly, decorate the trees using your icing and sprinkles.

Recipe Notes
originally posted:
October 23, 2021*As an Amazon Associate I earn from qualifying purchases. This means that the links on this website, and specifically on this post, that lead to other sites may be affiliate links.
Please note: Nutritional data has been calculated using a tool that comes with this recipe card and not by me. This means that Nutritional Information is only an estimate and can vary especially with ingredients that you use. The accuracy of this tool may differ from other tools as expected. Also note that there is no instructional value to the video that may be attached to this recipe. It is only there for visual pleasure. For more information about the images in this recipe, please refer the the recipe instructions. Thank you!
Follow Me