
Gingerbread Hot Cocoa Bombs are a fun treat especially on a cold day.
I love how simple these bombs make it to have some warm cocoa too!

Gingerbread Hot Cocoa Bombs
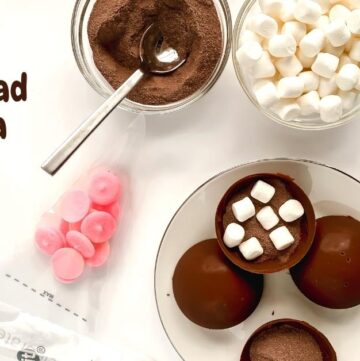
Everything you need, except for the hot water, to make a great tasting hot cocoa.
These bombs are adorable too!
Did you try my Chocolate Covered Peanut Butter Candy recipe?
That chocolaty recipe is another fun idea for a holiday-inspired recipe.
This recipe is for hot cocoa while that is for a candy.
To make this recipe you will need a Six Cavity Semi-Silicon Mold. You can find a selection of silicon molds here.
You may be wondering what does cocoa bomb mean?
This is indeed the good kind of bomb.
It is a chocolaty delight actually!
A cocoa bomb is pretty much what it says it is.
It is a 'bomb' filled with everything you need to make a hot cocoa with.
Well, without the hot water that is.
So how do you use a cocoa bomb.
I really like to use these as a fun gift or giveaway during the holiday season.
This is because most everybody likes them.
Here is what you need to do to actually use that bomb however.
You simply place the individual bomb in a mug.
Then you pour hot water over the bomb, stir it, and then enjoy it!

Tips for making hot cocoa bomb with marshmallows.
My cocoa bombs are decorated to look like cute little people.
You do not have to do this to enjoy your bombs.
More tips for you
- Chocolate melts are the preferred source of chocolate to use in this recipe because of their ability to melt more consistently. However, you can use chocolate chips if that is what you have one hand.
- It is easiest to melt the chocolate in the microwave for this recipe. Please use a microwave-safe bowl to melt yours and also, stop every 20 seconds to stir the chocolate while it melts.
- These bombs look great when you serve them with a cupcake liner. A cupcake liner can also be helpful in assembling the bombs if you use a cupcake pan to hold the bombs while they set.
Personalize your hot cocoa treats!
Yes, the bombs are great just the way they are.
However, there are ways to make yours even better!
Try one of these ideas.
Subscribe to DIYandFun
- Add a crushed cookie, such as chocolate chip, to the bomb.
- Drizzle melted white chocolate over the bombs.
- Add a teaspoon or two of caramel sauce to the inside of your bomb.
- Wrap your bombs in individual candy wrappers to give as gifts.
You may also be interested in these ideas.


About these chocolate bombs.
This recipe has only three ingredients plus gingerbread seasoning.
You will need hot cocoa mix and marshmallows for each bomb.
You will also need chocolate melts.
To make bombs like mine, you will need brown, white, pink, and red melt.
Also needed is a microwave safe bowl.
Ingredients needed to make hot cocoa bombs.
- Candy Melts- ¼ cup of each; brown, white, pink, and red.
- Hot Cocoa Mix- 1 serving for each bomb.
- Mini Marshmallows- as needed.
- Gingerbread Seasoning- ¼ teaspoon per bomb, this is optional.

How to make Gingerbread Hot Cocoa Bombs
Step One: Melt the chocolate.
Melt the candy melts with the microwave power reduced to 50 percent (prevents burning), stopping to stir every 20 seconds for no longer than two minutes. If chocolate does not fully melt after two minutes you can set the microwave on high for 15 seconds.
Step Two: Make the molds.
Place the molds on a rimmed baking sheet that can fit into your freezer. Use a spoon or scoop to dispense the melted chocolate into the molds. Be sure to completely cover the sides of the molds all the way to the top without getting it on the top of the mold. A pastry brush can help you do this.
Using the baking sheet to transfer, place the molds into the freezer for 10 minutes to set.
Step Three: fill the molds.
One set of the molds will be used to hold the ingredients. Fill each of the six halves in that set with the remining ingredients.
The second set of molds, the empty set, will need to be removed and then attached to the molds holding the candy. In a medium saucepan or pot, boil water. Once it starts to boil, turn off the heat and place a clean plate on top of the pan/pot to heat. Carefully, pop out the first empty chocolate bomb half from its mold, place the open side on the plate to soften and then attach it to one of the filled bomb halves in the other mold. Hold the bomb in place for a few seconds to set. Continue the process with the remaining bombs then place the bombs in the freezer for 10 minutes to set.
Once set, you can pop the bombs out of their molds and decorate before enjoying!
My bombs are decorated with icing.
Gingerbread Hot Cocoa Bombs, everything you need to add to warm water to make the perfect chocolaty warm beverage!


Gingerbread Hot Cocoa Bombs
Equipment
Instructions
- Melt the candy melts with the microwave power reduced to 50 percent (prevents burning), stopping to stir every 20 seconds for no longer than two minutes Place the molds on a rimmed baking sheet that can fit into your freezer. Use a spoon or scoop to dispense the melted chocolate into the molds. Be sure to completely cover the sides of the molds all the way to the top without getting it on the top of the mold. Using the baking sheet to transfer, place the molds into the freezer for 10 minutes to set.

- One set of the molds will be used to hold the ingredients. Fill each of the six halves in that set with the remining ingredients.The second set of molds, the empty set, will need to be removed and then attached to the molds holding the candy. In a medium saucepan or pot, boil water. Once it starts to boil, turn off the heat and place a clean plate on top of the pan/pot to heat. Carefully, pop out the first empty chocolate bomb half from its mold, place the open side on the plate to soften and then attach it to one of the filled bomb halves in the other mold. Hold the bomb in place for a few seconds to set. Continue the process with the remaining bombs then place the bombs in the freezer for 10 minutes to set.Once set, you can pop the bombs out of their molds and decorate before enjoying!

Recipe Notes
originally posted:
October 22, 2021*As an Amazon Associate I earn from qualifying purchases. This means that the links on this website, and specifically on this post, that lead to other sites may be affiliate links.
Please note: Nutritional data has been calculated using a tool that comes with this recipe card and not by me. This means that Nutritional Information is only an estimate and can vary especially with ingredients that you use. The accuracy of this tool may differ from other tools as expected. Also note that there is no instructional value to the video that may be attached to this recipe. It is only there for visual pleasure. For more information about the images in this recipe, please refer the the recipe instructions. Thank you!
Follow Me