This Easy Felt Turkey Craft Pattern is a fun idea for the Thanksgiving season.
I like that this project works for about any age or skill level!

Easy Felt Turkey Craft Pattern
This Turkey craft is for a felt turkey that is stuffed.
I will provide you with the pattern needed to make this 'stuffed turkey'.
Did you see my project for making DIY Turkey Pudding cups?
That project is also a simple Thanksgiving project that works for about any age.
It actually requires a full pudding cup, which can also become a tasty dessert!
To make your Turkey craft you will need craft felt in different colors. You can find variety packs of felt with different colors here.
This project is for anyone looking for virtual Thanksgiving crafts .
Really, as long as you have the materials on hand, you do not have to leave the house to make these turkeys.
I will provide you with links needed to help you find the materials (you may already have some on hand).
This project is suitable for most ages and skill levels.
There is sewing involved that some folks may need help with.
Also, there is some cutting that needs to be done.
You may be wondering what do you do with a felt turkey.
Certainly this is a DIY craft project which is a selling point in itself.
However, you could be wondering what to do with the turkey once have finished making it.
Ideas for you on how to use your turkeys.
- Use the turkeys are part of the place setting for Thanksgiving (placecards, napkin holder, or centerpieces).
- Add the turkey to your wreath or flower displays.
- Give them away as a gift for friends, neighbors, or grandparents!

Tips for making this Thanksgiving craft project.
Download more than one copy of the pattern while you are here.
You never know when you will need an extra!
More tips for you
- Yes, there is some sewing in this project. However, you could try using a liquid stitch product instead.
- This project calls for a glue gun with glue sticks. You can optionally try using craft glue instead.
- These turkeys would be cute magnet for your refrigerator. Simply glue a craft magnet on the back (you may need more than one depending on the size of the magnet).
Personalize your felt Turkey project.
These Turkeys are great just the way they are.
However, there are ways to make yours even better.
Subscribe to DIYandFun
You can try one of these ideas.
- Give your Turkey googly eyes instead of using the ones in the pattern.
- Use colored felt different from the ones suggested in the project.
- If you are able to enlarge the pattern, make a larger Turkey.
You may also be interested in these ideas.


About this felt Turkey craft.
To make this project you will first need to download the pattern that I have provided below.
This pattern is a template that will help guide you with tracing cutting out the pieces of felt for the project.
To stuff the Turkey, you will need Poly-fil Stuffing.
You may have these stuffing already or an old pillow that is ready for a re-use idea.
However, if you try using another material, try to make it something that resembles a poly-stuffing as this will make it easier to stuff the turkey with.

Materials needed to make DIY felt turkey.
- Craft Felt- Brown/Tan, Red, Yellow, Orange, and Black craft felt.
- Matching embroidery floss
- Poly-fil Stuffing
- Embroidery needle
- Scissors (please use age appropriate scissors as needed).
- Hot glue gun with glue sticks or an age appropriate craft glue.

How to make this felt turkey decoration.
Step One: prepare.
Assemble the materials.
Download the pattern template (below). I suggest that you print out it on a heavy card stock paper.
Cut out the pieces from the template then use the pieces to trace on the corresponding felt color before cutting out the pieces needed for your project.
Step Two: Make the feathers and the body.
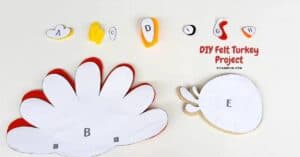
The pieces on the template have corresponding letters to make it easier for you to follow the steps below.
- Start by sewing the tail (A) to the back of the body (B). Set this aside.
- For the front side of the feathers (the other piece B) Place the orange piece D’s in the correct places. TIP: you can tack these down with a very small amount of glue so they don’t move around on you. Sew each piece D into place.
- For the smallest feather, yellow piece C. Repeat the same process that you did in the last step. This will complete the frost feather piece.
- Place the back piece B you made earlier together, right sides out and start to sew
them together along the outside. Tip:5. I recommend starting at one of the points marked with a square. Sew around the feathers and stop when you reach the other square. - Stuff the body with the fluff and use a blunt ended tool to help push the stuffing into the feather areas that may be hard to reach. Then stuff the main part of the body last. Finish sewing around the entire section.
Step Three: Make the head and finish.
- Sew the eyes (F) onto one piece E.
- Next, sew the snood (G) in place and then sew the beak (H) on last.
- Begin sewing the two piece E’s together to form the head, stopping about ¾ of the way to insert more fluff.
- Finish sewing the turkey, glue the body to the head, and enjoy!
Easy Felt Turkey Craft Pattern, a simple homemade DIY Thanksgiving craft project for any age including kids. Video included.


Easy Felt Turkey Craft Pattern
Materials
- Craft Felt -Brown/Tan, Red, Yellow, Orange, and Black craft felt.
- embroidery floss
- Poly-fil Stuffing
- Embroidery needle
- Scissors
- Hot glue gun or craft glue
Instructions
- Download the pattern template from DIYandFUN.com . Cut out the pieces from the template then use the pieces to trace on the corresponding felt color before cutting out the pieces needed for your project. Start by sewing the tail (A) to the back of the body (B). Place the orange piece D’s in the correct places. Sew each piece D into place.For the smallest feather, yellow piece C. Repeat the same process that you did in the last step. .Place the back piece B you made earlier together, right sides out and start to sewthem together along the outside. Sew around the feathers and stop when you reach the other square.Stuff the body with the fluff and use a blunt ended tool to help push the stuffing into the feather areas that may be hard to reach. Then stuff the main part of the body last. Finish sewing around the entire section.

- Sew the eyes (F) onto one piece E.Next, sew the snood (G) in place and then sew the beak (H) on last.Begin sewing the two piece E’s together to form the head, stopping about ¾ of the way to insert more fluff. Finish sewing the turkey, glue the body to the head, and enjoy!