
Holiday Painted Mason Jar DIY is an easy project.
I like that these mason jars make for a perfect decoration.

Holiday Painted Mason Jar DIY
This a nice upcycle idea for using jars.
These painted mason jars are perfect for holding holiday decorations.
Did you make my Homemade Boxwood Wreath Project?
That is another homemade project for holiday season décor.
Both projects would look great in a holiday home!
To make this project you will need clean mason jars. You can find a selection of mason jars online here.
This project is for anyone asking how do you decorate the outside of a mason jar.
I like to start by painting the jars.
Seasonal colors can make a mason jar look even nicer!
You can also add embellishments to the jar.
Jute twine can be tied around the jar for example
Or, you can simple paint some detailing on the jars.
What kind of paint should you use to paint a mason jar?
There are two kinds of paint that I prefer for a project like this one.
Certainly, not every kind of paint can cover a glass mason jar evenly.
For this project we are using chalk paint.
Acrylic paint is another kind of paint that would work with this project.
I also have an option for using a metallic paint for these jars.

Tips for painting mason jars.
My biggest tip is to make sure that your mason jar is clean before painting it.
The paint needs to be able to stick to the jar and dirt can hinder this process.
More tips for you
- Avoid using a glossy paint. This is because things such as odd brush strokes will show better with a glossy paint.
- When painting the jars, attempt to keep the strokes as even as possible.
- Allow the paint to dry entirely before moving on with the next step. This will help prevent any mishaps.
Personalize your painted jars.
This is a simple project that is easy to do.
However, you can certainly personalize it too!
Subscribe to DIYandFun
Try one of these ideas.
- Paint the jars blue for Hanukah.
- Use a permanent marker to add a design or a name to the outside of the jars.
- Use the jars as gifts for others and personalize them for that!
You may also be interested in these ideas.


About this painted mason jar project.
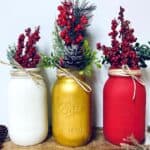
This is a simple painted mason jar project for the holiday season.
This project uses three mason jars.
This project uses chalk paint.
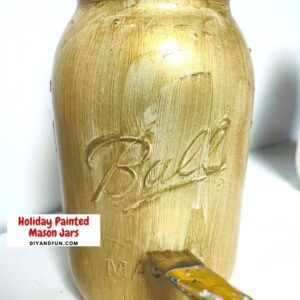
One of the painted jars is painted over with metallic paint to make it gold.
You can easily use spray paint for this as well.

Materials needed to paint holiday mason jars.
Supplies:
- Off white Chalk paint.
- Red chalk paint
- Paint Brushes
- Metallic Gold Acrylic Paint
- Raffia
- 3 large 16 ounce mason jars

How to make Holiday Painted Mason Jar DIY project
Step One: Clean the mason jars.
Wash the mason jars in soapy water. Then allow them to fully dry.
Step Two: Paint the mason jars.
Paint two of the mason jars with 3 coats of the off white chalk paint
Then paint the remaining mason jar with 3 coats of the red chalk paint.
Allow the jars to fully dry between layers of paint.
Step Three: Finish the jars.
Once the off white painted mason jars are completely dry, paint one of them with two coats of metallic paint.
When the three jars are completely dry you can tie the raffia around the top of each jar.
Fill the jars as desired.
Holiday Painted Mason Jar DIY project. A simple homemade idea for decorating mason jars for Christmas holiday decorations.

Painted Mason Jar DIY project
Ingredients
Instructions
- Paint two of the mason jars with 3 coats of the off white chalk paint. Then paint the remaining mason jar with 3 coats of the red chalk paint. Allow the jars to fully dry between layers of paint.

- Once the off white painted mason jars are completely dry, paint one of them with two coats of metallic paint.When the three jars are completely dry you can tie the raffia around the top of each jar.

Recipe Notes
originally posted:
November 18, 2021*As an Amazon Associate I earn from qualifying purchases. This means that the links on this website, and specifically on this post, that lead to other sites may be affiliate links.
Please note: Nutritional data has been calculated using a tool that comes with this recipe card and not by me. This means that Nutritional Information is only an estimate and can vary especially with ingredients that you use. The accuracy of this tool may differ from other tools as expected. Also note that there is no instructional value to the video that may be attached to this recipe. It is only there for visual pleasure. For more information about the images in this recipe, please refer the the recipe instructions. Thank you!
Follow Me