
This DIY Clay Pot Santa Hat Ornament is such a cute idea.
I like that this ornament can be made using dollar store materials as well!

DIY Clay Pot Santa Hat Ornament
This is an easy craft project for making a Santa hat ornament.
Even better, this ornament is perfect for gift giving too!
Have you made my Homemade Instant Pot Holiday Potpourri idea?
That project makes a great smelling potpourri using fresh ingredients.
That holiday potpourri would also make for a nice gift idea.
To make this ornament you will need a small clay or terra cotta pot. You can find a great selection of small clay pots at good prices here.
This project is one of many easy clay pot ideas.
It really just takes a bit of paint along with some decorations to make this project.
To hang the Santa hats, all you need is a bit of twine or ribbon.
Using a small clay pot works best for this idea.
This is because the pot will be hanging on a tree as an ornament.
The clay pot can become heavy once painted and have items glued on.
You may be wondering what is the best way to paint a clay pot?
You will want to have a clean pot before you begin working on this project.
Any kind of dirt, sticky residue, or anything else can have an effect on the outcome of the project.
Gently clean the outside of the pot a day before making this project.
This will allow for enough time for the clay pot to dry out before painting it.
Also, if this Santa hat is going to be used outside, you may want to seal it.
.

Tips for making a terracotta pot ornament.
Allow plenty of time for the paint to dry before adding any embellishments to your Santa hat.
I like to set a fan nearby to help it dry faster.
More tips for you
- This project calls for using a glue gun with glue sticks. However, you can alternatively use a craft glue (you would have to wait for it to dry).
- This hat details in this project are glued on. You can easily use permanent markers instead as needed.
- While this Santa hat is being used as an ornament, you can make this project for other used. I like the idea of using the Santa hats in place of seating cards at a table for a gathering.
Personalize this Santa hat project.
This project is cute and easy as is.
However, you may want to personalize your Santa hat ornament.
Try one of these ideas.
Subscribe to DIYandFun
- Make the hat pink for Mrs. Claus.
- Tie a Santa hat on to a wrapped package as a decoration.
- Seal the painted ornament and use it outdoors as a decoration.
You may also be interested in these ideas.


About this Santa Hat Ornament
This DIY ornament is a simple project using a mini clay pots.
Many of the materials used in this project can be found at your local dollar store.
The clay pot will be used upside down.
This will allow for the hole in the bottom to become a hole on the top.
We will use this hole to hold on to the twine that will be used to hang the ornament.

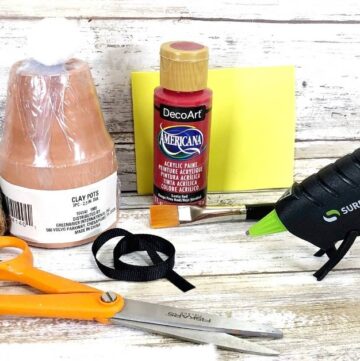
What you will need to make a Holiday Ornament from a Clay Pot.
- Clay Pot- small 2.3" pot.
- Acrylic Craft Paint – Primary Red and White.
- Jute Twine to hang.
- Black Ribbon for hat.
- Yellow Craft Foam- for buckle.
- Large Pompom- for hat.
- Chenille Stems (pipe cleaners)- 2 white for brim.
- Glue gun, sticks.
- Scissors.
- Paint Brush.

How to make a Clay Pot Santa Hat Ornament
Step One: prepare the materials.
I like to start by laying out old newspaper or a drop cloth over my work surface.
Also, I often like to use an old rimmed baking sheet to work on so that I can easily move my project as it dries or if I need to step aside.
Prepare the clay pot by removing any dust, dirt, or labels.
Step Two: Paint the clay pot.
Start by painting the top section of the clay pot with red acrylic craft paint. Set aside to dry. Apply a second coat and allow it to dry.
Then paint the rim of the pot with white acrylic craft paint. Allow the paint to dry and then apply a second coat and allow that to dry.
Step Three: attach the elements to the painted clay pot.
While your pot is drying, you can prepare the elements that will be attached to the pot to make the ornament.
To make the belt for the hat: cut a square from yellow craft foam. Fold the square in half and cut a smaller square from the center to create a buckle. Thread the black ribbon through the buckle.
When the pot has dried you can attach the belt around the clay pot with a glue gun and glue sticks.
Decorate the rim of the hat.
Wrap two white chenille stems or pipe cleaners around the rim of the clay pot.
Then secure them with a glue gun and glue sticks.
Lastly, add the hanger.
Cut a 12” length of natural jute twine, tie it in a loop with a knot, and thread it through the hole in the pot. Attach large white pom pom to the top of Santa’s hat with a glue gun and glue sticks.
DIY Clay Pot Santa Hat Ornament , an adorable, inexpensive, and easy ornament craft idea for Christmas and holiday season.


Clay Pot Santa Hat Ornament
Instructions
- Start by painting the top section of the clay pot with red acrylic craft paint. Set aside to dry. Apply a second coat and allow it to dry. Then paint the rim of the pot with white acrylic craft paint. Allow the paint to dry and then apply a second coat and allow that to dry.

- To make the belt for the hat: cut a square from yellow craft foam. Fold the square in half and cut a smaller square from the center to create a buckle. Thread the black ribbon through the buckle. Wrap two white chenille stems or pipe cleaners around the rim of the clay pot. Then secure them with a glue gun and glue sticks.Lastly, add the hanger .Cut a 12” length of natural jute twine, tie it in a loop with a knot, and thread it through the hole in the pot. Attach large white pom pom to the top of Santa’s hat with a glue gun and glue sticks.
Recipe Notes
originally posted:
November 17, 2021*As an Amazon Associate I earn from qualifying purchases. This means that the links on this website, and specifically on this post, that lead to other sites may be affiliate links.
Please note: Nutritional data has been calculated using a tool that comes with this recipe card and not by me. This means that Nutritional Information is only an estimate and can vary especially with ingredients that you use. The accuracy of this tool may differ from other tools as expected. Also note that there is no instructional value to the video that may be attached to this recipe. It is only there for visual pleasure. For more information about the images in this recipe, please refer the the recipe instructions. Thank you!
Follow Me