
How to Decorate Pots with Seashells is a really cute idea.
I like this this is an inexpensive and simple project to make.

How to Decorate Pots with Seashells
This is a simple craft idea for personalizing a clay pot.
Many of the materials can be found at a dollar store or inexpensively elsewher.
Did you try my Clay Pot Sombrero Craft DIY?
That craft project is another fun way to decorate a simple clay pot.
Both this project idea and that one are easy and cute ideas for using a clay pot.
To make this project you will need seashells. If you do not live by a beach (raising my hand) you can find inexpensive seashells here.
People ask how do you decorate with shells.
Seashells are an easy way to decorate for a beach or summertime theme.
They are also easy reminders of warm and sunny days with water.
These seashells are simply glued on to a clay pot.
This project is a great idea for a reminder of a beach vacation. You can also make this as a gift to give to someone special.
You may be wondering how do you stick shells to plant pots.
It is important that you will need to use a glue that adheres well to make sure that the shells stick to the pot.
Also, The glue should be able to set quick enough to keep the shells in place rather than falling while you work.
You could try using a glue gun for this project.
If you are planning to keep your finished pot indoors, you may be able to use a glue gun with glue sticks. However, make sure that you use good glue sticks that can hold the shells well.

Tips for making a seashell clay pot.
Make sure that you clay pot is clean on the outside before making this project.
This will ensure that the glue will properly stick.
More tips for you.
- Before gluing on the seashells do a dry-run first. Place the pot on its side to do this.
- You will need both large seashells and smaller seashells for this project. The larger seashells will be layered on top of the pot while the smaller ones will go on the bottom.
- If you are concerned that the pot may not be fully sealed, you can use a spray on cement sealer. While not necessary, the sealer may be a good idea if you are placing the pot outdoors.
Personalize your clay pot.
While this clay pot project is cute just the way it is, you can personalize yours.
Personalizing you clay pot can make it special.
Try one of these ideas.
- Use similarly shaped seashells that are similar in hue to make the outcome more consistent.
- Paint the clay pot and then use the seashells as accents.
- Use small tiles or rocks with the seashells.
Subscribe to DIYandFun
You may also be interested in these ideas.


About this seashell pot project.
This is a simple do it yourself project idea for decorating a clay pot.
We will be gluing seashells on to the pot for decoration.
To make this project you will need a terra cotta pot.
You will also need seashells.
If you are using seashells that you have found at the beach, be sure to rinse them and dry them first.
Materials needed to make a terra cotta seashell pot.
- Terra Cotta Pot- 1. Mine is a medium pot.
- Seashells.
- Glue gun and glue sticks (indoors not recommended for indoors) or a strong glue depending on where your pot will be placed.
- Optional as needed, sealer for the pot, plant for the finished pot, or other items to glue on to the pot.

How to Decorate Pots with Seashells
Step One: prepare the materials.
Remove any dirt or debris from the terra cotta pot(s). If you are planning to use the pot in a warm location or outdoors, you may want to seal them first.
Rinse the shells to remove any debris as well.
Allow the pot(s) and shells to fully dry.
Step Two: Organize the materials.
Line up your seashells by size. You will need the smaller shells for the bottom and the larger ones on top.
If you are using a glue gun make sure that it is plugged in and warm.
However, if you are using a stronger glue take the needed precautions as indicated on the packaging.
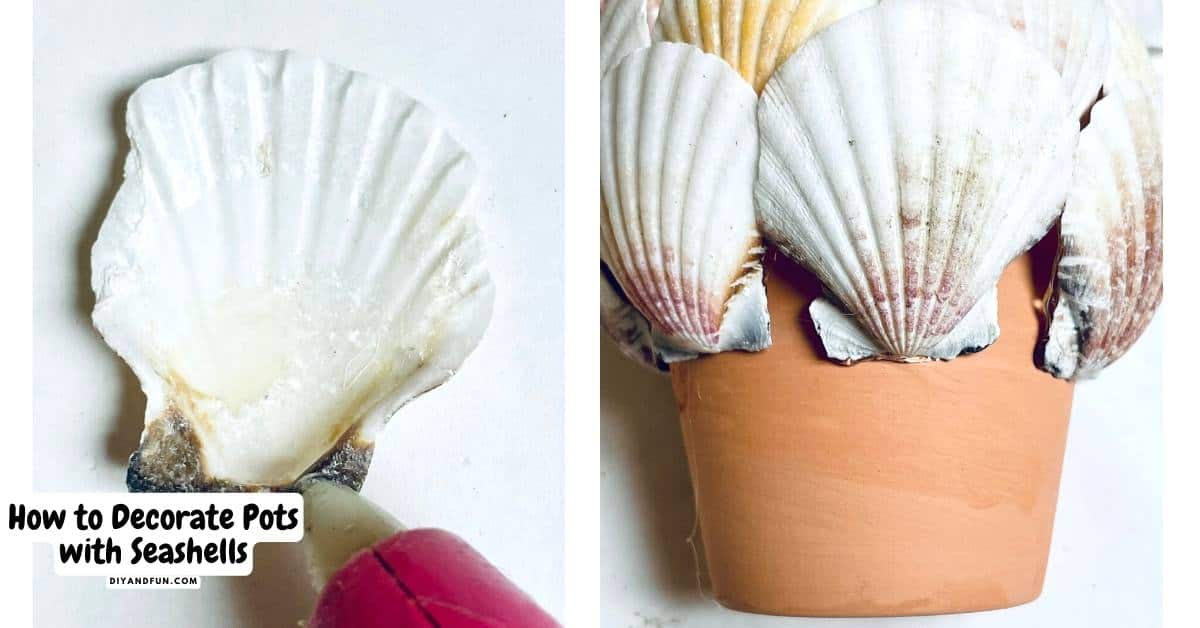
Step Three: Glue the shells on to the pot.
You will start by gluing the shells on to the top of the pot first and then add the remaining shells in layered rows working your way down. The smallest shells will go on to the bottom.
Start by adding a line of glue on the inside bottom section of the first shell and then press the shell firmly on the top part (rim) of the terra cotta pot. The shell should extend over the top of the rim. Repeat this process all the way around the top part of the pot to complete the row.
For the second layer, add the glue to both the bottom and the top part of the shells. The shells will need to adhere to both the pot and the shell that it will overlap on top of.
Repeat this until the entire pot is covered with shells.
Allow the glue to fully dry before moving the pot.
How to Decorate Pots with Seashells, a do it yourself craft project idea for personalizing a garden planter pot .


HOW TO DECORATE POTS WITH SEASHELLS
Materials
- Terra Cotta Pot-
- Seashells.
- Glue gun and glue sticks (indoors not recommended for indoors) or a strong glue depending on where your pot will be placed.
Instructions
- Remove any dirt or debris from the terra cotta pot(s). If you are planning to use the pot in a warm location or outdoors, you may want to seal them first.Rinse the shells to remove any debris as well. Allow the pot(s) and shells to fully dry.
- Line up your seashells by size. You will need the smaller shells for the bottom and the larger ones on top.If you are using a glue gun make sure that it is plugged in and warm.However, if you are using a stronger glue take the needed precautions as indicated on the packaging.
- Start by adding a line of glue on the inside bottom section of the first shell and then press the shell firmly on the top part (rim) of the terra cotta pot. The shell should extend over the top of the rim. Repeat this process all the way around the top part of the pot to complete the row.
- For the second layer, add the glue to both the bottom and the top part of the shells. The shells will need to adhere to both the pot and the shell that it will overlap on top of.
- Repeat this until the entire pot is covered with shells. Allow the glue to fully dry before moving the pot.