I use to wonder How to make a Halloween Origami Bag.
This is a fun project that older kids would enjoy doing as well.
How to make a Halloween Origami Bag
This is a fun tutorial for making a cute Halloween inspired bag out of paper.
If you like black cats at Halloween, you will probably like this project as well!
Did you try my Halloween Balloon Pumpkin project?
That diy project is another fun Halloween do it yourself idea.
This project would look cute beside that Halloween balloon pumpkin.
To make this project you will need Origami Paper in two colors.
You can find Origami paper here.
People ask what is Origami and what does Origami symbolize.
Origami is the Japanese art of folding paper into shapes.
In this project, Origami will be folded into the shape of a bag.
Technically, Origami means to fold paper.
The paper is folded into shapes without the uses of scissors, tape, or even glue.
As you can imagine, there are easy Origami projects and difficult ones with many projects in between.
This project is a Halloween origami easy (or easier) project.
I do have a video that you can use a reference to help you along the way.
Also, there are detailed steps provided below.
Yes, there is glue and there is tape mentioned in the materials needed section.
This is because we are attaching face elements and handles to the bags.
You are welcome to skip these steps if desired.

Tips for making this Origami bag.
Review the instructions before making this project. It will make them easier to follow when you are actually making this project.
More helpful tips for you.
- This project calls for using Origami paper. I would suggest that you use actual Origami paper and not another kind of paper as this is a specially made paper for projects such as this one.
- The paper that is used for the cat head is 8 X 8 in size. The straps can be made by cutting the paper into strips.
- Take your time to make this project especially if you are new to Origami. It may take more than one try to make your perfect cat.
How to personalize your origami bag.
This is a cute bag as is according to the tutorial.
However, there are ways to make this bag even cuter!
Subscribe to DIYandFun
Try one of these ideas.
- Use another color to make your kitty not a black cat.
- Add a tail using a string to the the backside of your cat.
- Use markers to color your kitty bag.
- Make your cat bag into a dog bag instead.
- Use white paper and make a Halloween ghost instead.
You may also be interested in these ideas.


Uses for this easy origami bag.
Once you have made your cat origami bag, there are some creative things that you can do with it.
Yes, these bags can be displayed as they are for Halloween.
Here are some more ways to enjoy your origami bag.
- Fill the bag with candy and give it to someone as a gift.
- Hang your Halloween bag on a Halloween tree.
- Use your bag to hold something such as paper clips, coins, or even small Halloween toys.

Materials needed to make this origami bag.
- Origami Paper (8 X 8", black)
- Also, Origami Paper- 2 for handles ( 8 X .75").
- Paper scraps- for face features.
- Marker
- Tape/Glue
How to make an origami bag.
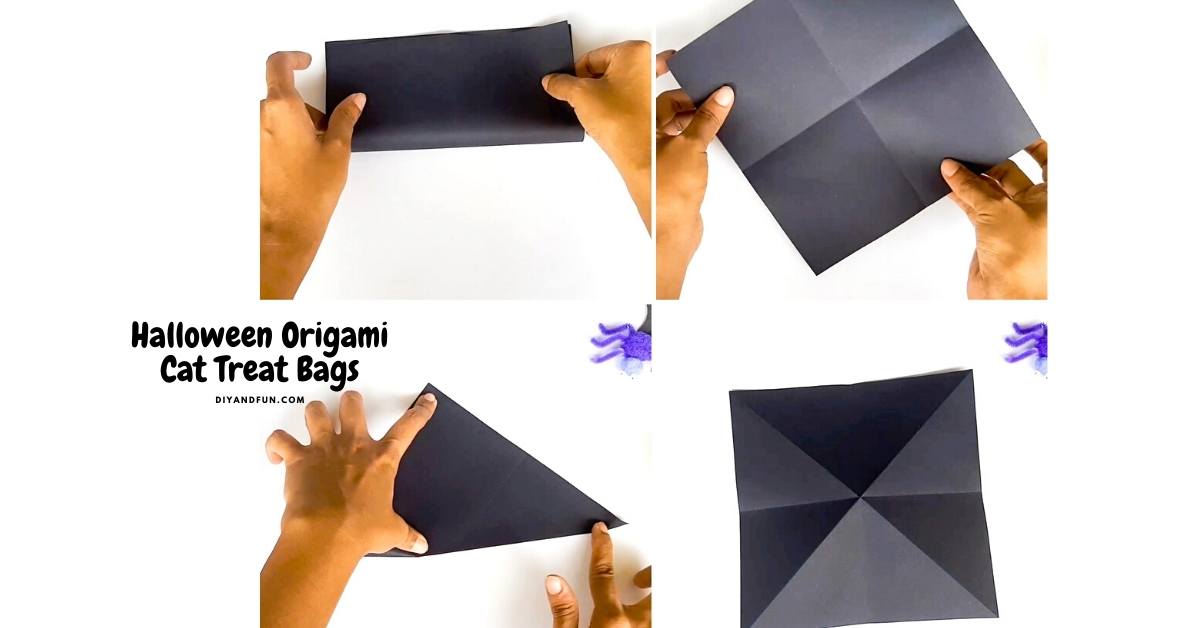
Step 1. Fold the 8”x8” paper in half. The open the paper and fold it in the opposite direction to form a cross with the fold creases. Open the paper and fold one corner to the other to make a triangle. Again, open the paper and join the other two opposite corners.
Your paper should now have 8 equal sized triangle creases. With the paper open, grab the sides of the bottom large triangle press in the sides to bring together the top large triangle. This forms the double triangle base. Next, turn the triangle so the point points downward. Take one side point and make a fold about 1.75” . Repeat with the other 3 side points (both sides) so that it looks like “dog ears” on both sides.
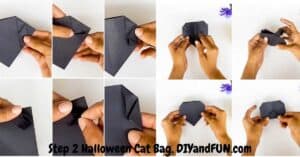
Step 2, Fold the point of a “dog ear” in to meet the line. Fold the bottom portion to the side (to make a helpful crease) and then up. Push the bottom of the point pocket open and tuck in the little triangle so that it looks like the photo above. Repeat this for the other 3 “dog ears”.

Fold the front two sides and back two sides together to hide the folds and tucks. Then fold the bottom point, with the point stopping about half way. This crease forms the bottom of the bag.
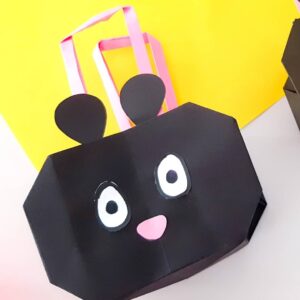
Step 3. Finishing touches. Add eyes and a nose to the bag using scrap paper. Then add ears and the handles, attaching them using tape or glue. Decorate as desired.
>>SEE THE VIDEO OR THIS PROJECT HERE. <<
How to make a Halloween Origami Bag , a fun do it yourself project for making a Halloween inspired cat bag. Video.

Halloween Origami Cat Treat Bags
Materials
- Origami Paper
- Marker
- Tape/Glue
Instructions
- Fold the 8”x8” paper in half. Then open the paper and fold it in the opposite direction to form a cross with the fold creases. Open the paper and fold one corner to the other to make a triangle. Again, open the paper and join the other two opposite corners.Your paper should now have 8 equal sized triangle creases. With the paper open, grab the sides of the bottom large triangle press in the sides to bring together the top large triangle. This forms the double triangle base. Next, turn the triangle so the point points downward. Take one side point and make a fold about 1.75” . Repeat with the other 3 side points (both sides) so that it looks like “dog ears” on both sides.

- Fold the point of a “dog ear” in to meet the line. Fold the bottom portion to the side (to make a helpful crease) and then up. Push the bottom of the point pocket open and tuck in the little triangle so that it looks like the photo above. Repeat this for the other 3 “dog ears”.
- Fold the front two sides and back two sides together to hide the folds and tucks. Then fold the bottom point, with the point stopping about half way. This crease forms the bottom of the bag.