
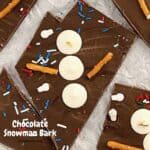
Chocolate Snowman Bark is an easy and tasty homemade candy treat idea.
I like how this recipe is especially perfect for the winter time.

Chocolate Snowman Bark
This is a simple recipe for chocolate bark that is decorated with 'snowmen'.
Make this as a treat, a dessert, or even to give away to other to enjoy!
Did you try my Easy Chocolate Halloween Bark recipe?
Like this recipe, that recipe is also for a chocolate bark..
However, while that recipe is decorated for Halloween, this recipe for bark is decorated for winter.
This recipe feature melting wafers for both the chocolate and for the snowmen. You can find melting wafershere.
You may be wondering why is it called chocolate bark.
I can assure you that chocolate bark has nothing to do with dogs who bark.
It also has nothing to do with the bark that grows on tree.
Some folks do believe that the name of chocolate bark does have something to do with what it resembles.
When the chocolate is broken into pieces, it may resemble bark from a tree.
However, depending on the shapes that evolve, it may also look like states, people, or even a car. Thus, resembling bark from a tree gets my vote for the origin of chocolate bark.
People often ask what us chocolate bark used for.
Obviously, this chocolate bark is used for eating.
Think of this chocolate bark as a homemade candy.
Chocolate bark can also be part of another recipe.
You could easily make a sandwich kind of treat by pairing two pieces of bark with peanut butter or frosting in the center. Or, you can break up your chocolate bark into pieces small enough to add to homemade ice cream or top your baked goods with.

Tips for making chocolate bark.
Decorating your chocolate bark with the snowmen and decorations is simple to do.
When you want to keep in mind is that the chocolate base should partially (five minutes or so) cool before adding the toppings.
More tips for you.
- The snowmen are made using white chocolate wafers. To create an extra spread or melt three wafers together to look like a snowman, simply place the wafers on a piece of parchment paper and heat in the oven for a few minutes.
- This recipe calls for chocolate wafers to make the base. Feel free to use chocolate chips instead.
- You can also add some crunch to your melted chocolate. Rice cereal, chopped pretzels, or even chia can help with this.
Personalize this chocolate bark.
While this recipe for chocolate bark is great just the way it is.
However, you can take it up a notch.
Try one of these ideas.
- Add edible eyes to your snowmen.
- Sprinkle coconut flakes of the chocolate to make snow.
- Use candy to add buttons, licorice for arms, or dried fruit to make a nose.
Subscribe to DIYandFun
You may also be interested in these ideas.


About this recipe for chocolate bark.
This is a basic recipe for chocolate bark made using chocolate wafers.
The bark is decorated with white candy melt wafers to look like snowmen.
You can easily use other toppings for this bark.
I suggested a few ideas such as adding coconut flakes as snow.
Adding sprinkles of different colors also makes this a fun idea.

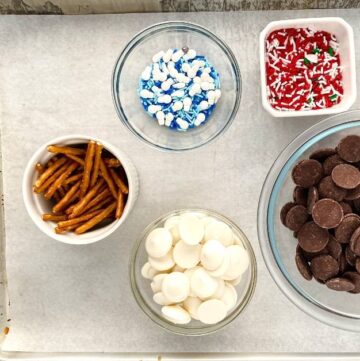
Ingredients needed to make chocolate bark.
- Ghiradelli chocolate melting wafers- 16 ounces.
- White Candy Melting Wafers- 1 cup or as needed.
- Pretzel Sticks.
- Sprinkles or edible decorations.

How to make Chocolate Snowman Bark
Step One: prepare.
It is a good idea to get the ingredients that are need ready to go before beginning.
Line a rimmed baking sheet with parchment paper. If your baking sheet is newer you can give it a quick spray with nonstick before placing the parchment paper on top to help hold it in place.
Step Two: make the base.
It is best to melt the chocolate according to the directions on the package.
Then use an offset or similar spatula evenly spread the chocolate around.
Keep the chocolate about an inch away from the edges of the parchment paper.
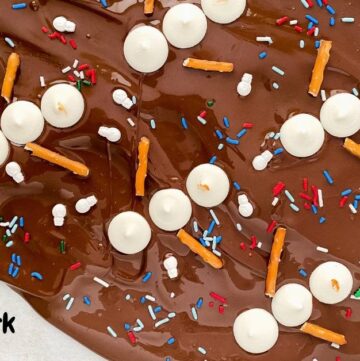
Step Three: finish the bark.
You can use an orange food writer to make a nose the white wafers that will serve as the head of the snowmen.
Then place the heads on to the melted chocolate and add two white wafers below to make the rest of each snowman.
Break the pretzels as needed to make arms and if desired, fingers for the snowmen and place them beside the center wafers.
Finish the bark with any desired sprinkles or toppings.
Allow the bark to harden (about 30 minutes in a refrigerator) before breaking into pieces and enjoying.
Chocolate Snowman Bark, an easy dessert or snack treat recipe with candy snowmen on a tasty chocolate base.

Chocolate Snowman Bark
Ingredients
Instructions
- Line a rimmed baking sheet with parchment paper It is best to melt the chocolate according to the directions on the package. Then use an offset or similar spatula evenly spread the chocolate around. Keep the chocolate about an inch away from the edges of the parchment paper.

- You can use an orange food writer to make a nose the white wafers that will serve as the head of the snowmen.Then place the heads on to the melted chocolate and add two white wafers below to make the rest of each snowman.Break the pretzels as needed to make arms and if desired, fingers for the snowmen and place them beside the center wafers. Finish the bark with any desired sprinkles or toppings.Allow the bark to harden (about 30 minutes in a refrigerator) before breaking into pieces and enjoying.
Recipe Notes
originally posted:
December 17, 2021*As an Amazon Associate I earn from qualifying purchases. This means that the links on this website, and specifically on this post, that lead to other sites may be affiliate links.
Please note: Nutritional data has been calculated using a tool that comes with this recipe card and not by me. This means that Nutritional Information is only an estimate and can vary especially with ingredients that you use. The accuracy of this tool may differ from other tools as expected. Also note that there is no instructional value to the video that may be attached to this recipe. It is only there for visual pleasure. For more information about the images in this recipe, please refer the the recipe instructions. Thank you!
Follow Me