This DIY Fall Book Stack Project is an easy and inexpensive project to make.
I like that this book stack is in the fall theme too!

DIY Fall Book Stack Project
This is a fun fall-inspired decor project that looks great as a display.
I like that this book stack looks great on a shelf or as part of a pumpkin display.
Did you make my Rustic Farmhouse Book Stack Project?
That bookstack project was made using unfinished wood..
This project uses an unfinished craft wood crate.
This project uses an unfinished wood crate to make the stacks.
Please use a crate that does not have spaces between the slats.
This fall diy project is especially for anyone asking how do you make painted book stacks.
Painted book stacks are easier to make than you may imagine them to be.
By using an unfinished wood crate, this project is even easier!
I see wooden book stacks for sale online and at stores and I am amazed at how much they cost.
Making your own wooden book stack is nice because you can personalize it as you like to.
This project would even make for a nice gift idea!
Here are some tips for making a fall book stack.
Many of the supplies used in this project can easily be found at a local dollar or discount store.
I will also offer online resources for this project.
More tips for you.
- To make this project, we will paint the outside of the crate. There us no need to paint the inside of the crate as it will not be visible.
- While this project uses the crate upside down, you could make this right side up. This will allow you to use your crate to hold things, such as apples or goodies.
- Adding a coat of craft finish spray is not necessary for this project. However, you can choose to do so depending on how you will be using your book stack.

How to personalize your book stack.
Personalizing your book stack is a great way to make it yours and unique.
It is also easy to do.
Here are some ideas.
Subscribe to DIYandFun
- While I am using specific fall colors in this tutorial, you can simply use white or any colors of your choice.
- Decorate your fall book stack using craft decals, craft stamps, or markers.
- Instead of the words that I have used in this tutorial, use the names of people or books.
- I mentioned above that this project is made by turning the crate upside down. However, if you want to hold something in your crate, make yours right side up. I'm thinking about pine cones as a filler!
You may also be interested in these ideas.

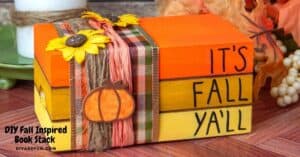
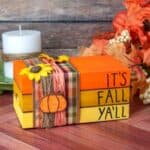
Wood Crate Autumn Book Stack
This project is simple to do once you have your supplies gathered.
Many of the supplies can be found in a dollar store or craft store as well.
This project consists of two main parts.
The first part is painting the crate in fall colors.
In the second part we will decorate the painted crate.
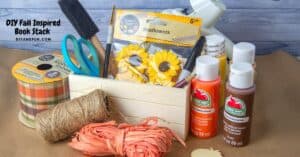
Supplies needed to make this DIY Fall Book Stack Project.
- Unfinished wooden craft crate.
- Sunny Day Matte Paint.
- Golden Sunset Matte Paint.
- Pumpkin Orange Matte Paint.
- Nutmeg Brown Matte Paint.
- Paint brushes, foam and small.
- Wire edged autumn theme ribbon.
- Jute Twine.
- Orange Raffia.
- Wooden pumpkin decoration.
- Glue gun and sticks.
- Scissors.
- Pencil.
- Black Sharpie Marker.
How to make this DIY Wooden Book Stack
Step 1. Prepare as needed using a drop cloth etc. Use sandpaper if needed to smooth out the crate. Also, wipe off any dust using a clean rag. Using the pencil, draw the lines on the side of the crate to match the lines on the front and back. Then turn the crate upside down.
Step 2. Decide which colors you want to paint each section of your crate. Using a small foam brush: paint, yellow on the bottom, golden in the middle, orange on the top, leaving the little spaces between each unpainted. Set aside to dry. (I use a fan.)
Step 3. Once the crate has dried, use the brown paint and a small detail brush to paint the little spaces between each color on the crate. Also paint the lines you drew on the sides. Add detail to the small pumpkin with the brown paint and set aside to dry.
Step 4. Once the book stack is dried completely, on the right hand side of the front, lightly write “IT’S FALL YA’LL” with the pencil, with one word on each section starting from the top. Then write over the words with the black sharpie marker.
For the ribbon. Add glue to the back of the book stack. Wrap the wired ribbon around tightly, secure in the back with more glue, and cut off excess.
Next, add glue to the back of one side of the ribbon and add a piece of twine. Wrap about 10 times and secure with glue in the back. Do the same thing with the raffia right next to the twine. Then add glue between the twine and the raffia in the center front and add the small pumpkin. Add any other decorations as desired. Glue to the top of the ribbon on the top part of the book stack.

DIY Fall Book Stack Project
Materials
Instructions
- Prepare as needed using a drop cloth etc. Use sandpaper if needed to smooth out the crate. Also, wipe off any dust using a clean rag. Using the pencil, draw the lines on the side of the crate to match the lines on the front and back. Then turn the crate upside down.
- Decide which colors you want to paint each section of your crate. Using a small foam brush: paint, yellow on the bottom, golden in the middle, orange on the top, leaving the little spaces between each unpainted. Set aside to dry. (I use a fan.)

- Once the crate has dried, use the brown paint and a small detail brush to paint the little spaces between each color on the crate. Also paint the lines you drew on the sides. Add detail to the small pumpkin with the brown paint and set aside to dry.
- Once the book stack is dried completely, on the right hand side of the front, lightly write “IT’S FALL YA’LL” with the pencil, with one word on each section starting from the top. Then write over the words with the black sharpie marker.For the ribbon. Add glue to the back of the book stack. Wrap the wired ribbon around tightly, secure in the back with more glue, and cut off excess.Next, add glue to the back of one side of the ribbon and add a piece of twine. Wrap about 10 times and secure with glue in the back. Do the same thing with the raffia right next to the twine. Then add glue between the twine and the raffia in the center front and add the small pumpkin. Add any other decorations as desired. Glue to the top of the ribbon on the top part of the book stack.