
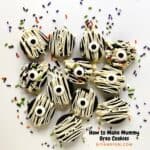
Everyone seems to want to know How to make Mummy Oreo Cookies.
Not only are they a cute idea, they are tasty as well!

How to make Mummy Oreo Cookies
This is a fun way to dress up a favorite cookie.
I like how easy this is to do too!
Did you see my recipe for Monster M & M cookies?
That is another fun cookie idea that tastes good too!
This recipe is really more of a Halloween idea even though it could work any time of the year.
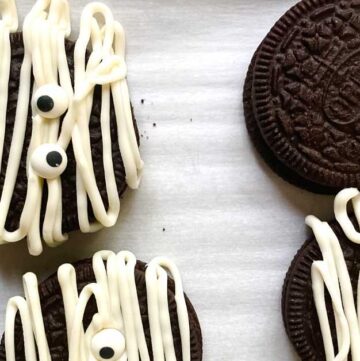
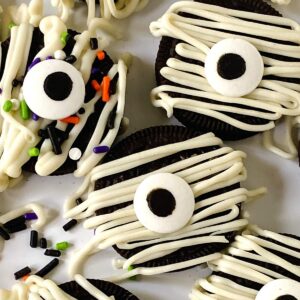
This recipe calls for using edible candy eyes.
You can find a good selection of edible candy eyes here.
Have you ever wondered what are Oreos so good?
Oreo cookies are a basic sandwich cookie that seems to hit the needs of cookie lovers.
Not only do you get those hard chocolate flavored crunchie outer layers on both sides, you get a soft sweet center that perfectly complements that crunch.
Perhaps even just as popular is the method used to eat those cookies.
The company likes to advertise 'unscrewing' the cookie to eat the center first.
However, there is that cookie dunking base who may disagree with that.
What are Mummy Halloween Oreos?
Oreo cookies seem to be everywhere as soon as people start thinking about fall and Halloween.
The Halloween Oreos come in colors and flavors that certainly get people excited.
These Mummy Halloween Oreos are decorated Oreos.
Decorating your cookies is a rather simple process that kids can get involved in.
Sharing the Oreo mummies can be just as fun as making them too!

Here are some tips for making your Halloween Oreos.
I mentioned that edible candy eyes. are used to decorate these cookies.
Using colored, such as green edible eyes, could be fun too!
Here are some more tips for you.
Subscribe to DIYandFun
- You will need to melt chocolate to make the mummy design on these cookies. If your chocolate seems to be too thick after heating it, blend in a small amount (teaspoon or less at a time) of oil or coconut oil to the chocolate to help thin it out.
- Using regular Oreos works great in this recipe. However, using the double stuffed version gives you the opportunity to use a lollipop stick to make you mummies into pops.
- These cookies should be stored in an airtight container. Freezing them may also work.
How to personalize these Halloween treats.
Covering these cookies with white chocolate and adding eye balls is creative and fun.
However, there is more that you can do to make these treat fun.
Fun ways to personalize these cookies.
- Use an Oreo specific to Halloween for more colors and flavors.
- Instead of white chocolate melts, use another color such as green.
- Adding a few drops of food coloring can give your white chocolate more colors such as orange.
- Use fun eyeballs with lashes, candy mustaches, or make your own topping with Halloween molds.
- Top your cookies with sprinkles, chopped nuts, or edible glitter.

Here is how to make Sugar Free Mummy Cookies.
Sugar free Oreo cookies do not exist.
However, you could use a Sugar Free Sandwich Cookie, which does exist.
What else you would need to make this a sugar free recipe idea.
Sugar Free White Baking Chips can be used instead of the white melting chocolate.
Also, you can find Sugar Free Sprinkles here.
You may also be interested in these ideas.
- The Best Oreo Peanut Butter Pie
- Cinnamon Sugar Churro Cheesecake Bars
- 2 Ingredient Cinnamon Roll Cobbler
- 13 Easy Summer Dessert Recipes that Don't Suck!
- Chewy Oatmeal Chocolate Chip Bars (Easy One-Bowl Recipe)
Ingredients needed to make Mummy Oreos.
- Chocolate Sandwich Cookies, such as Oreos.
- Small Candy Eyes.
- White Melting Chocolate.
- 12 inch piping bag or piping tool.
How to make Mummy Oreo Cookies
Step one. Line a rimmed baking sheet with parchment paper. This will be a workspace that is also easy to move when drying if needed. Place individual cookies on the sheet, leaving space between them as needed.
Step two. Melt the chocolate as indicated in the instructions on the packaging. Add a very small amount of coconut oil or oil can help this this out, and thus easier to work with, if needed. Transfer the melted chocolate to your piping bag.
Step three. Snip the tip of the piping bag or follow the direction indicated for piping. Then use a 'zig-zag' method to cover each of the cookies to form your mummy wrap. Add the eyes and other decorations. Allow the cookies to se (about 25 minutes.) Store in an air tight container.
How to make Mummy Oreo Cookies, a simple and fun way to dress up a favorite cookie. Sugar free alternative included.

How to make Mummy Oreo Cookies
Equipment
Instructions
- Line a rimmed baking sheet with parchment paper. This will be a workspace that is also easy to move when drying if needed. Place individual cookies on the sheet, leaving space between them as needed. Melt the chocolate as indicated in the instructions on the packaging. Add a very small amount of coconut oil or oil can help this this out, and thus easier to work with, if needed. Transfer the melted chocolate to your piping bag.

- Snip the tip of the piping bag or follow the direction indicated for piping. Then use a 'zig-zag' method to cover each of the cookies to form your mummy wrap. Add the eyes and other decorations. Allow the cookies to se (about 25 minutes.) Store in an air tight container.
Recipe Notes
originally posted:
August 30, 2021*As an Amazon Associate I earn from qualifying purchases. This means that the links on this website, and specifically on this post, that lead to other sites may be affiliate links.
Please note: Nutritional data has been calculated using a tool that comes with this recipe card and not by me. This means that Nutritional Information is only an estimate and can vary especially with ingredients that you use. The accuracy of this tool may differ from other tools as expected. Also note that there is no instructional value to the video that may be attached to this recipe. It is only there for visual pleasure. For more information about the images in this recipe, please refer the the recipe instructions. Thank you!
Follow Me