Easy DIY Fabric Covered Pumpkin is the perfect project to mark the autumn season.
I like how inexpensively this project can be made for!

Easy DIY Fabric Covered Pumpkin
A simple project for making a fabric covered pumpkin.
The materials can easily be found at a dollar store and online for this project.
Did you try my Easy Pumpkin Tray Project?
That project is for a pumpkin that can be made out of three oval trays.
Like with this project, much of the materials used in that project can be found at a dollar store.
To cover your pumpkin, you can use Natural Duck Cloth Fabric. You can find Natural Duck Cloth Fabric here.
This project is for anyone asking how do you decorate a Dollar Tree Pumpkin.
I know that my Dollar Tree has all kinds of pumpkins.
Many of those pumpkins can easily be used as part of a DIY project, such as this one.
For this decorated pumpkin project, you will need a foam pumpkin.
This is because the instructions for this project call for removing part of the foam to cover the pumpkins.
You can also find foam pumpkins online.
You may also be wondering how do you wrap a pumpkin.
This diy pumpkin project calls for wrapping a foam pumpkin with fabric.
Yes, there are many ways to do this however, I like this simplicity of this project.
This project for a wrapped pumpkin is easy to follow.
If you follow the steps listed below, this project should be simple to make.
You can also practice the wrapping steps before you start if needed.

Tips for making fabric covered pumpkins.
My instructions call for using Natural Duck Cloth Fabric or Drop Cloth Fabric. The fabrics are inexpensive and can easily be worked with in a project such as this one.
Here are more tips.
- Since the pumpkins are so inexpensive, I suggest that you buy extra pumpkins. This is because you may want to practice on one or in case you make a mistake or want to make an extra diy project.
- The measurement for the materials are based upon a pumpkin size of 3". If you decide to use a pumpkin of a different size, that the size into considerations when you are planning out your other materials.
- This project is made using a hot glue gun. Take precautions as needed when you are working with anything hot such as a glue gun. Also, have additional glue sticks on hand in case you need them.
How to customize your no sew fabric pumpkins.
This project is a pretty basic project for a fabric covered pumpkin.
You can also make your fabric covered pumpkin more fun!
Here are some ideas on how to personalize your fabric pumpkin.
- Dye or Tie Dye the fabric that you use to cover your pumpkins with. Or, you can use another fabric that you may just have on hand.
- Attach craft eyes, a craft nose, and a mouth to your pumpkins.
- Or, you can simply use some Sharpie pens to decorate your pumpkins.
Subscribe to DIYandFun
You may also be interested in these ideas.
- The Best Oreo Peanut Butter Pie
- Cinnamon Sugar Churro Cheesecake Bars
- 2 Ingredient Cinnamon Roll Cobbler
- 13 Easy Summer Dessert Recipes that Don't Suck!
- Chewy Oatmeal Chocolate Chip Bars (Easy One-Bowl Recipe)
Easy diy fabric covered pumpkin.
This is a simple craft project that can be made using items found as a dollar store, craft store, or even online. You may even have some of the listed materials on hand already!
There are three parts to making these pumpkins.
The first part is setting up the project and preparing the foam pumpkin.
Then we will cover the pumpkin with fabric and add the finishing touches.

Materials needed to make fabric covered foam pumpkins
This is for one pumpkin. Simply multiply each material as needed for more pumpkins.
Here is what you will need for each fabric covered pumpkin.
- Foam Pumpkin- 1 (3" tall).
- Wine Cork-1.
- Square Natural Duck Cloth Fabric or Drop Cloth Fabric- 1 (13” x 13”).
- Buffalo Patterned Fabric- 13” long x 2” wide strip . You can use any fabric if desired.
- Jute String- 16" and 6" piece.

How to make a fabric covered pumpkin
Step 1:Prepare the pumpkin. Clean the pumpkin as needed by wiping it down and removing any embellishments or tags.
Using a scissors or similar instrument, carefully create a hole in the top of the pumpkin. The hole should be a 1.5” wide circle on top of the pumpkin. Then remove the loosened foam to create a hole. However, you may need to dig out additional foam from inside the pumpkin until it’s about 2” deep.
Step 2: Cover the pumpkin.
Start by cutting the cloth into a circle.
- Fold the 13” x 13” square piece of cloth in half. Then fold it in half again.
- You can draw an arc using one corner of the folded fabric as your base point. You can use a compass or a round can or similar item to trace the arc if you do not have a compass.
- Cut along the curved arc line that you have drawn.
- Unfold the cut fabric and you should have a round piece of fabric.
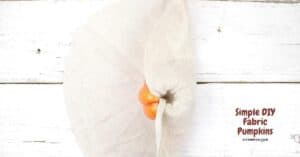
Next, lay the fabric circle down on a flat work surface and set the pumpkin in the center of the fabric with the hole that you cut out on top. Pull a point from the edge of the fabric up over the pumpkin and tuck it into the hole on top of the pumpkin.
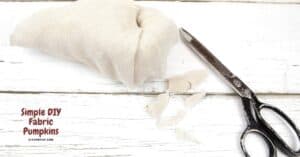
Holding the cloth inside the hole with your finger, run your thumb down the edge of the pumpkin, pressing the cloth tight to the side of the pumpkin. Grab the next section of your cloth and fold it upwards, making a crease along the edge where your thumb is holding the cloth. Then tuck in the top of this piece into the top hole of the pumpkin. Continue this process until the pumpkin is covered with the entire fabric circle. Trim the excess fabric leaving just enough to tuck inside of the hole on top.
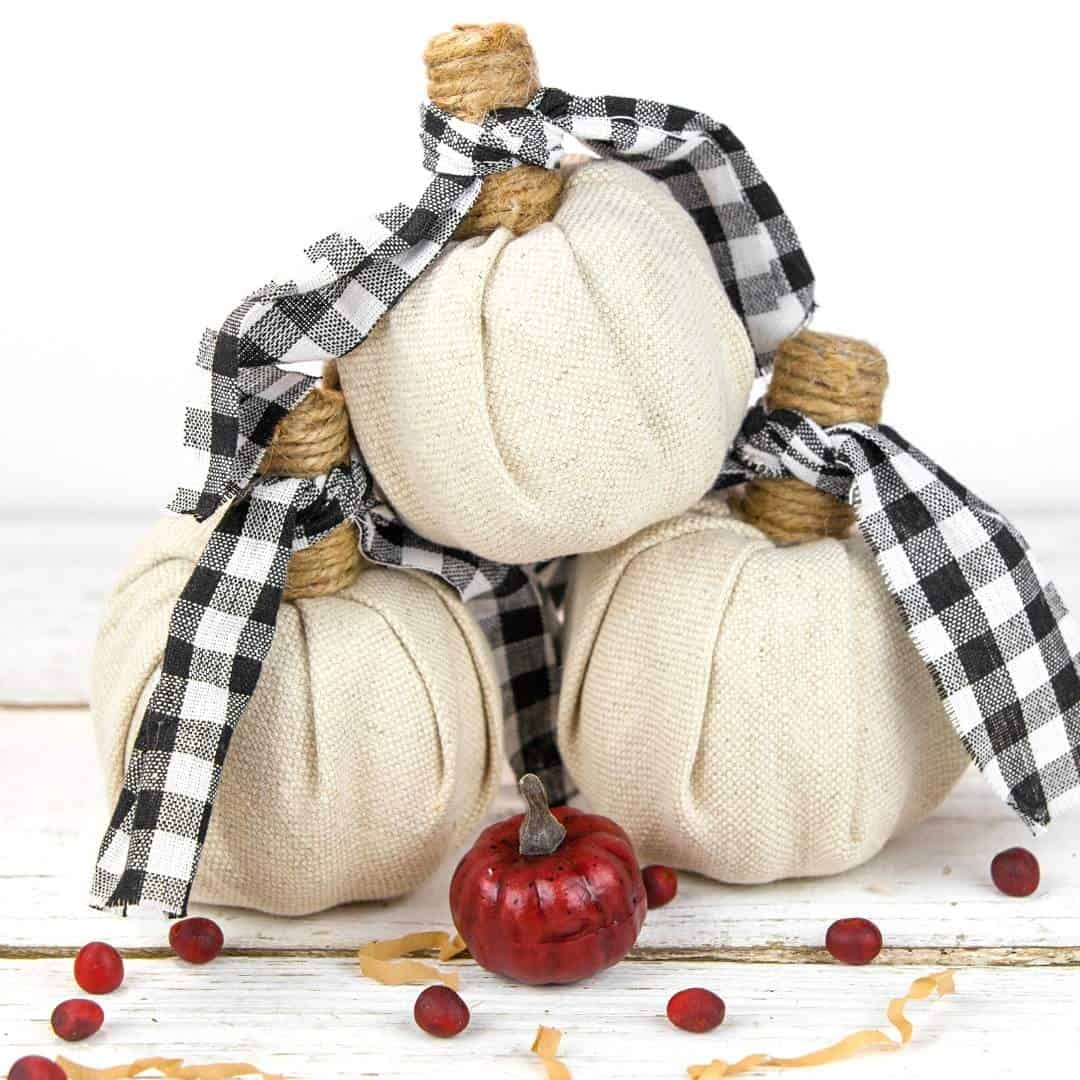
Finish the pumpkin by making the stem.
To make the step, you can attach the 16” piece of Jute String around the outside of a wine cork. To do this make a zig zag line of hot glue on one side of the cork (lengthwise) and then wrap the jute from the bottom until it covers the entire cork. Next, you can hot glue the remaining end of the string to the cork. Use the smaller jute string to cover the top of the cork in a spiral pattern.
Then tie the fabric around the cork and use the glue to attach it to the top of the pumpkin.
Easy DIY Fabric Covered Pumpkin, A simple fall inspired craft project that can be made with dollar store materials.


Easy DIY Fabric Covered Pumpkin
Equipment
- Glue Gun and Sticks
- Pen
Materials
Instructions
- Using a scissors or similar instrument, carefully create a hole in the top of the pumpkin. The hole should be a 1.5” wide circle on top of the pumpkin. Then remove the loosened foam to create a hole. However, you may need to dig out additional foam from inside the pumpkin until it’s about 2” deep.
- Cut the fabric into a large circle Fold the 13” x 13” square piece of cloth in half. Then fold it in half again. You can draw an arc using one corner of the folded fabric as your base point. You can use a compass or a round can or similar item to trace the arc if you do not have a compass. Cut along the curved arc line that you have drawn. Unfold the cut fabric and you should have a round piece of fabric.
- Next, lay the fabric circle down on a flat work surface and set the pumpkin in the center of the fabric with the hole that you cut out on the top. Pull a point from the edge of the fabric up over the pumpkin and tuck it into the hole that you cut out on top of the pumpkin.Holding the cloth inside the hole with your finger, run your thumb down the edge of the pumpkin, pressing the cloth tight to the side of the pumpkin. Grab the next section of your cloth and fold it upwards, making a crease along the edge where your thumb is holding the cloth. Then tuck in the top of this piece into the top hole of the pumpkin. Continue this process until the pumpkin is covered with the entire fabric circle. Trim the excess fabric leaving just enough to tuck inside of the hole on top.

- To make the step, you can attach the 16” piece of Jute String around the outside of a wine cork. To do this make a zig zag line of hot glue on one side of the cork (lengthwise) and then wrap the jute from the bottom until it covers the entire cork. Next, you can hot glue the remaining end of the string to the cork. Use the smaller jute string to cover the top of the cork in a spiral pattern. Then tie the fabric around the cork and use the glue to attach it to the top of the pumpkin.