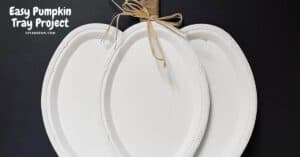
This Easy Pumpkin Tray Project makes perfect use of those leftover oval trays that you may have left over from a party or gathering. This is a creative idea that even kids can do!

Easy Pumpkin Tray Project
This is a simple project for making a fun pumpkin craft.
I like how easy it is to make this a fun project for fall!
Did you try my fall garland project?
That project is another fall inspired way to make something fun to display.
Both that garland project and this pumpkin tray project can be done relatively cheap as well!
If you do not have a leftover disposable oval tray do not worry!
You find oval trays here that would work or possibly at your local dollar store!
This project is for anyone asking about oval plate uses.
We hosted a party not too long ago and catered in from a certain restaurant whose guacamole I made a copycat version of recently. They gave us plenty of those compostable heavy duty durable oval plates which we were trying to use up for the longest time.
The compostable oval paper plates work great in this project.
I like that they can be easily painted, glued and hung up about anywhere to display.
However, using any oval plate or tray that is lightweight and can be painted will probably work in this project too!

Tips for making a Halloween pumpkin paper plate craft.
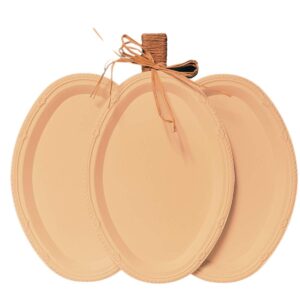
Oval shaped plates work great because they can easily be glued together to form a pumpkin shape. Play around with how your place your plates to get that perfect pumpkin shape before gluing your plates together.
More helpful tips for you.
- Paint can really make these pumpkins look great. Painting with white chalk paint can work great on surfaces such as the aluminum oval plates that you may find at a dollar store. Or, you can use an orange paint which you can find in more 'kid-friendly' varieties.
- While these plates made into pumpkins are cute to display on a wall or front door, obviously, they are not for eating on. However, you could glue a few magnets on the back for grandma or someone else to display on their refrigerator!
- Personalize your pumpkin project with decals. You find pumpkin related decals here.
- My pumpkins were made using a glue gun. Feel free to use the glue of your choice especially if this will be a craft that you will make with children. You may need to use a few props to hold your plates in place while they dry.
- Use a marker to draw lines or face details. This can make it even more fun for this kids!
You may also be interested in these ideas.
Subscribe to DIYandFun
- Marshmallow Fluff S'mores Poke Cake
- The Best Oreo Peanut Butter Pie
- Cinnamon Sugar Churro Cheesecake Bars
- 2 Ingredient Cinnamon Roll Cobbler
- 13 Easy Summer Dessert Recipes that Don't Suck!
About this paper plate Pumpkins craft
To make this craft we will glue together three lightweight disposable plate into the shape of the pumpkin. The plates can be painted before they are glued together and the detailed after the craft has been made.
We will also make a pumpkin stem for your pumpkins.
To make the stem you will need a large craft stick or tongue depressor.
A wooden paint stir may also work as a stem for this project.

Supplies Needed to Make this Easy Pumpkin Tray Project.
- Large Oval Disposable Plates or Dollar Store Trays- three for every pumpkin you will be making.
- Scissors.
- Paintbrush.
- White chalk paint, orange paint, or craft paint of choice.
- Glue Gun or fast drying glue (kid friendly if needed).
- Jute Twine.
- Raffia.
- large craft stick or tongue depressor., or wooden paint stir- 1 per pumpkin.

How to make paper plate pumpkin arts and crafts.
If this is a project that kids will be making, please use child-friendly supplies and techniques. Also, these pumpkins are intended to be used for display purposes only and not for any thing that has to do food or eating.
Step One. Prepare your plates by removing any dust other items that are on them. Then paint the plates. For the metal or non-paper kind, you may need to apply more than one coat of paint. For example, a dollar store serving platter may need up to three coats of paint. Allow the plates to fully dry.
Step Two. Arrange the plates to form the pumpkin before you glue to ensure that you are happy with the design. My suggestion is to start by placing two of the trays or plates vertically next to each other with one of the edges overlapping the other tray.
Step Three. Glue the plates in place. When you have the two trays or plates plates vertically placed next to one another, using the hot glue gun (or glue of choice), glue the two trays together where they meet. Next, you can add a line of glue to the center where the two trays are attached and lay the last tray on top, apply a little pressure to make sure it adheres.
Step Four. Add the stem to your pumpkin. Start by adding a dab of hot glue (or glue of choice) to the wooden stick about two inches down. Then wrap the jute twine around the wooden stick until you reach just below the curved section of the stick. Once completely wrapped, add a dab of glue at the end of the twine and then cut the remainder off. You can then glue the wrapped stick to the backside of the pumpkin (you may need to brace the stick in place while the glue dries ).
Step Five. Personalize your pumpkin. Tie a raffia bow around the stem. Decorate using markers or decals. You can also glue magnets on the back or a twine loop on the top for hanging.
Easy Pumpkin Tray Project
Materials
- Large Oval Disposable Plates or Dollar Store Trays- three for every pumpkin you will be making.
- Scissors.
- Paintbrush.
- White chalk paint, orange paint, or craft paint of choice.
- Glue Gun or fast drying glue (kid friendly if needed).
- Jute Twine.
- Raffia.
- large craft stick or tongue depressor., or wooden paint stir- 1 per pumpkin.
Instructions
- Prepare your plates by removing any dust other items that are on them. Then paint the plates. For the metal or non-paper kind, you may need to apply more than one coat of paint.

- Arrange the plates to form the pumpkin before you glue to ensure that you are happy with the design. Glue the plates in place. When you have the two trays or plates plates vertically placed next to one another, using the hot glue gun (or glue of choice), glue the two trays together where they meet. Next, you can add a line of glue to the center where the two trays are attached and lay the last tray on top, apply a little pressure to make sure it adheres.
- Add the stem to your pumpkin. Start by adding a dab of hot glue (or glue of choice) to the wooden stick about two inches down. Then wrap the jute twine around the wooden stick until you reach just below the curved section of the stick. Once completely wrapped, add a dab of glue at the end of the twine and then cut the remainder off. You can then glue the wrapped stick to the backside of the pumpkin (you may need to brace the stick in place while the glue dries ). Personalize your pumpkin. Tie a raffia bow around the stem.