
Santa Party Cup DIY is a fun way to decorate a disposable cup in a holiday theme.
I like that there are so many uses for this project too!

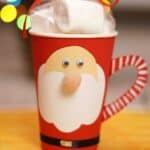
Santa Party Cup DIY
This is a fun idea for decorating a cup to look like a Santa.
I like that this project can be altered for most any age group too!
Did you try making my Tissue Paper Christmas Paper DIY?
That is another idea for a Christmas holiday themed project,
Both projects would look cute when displayed together.
To make this project your will need a disposable cup that you can glue the other items on to. You can find a good selection of disposable cups here.
This project is for asking what crafts can you make for Christmas.
Making a decorated Santa cup is one fun project that you can make for Christmas.
Really, this project can be as easy as you want to make it.
You may also like that this project is inexpensive to make too!
Many of the materials in this project can be found at a local dollar or craft store.
You may even have some of the materials on hand in your own home.
What can you do with a Santa Cup?
You can actually dink from this cup if you wanted to.
As long as you keep the inside clean that is.
Here are some more uses for this decorated holiday.
- Make this decorated cup as a project during a gathering. Then the cups can be used during the gathering.
- Fill the cups with baked goods to give to friends and family.
- Use the cups as pen and pencil holders.
- Fill the cups with holiday candy.

Tips for making a decorated cup.
When selecting cups to use for this project, I suggest that you find something that is somewhat sturdy so that your cups will holdup to being glued on to etc.
More tips for you
- If you are intending to use your cups for beverages, it may be a good idea to have another cup inside of the cup while you work. Then you can simply remove that inner cup when you go to drink from it.
- Another option is to add the cup when you go to use it.
- Use letter decals on your cups to add names or other words.
Personalize your Santa favor cup.
These Santa cups are cute just the way they are.
However, you can make them even better.
Try one of these ideas.
- Add glasses to your Santa using decals or a marker.
- Make your cup into a Mrs. Santa Clause by gluing on cotton balls.
- Use mini cups to make small decorated cups.
You may also be interested in these ideas.


About this Santa Cup DIY.
This decorated cup craft idea is intended to be a simple project that takes less than an hour to do.
To make this craft diy it is a good idea to use a disposable cup as you will be gluing things on to it.
Subscribe to DIYandFun
There are many uses for this cup.
While you could drink from the cup when you are finished making it, this cup makes for a good holder too.
For example, you could place baked goods or candy in a plastic bag and place the bag inside of the cup to give as a gift.

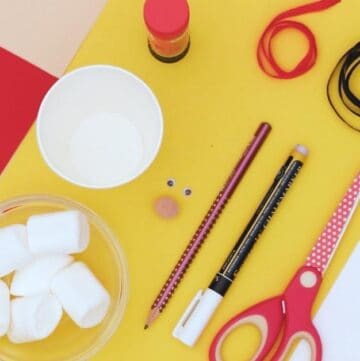
Materials needed to make a Santa cup.
- Disposable Cups- 10-12 oz work best but, you can use what you like. Also, a red cup is especially festive for this.
- Craft Eyes
- Construction Paper
- Pompoms
- Ribbon (black for a belt).
- White chalk marker to make stripes on the handle.
- Glue sticks or glue gun, scissors, pencil, and markers for decorating.

How to make Santa Party Cup DIY
Step One: prepare.
Download the template. You can print out the template on white paper to glue on to the cup.
If you are not using a red cup, you will need to cut out red paper to glue on to the cup.
To trace the cup simple place the cup on a red piece of construction paper and trace it,
Then cut the paper out and glue it on to the cup.
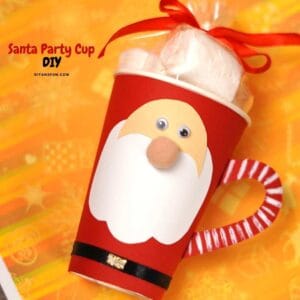
Step Two: make the face.
There is a Santa face and a beard on the template that I have included. You can cut that out to use or use your own template. The beard should be white and the face can be colored with a marker or pencil or you can use paper that is skin colored.
Glue on the eyes and the pompom nose. Then you can attach the face to the cup.
Step Three: finish the project.
Glue on a piece of black ribbon for the belt. You can use gold ribbon, small piece of foil, or a gold Sharpie to make the buckle.
To make the handle/ ear (optional) you can use red paper and add the stipes using a chalk marker..
Another option is to glue on a small Santa hat.
Santa Party Cup DIY, a simple DIY craft idea for decorating a disposable cup for the Christmas holiday season.

Download the template for this project.
See the video for this project here.
Santa Party Cup DIY
Ingredients
- Disposable Cups-
- Craft Eyes
- Construction Paper
- Pompoms
- Ribbon (black for a belt).
- White chalk marker to make stripes on the handle.
- Glue sticks or glue gun, scissors, pencil, and markers for decorating.
Instructions
- Download the template. You can print out the template on white paper to glue on to the cup.If you are not using a red cup, you will need to cut out red paper to glue on to the cup. To trace the cup simple place the cup on a red piece of construction paper and trace it, Then cut the paper out and glue it on to the cup.Make the face.There is a Santa face and a beard on the template that I have included. You can cut that out to use or use your own template. The beard should be white and the face can be colored with a marker or pencil or you can use paper that is skin colored.Glue on the eyes and the pompom nose. Then you can attach the face to the cup.

- Glue on a piece of black ribbon for the belt. You can use gold ribbon, small piece of foil, or a gold Sharpie to make the buckle.To make the handle/ ear (optional) you can use red paper and add the stipes using a chalk marker. Another option is to glue on a small Santa hat.
Recipe Notes
originally posted:
December 9, 2021*As an Amazon Associate I earn from qualifying purchases. This means that the links on this website, and specifically on this post, that lead to other sites may be affiliate links.
Please note: Nutritional data has been calculated using a tool that comes with this recipe card and not by me. This means that Nutritional Information is only an estimate and can vary especially with ingredients that you use. The accuracy of this tool may differ from other tools as expected. Also note that there is no instructional value to the video that may be attached to this recipe. It is only there for visual pleasure. For more information about the images in this recipe, please refer the the recipe instructions. Thank you!
Follow Me