
Thrift Store Toolbox Makeover DIY for taking a basic wooden tool holder and turning it into something useful.
I like how surprisingly easy this project is to do!

Thrift Store Toolbox Makeover DIY
This project is for taking a wooden tool holder and upcycling it into something useful.
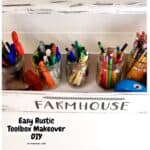
My toolbox was upcycled into a farmhouse style container for jars holding pens and pencils.
Did you see my Easy File Cabinet Makeover?
That file cabinet makeover turned a dumpster found cabinet into a nice piece of furniture.
Both this toolbox holder and that file cabinet are nice ideas for upcycling items into something useful.
My toolbox was an old thrift store find. You can find similar toolbox holders that could work in this project here.

You can clean it and then paint the box and continue to use it.
Or, you can update the box into something new. This toolbox was updated into a kitchen office pen and marker holder. Canning jars are used to hold the pens and markers and other items. These jars can be easily removed and then replaced as well in order to use the pens and markers.
Please note that this specific project uses a wooden box.
However, a metal box may be used with a few adjustments.
A metal box may call for removing the old paint before painting it white.
You may also may need to use different paint that is specific for that surface.
Do a bit of research as it could work out for you!
Tips for updating a toolbox.
Try not to overthink this project. This project is basically turning something old and trash-bound into something useful.
More tips for you
- This toolbox used in this project was found at a thrift store. Other places to find similar toolboxes include garage sales, antique stores , curbsides, or you can even use an inexpensive one that is new.
- The decorations for this toolbox update were primarily found at a dollar store. You can also find decorations at a craft store as well.
- While you do not have to update the exact kind of toolbox that is shown here, you should use one that is wooden and can easily be updated. Metal or plastic boxes probably will not work with this exact project.
Personalize your updated toolbox.
This toolbox was updated in a farmhouse style to be used in a kitchen as a pen holder.
However, you can update yours to suit your needs.
Try one of these ideas.
- Use the paint that you painted something else with to match this to it.
- Personalize your toolbox by writing a name or something special on it using paint pens.
- Use a hanging kit to attach the needed attachments to hang your toolbox on a wall or other location.
You may also be interested in these ideas.


About this upcycle toolbox project .
This thrifted toolbox was turned into a back-to-school office
supply coral. It took less than an hour to do this.
Subscribe to DIYandFun
The box was first cleaned.
Light sanding was needed to first smooth out the surface.
Then it was painted and decorated in a farm style.

Materials needed to make this toolbox project.
- Old wood toolbox or something similar.
- Sandpaper or sanding block.
- (White) chalk paint (acrylic could work as well)
- Black craft paint .
- Foam brushes.
- Decorative decals.
- Letter Stickers or Decals for words.
- Ribbon ⅜” wide (or of choice).
- Optional- drill and bit for adding ribbon strip, acrylic sealer and canning jars to hold items in.

How to make this Thrift Store Toolbox Makeover DIY.
Prep time: 10 minutes, active time: 20 minutes plus paint drying time.
Step One: prepare the toolbox.
Start by removing any debris, dirt, or objects such as stickers from your toolbox. Also, use a sanding block or sandpaper to even out the surface to make it smooth. Then you can use a wet rag or similar object to wipe down the box. Allow the box to dry.
Paint on the base layer of the box.
- Paint the toolbox white (or color of your choice) using a sponge brush. Note: It may take several coats of paint depending on the original color of the box. Allow the box to dry in between coats.
- To create a rustic farmhouse feel to the toolbox, you can use a sponge brush dipped in black paint and then
blotted on a paper towel, to add black to the inside and outside edges. - Add a few more swipes of
the black paint to the handle and along the front of the toolbox.
Expert tip 👉Keep in mind that you will be adding stickers to the front of of you box. As a result you should avoid painting in that area if you want the stickers to stick properly.
Step three: add the details to the box.
If you decide to add buffalo check or similar ribbon to the front of your toolbox (like mine has), you will need to drill two small holes and tie off the ribbon on the inside of the box. Be sure to center the ribbon!
For adding decals and stickers, you should use a ruler to find the center of your toolbox before adding your decals and stickers. Also, keep in mind where the ribbon is centered when you do this.
If you are adding letters to make a word, start with the center most letter of the word(s) and work your way out from there. Also, you should measure from the bottom and keep checking your letters to make
sure you are not placing the stickers on a slant.
Step Four: Finish the toolbox project.
- While it may not be necessary to do so, it may be a good idea for you to seal your paint or line the inside of the box depending on what you intend to use it for. Allow for this to dry if you take this step.
- Make sure that you canning jars will easily fit and can be removed and replaced if needed.
- Lastly, you can fill your canning jars with what you will be storing inside of them. My jars have pencils, pens, markers, colored pencils, rubber bands, screwdrivers, and/or scissors. Add rulers, pencil sharpeners, calculators, flashlights, glue, or whatever office supplies you may want to have easy access to.
Thrift Store Toolbox Makeover DIY, a simple project for taking a wooden tool holder and turning it into something useful and attractive.

Thrift Store Toolbox Makeover DIY,
Materials
- Wood toolbox
- Sandpaper or sanding block.
- (White) chalk paint
- Black craft paint .
- Foam brushes.
- Decorative decals.
- Letter Stickers or Decals for words.
- Ribbon ⅜” wide (or of choice).
- Optional- drill and bit for adding ribbon strip, acrylic sealer and canning jars to hold items in.
Instructions
- Remove any debris, dirt, or objects such as stickers from the toolbox. Use a sanding block or sandpaper to even out the surface to make it smooth. Then use a wet rag or similar object to wipe down the box. Allow the box to dry.
- Paint the toolbox white (or color of your choice) using a sponge brush. Note: It may take several coats of paint depending on the original color of the box. Allow the box to dry in between coats.
- To create a rustic farmhouse feel to the toolbox, use a sponge brush dipped in black paint and then blotted on a paper towel, to add black to the inside and outside edges.
- Add the decals and stickers as desired. Also, add the ribbon as desired.
- Lastly, fill your canning jars with what you will be storing.
Time needed: 1 hour
Quick how to steps for this toolbox project.
- Prepare the box.
Clean the box and remove any debris, dirt, or stickers.
Sand the box as needed to smooth it out.
Clean the box with a wet rag and then allow it to dry. - Paint the box.
It may take more than one coat of paint to cover your box. Allow the paint to dry fully before adding additional coats.
- Add the details.
You can add details such as stickers, decals and ribbons after the box has dried.