
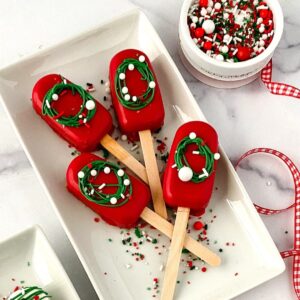
Christmas Cake Pops are really a fun holiday dessert or treat idea.
I like that cake pops make eating cake even more fun!

Christmas Cake Pops
This is a fun idea for making cake pops that are festive.
I like that these cake pops can be so easily personalized too.
Have you seen my Christmas Tree Brownie Treats?
That is another fun holiday treat idea that can be served on a stick.
Both holiday dessert pops would look great together when served on a Christmas season dessert table!
These cake pops call for using popsicle stick to hold the cake pops. You can find Christmas themed popsicle sticks here.
This idea is for anyone looking for a fun cake pops recipe.
Really, cake pops are as easy to make as cupcakes.
For the basic cake part of the pop you can use about any basic cake mix recipe.
It is what you put over those baked pops that makes it so fun.
Since this is a holiday or Christmas recipe idea, using edible holiday inspired decorations seems like an easy choice. You can make this as easy as holiday sprinkles!
Melted chocolate is used to coat cake pops.
While you may want to use regular cake frosting, chocolate works better.
Melted chocolate is used for several reasons.
Frosting would be messy to eat if it were used.
Melted chocolate however, gets hard and is thus, less of a mess.
Even better, coating the cake bars with melted chocolate helps to keep the cake together rather than falling apart on you.

Tips for making cake pops.
I just mentioned that melted chocolate is used to coat the cake pops rather than frosting.
You can use Colored Candy Melts, Almond bark, or Ghirardelli melting wafers for example.
More tips for you
- After the cake is coated with the melted chocolate, if the sides are not fully covered there is an easy fix. Simply apply a small amount of the melted chocolate into the exposed areas and allow it to dry.
- If your chocolate has drips that have hardened you can fix this too. Simply use clean kitchen scissors and carefully the hardened chocolate drips off of the bars.
- If the chocolate cracks when removing the bars after covering, you can peel the chocolate off. If there is no cake attached to the chocolate that you peeled off you can simply recover the bar with new chocolate.
- Sometimes cake pop sticks have trouble staying inside of the bar. To remedy this you can dip the stick into melted chocolate and stick it back into the bar. Be sure to allow for the stick to.
Personalize holiday cake pops.
Yes, these cake pops are great just the way that they are.
However, you can make yours even better.
Try one of these ideas.
- Sprinkle chopped nuts over the chocolate after covering the pops.
- Make a swirl style cake by using two different colored cake batters.
- Use two different colored chocolate toppings to make your pops more than one color.
Subscribe to DIYandFun
You may also be interested in these ideas.


About this recipe for holiday cake pops.
To make this recipe you will need a basic cake mix. Feel free to use the flavor mix of your choice.
You will need to bake your cake mix in molds.
You can find bar molds here .
Other sizes and shapes of cake molds can be found here.

Ingredients needed to make holiday cake pops.
- Cake mix that can be used to make the cake portion of the pops.
- Frosting- 1 cup.
- White Candy Melts- ¼ cup.
- Red Candy Melts- ¼ cup.
- Green Candy Melts- ¼ cup.
- Edible Holiday Decorations.
- Vegetable oil, coconut oil, or paramount crystals.

How to make Christmas Cake Pops.
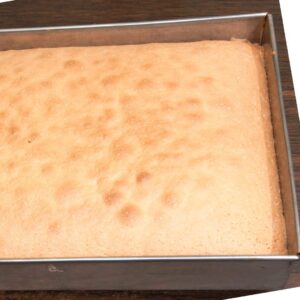
Step One: make the cake.
Bake the cake in cake pan according to the directions on the packaging or your recipe of choice.
The baked cake does not have to be pretty as it will be scooped into the molds later on.
Allow the cake to fully cool.
When the cake has fully cooled, break the cake up and place the pieces into a food processor or sturdy blender. Give the cake a few quick pulses and then add the frosting. Then process until the ingredients come together in a ball (should take less than a minute).
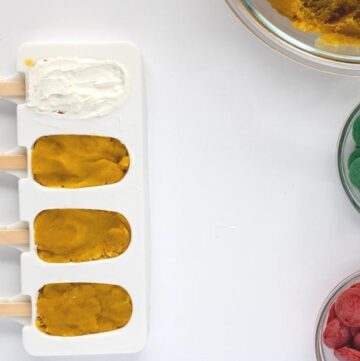
Step Two: prepare the molds.
Melt the first color of candy melt coating (such as white) according to the instructions on the package.
You can thin the it out as needed using a teaspoon of the oil.
Pour one tablespoon (for bar sized molds) of the melted candy into each of the molds, spreading the chocolate evenly throughout the molds. Then slide a popsicle stick into the center making sure they are as even as possible.
Freeze the molds for 15 minutes (no more no less or you risk cracking the chocolate).
(When placing the molds into in the freezer it needs to be flat and the sticks can not be pointed down).
Step Three: complete the cake pops.
Remove the trays with the hardened chocolate from the freezer.
Using a small cookie scoop, you can scoop out the cake dough that you put together in the food processor.
Press the dough into each of the molds, gently as you do not want to crack the chocolate that is already in the mold.
Cover the cake pops with the remaining melted wafers and decorate. You can clean up the edges as much as possible and then freeze the pops for at least five minute to harden.
Carefully remove from molds by peeling the pops from the top down.
This easy recipe for Christmas Cake Pops is perfect for most any holiday party, gathering, or dessert treat.


Christmas Cake Pops
Ingredients
- 1 Cake mix
- 1 cup Frosting
- ¼ cups White Candy Melts
- ¼ cups Red Candy Melts
- ¼ cup Green Candy Melts
- Edible Holiday Decorations.
Instructions
- Bake the cake in cake pan according to the directions on the packaging or your recipe of choice. The baked cake does not have to be pretty as it will be scooped into the molds later on. Allow the cake to fully cool.When the cake has fully cooled, break the cake up and place the pieces into a food processor or sturdy blender. Give the cake a few quick pulses and then add the frosting. Then process until the ingredients come together in a ball (should take less than a minute).

- Melt the first color of candy melt coating (such as white) according to the instructions on the package. You can thin the it out as needed using a teaspoon of the oil.Pour one tablespoon (for bar sized molds) of the melted candy into each of the molds, spreading the chocolate evenly throughout the molds. Then slide a popsicle stick into the center making sure they are as even as possible. Freeze the molds for 15 minutes (no more no less or you risk cracking the chocolate).(When placing the molds into in the freezer it needs to be flat and the sticks can not be pointed down).
- Remove the trays with the hardened chocolate from the freezer. Using a small cookie scoop, you can scoop out the cake dough that you put together in the food processor. Press the dough into each of the molds, gently as you do not want to crack the chocolate that is already in the mold.Cover the cake pops with the remaining melted wafers and decorate. You can clean up the edges as much as possible and then freeze the pops for at least five minute to harden.
originally posted:
December 7, 2021*As an Amazon Associate I earn from qualifying purchases. This means that the links on this website, and specifically on this post, that lead to other sites may be affiliate links.
Please note: Nutritional data has been calculated using a tool that comes with this recipe card and not by me. This means that Nutritional Information is only an estimate and can vary especially with ingredients that you use. The accuracy of this tool may differ from other tools as expected. Also note that there is no instructional value to the video that may be attached to this recipe. It is only there for visual pleasure. For more information about the images in this recipe, please refer the the recipe instructions. Thank you!
Follow Me