
Easy Kids Paper Plate Sheep Craft that is suitable for most ages.
This is a simple DIY idea for turning a paper plate into a sheep's face.

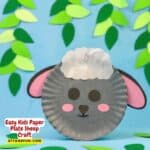
Paper Plate Sheep Craft Face DIY
This is a fun and simple idea that takes about 20 minutes to make.
These cute sheep faces make for adorable decorations especially during the spring months.
Did you see my Pine Cone Carrot Craft DIY
That craft is another fun idea that can be done by most ages. Both this craft and that one are simple crafts that are suitable for most ages.
To make this craft you will need gray acrylic paint. You can find acrylic paint here.
Frequently asked questions about paper plate crafts.
Paper plate craft are an inexpensive and simple medium for craft ideas.
Because they are easy to color or paint on, paper plates are especially friendly to kids craft ideas.
When selecting paper plates for craft projects, it is important that you select plates that are sturdy enough to hold the decorations and other elements that will be attached to it. Also, for best results, use paper plates that are not coated as the coating can have an effect on paint or glue.
While suitable crafts for certain ages depends on the craft and the ages, many crafts can be done with supervision.
In this specific craft diy, children may need help tracing, cutting , painting, and/or glueing. Of course, this also depends on the child's age and abilities.

Tips for making a sheep face paper plate.
To make the face you will need to paint the plate with gray paint. If your paint is too dark, you can mix it with white acrylic paint or use a combination of white and black to make the gray of your choice.
More tips for you
- Many or all of the materials needed to make this project can be found at a dollar store. Try looking there to save some money.
- The plates can be displayed as is or you can use a hole puncher to punch a hole on top to hang the plates. Another option is to attach a wooden paint stir on the back and use the plate as a puppet!
- While this project is suitable for most ages, some folks may need a bit of assistance. This is especially true with cutting and painting in this project.
Personalize these adorable sheep.
These sheep are really adorable just the way they are.
You can however, make yours even better.
Try one of these ideas.
- Glue cotton balls on the head instead of the white 'cloud'.
- Add googly eyes instead or the paper eyes.
- Allow kids to color the sheep to personalize their craft project.
About this kids craft idea.
This is a simple craft idea for turing a basic paper plate into the face of a sheep.
Most ages are suitable for this project, some with assistance.
To make this project we will first paint the plate gray.
Subscribe to DIYandFun
While the plate is drying, we can cut out the face elements as well as the ears.
Once the the plate has dried you can finish the features.

Materials needed to make a paper plate sheep head.
- Paper Plate. Select a white paper plate that can be painted.
- Acrylic Paint. Choose gray paint or black and white paint to mix your own gray with.
- Construction Paper. Black, white, and pink paper were used to make my sheep.
- Also needed; a paint brush, scissors, pen, marker, glue, and a pencil for tracing with.
Expert Tip 👉 When selecting a paper plate, choose one that does not have a coating and that is also sturdy enough to handle being painted.

How to make this Easy Kids Paper Plate Sheep Craft
Step One: prepare.
Prepare your work area as needed. Also, gather the materials that are needed to make this project.
Lastly, download the template for paper plate sheep kids craft.
Step Two: paint the plate and prepare the elements.
- Start by painting the plate a gray color.
- While the paint is drying, you can trace and cut out the elements from the downloaded template.
- On black paper you will need: the outer (larger) ears, two round eyes, and the heart nose.
- For the pink paper, you will need the two oval cheeks and the inner ears.
- The white paper can be used to make the hair fluff on top.
Step Three: finish making the sheep.
- Glue the pink ear pieces on to the larger black pieces so the there is about a half inch of black paper visible from the front of the ears. Then flip the plate over and glue the ears on to the back of the plate so that they are visible to the front.
- Glue the nose on the the face about an inch down from the center of the plate. Then use a marker to add in the mouth as indicated on the image above.
- Now, glue the eyes on to the plate about two inches above the nose, with the nose centered between them.
- Next, glue on the pink cheese on each side of the nose.
- Lastly, glue on the white paper 'fur' on top of the head.
Expert Tip 👉 Refer to the images on this page for details if you are unsure of where everything should go.
In case you missed something.
Easy Kids Paper Plate Sheep Craft, a simple diy idea that turns a paper plate into an adorable sheeps face. Most ages.

Easy Kids Paper Plate Sheep Craft
Materials
- Paper Plate
- Acrylic Paint Gray or black and white
- Construction Paper Black, white, and pink.
Also needed; a paint brush, scissors, pen, marker, glue, and a pencil for tracing with.
Instructions
- Prepare your work area as needed. Also, gather the materials that are needed to make this project. Download the template for paper plate sheep kids craft.
- Start by painting the plate a gray color.
- While the paint is drying, you can trace and cut out the elements from the downloaded template. On black paper you will need: the outer (larger) ears, two round eyes, and the heart nose. For the pink paper, you will need the two oval cheeks and the inner ears. The white paper can be used to make the hair fluff on top.
- Glue the pink ear pieces on to the larger black pieces so the there is about a half inch of black paper visible from the front of the ears. Then flip the plate over and glue the ears on to the back of the plate so that they are visible to the front.
- Glue the nose on the the face about an inch down from the center of the plate. Then use a marker to add in the mouth as indicated on the image above.
- Now, glue the eyes on to the plate about two inches above the nose, with the nose centered between them.
- Next, glue on the pink cheese on each side of the nose. Lastly, glue on the white paper 'fur' on top of the