
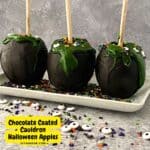
Fun looking Chocolate Coated Cauldron Halloween Apples that are especially perfect for the Halloween season.
I like how easy these yummy apples are to make!

Coated Cauldron Halloween Apples on a stick.
The stick is used as the 'ladle' used to 'stir' what is in the cauldron by the way.
This is really an apple that is coated with a bit of sweetness in my opinion.
Did you see my Easiest Ever Halloween Witch Cupcakes ?
Those cupcakes are another fun treat to make for the Halloween season. Both these apples and those cupcakes would go nicely when served together for a party or gathering.
To make the 'ladle' for the apples you will need sturdy skewers for dipping food. You can find a selection of skewers here.
You have probably seed a cauldron in a children's fairy tale or silly movie.
That cauldron was probably associated with a witch.
A cauldron is large black kettle or pot with handles on the sides.
These days, a cauldron is usually on top of some kind of a fire with a witch nearby keeping an eye on it.
For best results, you should use an apple that is large, fresh, and not too sweet.
Also, the apple should be free of dents, worms, and anything you would not want to eat while eating an apple.
Apple choices for caramel apples include:
🍎 McIntosh
🍏 Granny Smith
🍎Honeycrisp.

Tips for making candy covered apples.
Using apples that are freshly picked or purchased is really best for this idea. This is because these apples will be more firm and also fresh for eating.
More tips for you
- Remove the stem from the apples and then stick the skewer it place of the stem. Then place the apples in the refrigerator before coating them.
- If your caramel seems too thick to work with, add a teaspoon or two of some kind of milk to thin it out. Do not add too much milk as this can make your caramel too runny to hold however.
- For the chocolate melts, if they seem too thick to work with, add a teaspoon or two of melted coconut oil. This will help the melted chocolate be more uniform and smooth.
Personalize candy coated apples.
These apples are so easy to make and also so yummy to eat!
You can however make yours even better.
Try one of these ideas.
- Sprinkle some chopped nuts on top of the caramel layer while it is still warm.
- Place each cooled and set apple into a Halloween Cellophane bag and tie a Halloween ribbon around the top to give away to friends, teachers, neighbors, or family,
- Instead of making the 'witches brew' (aka caramel) green, use another color such as orange.


About this halloween witch inspired treat.
I think of this a healthier fall treat because an actual apple is used.
The inspiration for this recipe idea comes from a 'witches cauldron'.
Subscribe to DIYandFun
This is a two part recipe idea for making a halloween treat on a stick.
The first part of this recipe is for making a candy topped apple. Once the candy has solidified, a caramel layers is added to the apple.

Ingredients needed to make three Cauldron Halloween Apples .
- Apples. Large and firm apples work best.
- Skewers . Wooden skewers are used to both hold the apples for eating and to represent a ladle.
- Chocolate Candy Melts. Melts are preferred to chips in this recipe idea.
- Caramel Squares. Fresh caramel is preferred for best results.
- Leaf Green Food Coloring. This is the secret ingredient used to turn the caramel green 😉.
- Edible Halloween sprinkles and toppings . This is as desired.

How to make Chocolate Coated Cauldron Halloween Apples
Yields: 3 Apples
Prep time: 5 minutes
Active time:15 minutes
Idle time:10 minutes
Total time: 30 minutes
Step One: prepare.
Clean and dry the apples as needed. Remove the stems and stick a skewer in each apple. Place the apples in your refrigerator for at least thirty minutes to get cool.
Step Two: the chocolate layer.
Melt the chocolate as directed on the packaging in a shallow microwave safe bowl. I melt mine stopping every 15 seconds to stir.You can add a teaspoon or two of coconut oil as needed to smooth the chocolate out.
Line a rimmed baking sheet or similar item with parchment paper. Take the apples out of the refrigerator and dip each individual apple into the melted chocolate, scrape the bottom of the apples on to the side of the bowl to remove any excess chocolate, and then place the apples on to the parchment paper lined baking sheet.
Transfer the apples to your refrigerator for at least 15 minutes to set.
Step Three: the caramel layer.
- Remove the apples from your refrigerator.
- Melt the caramels according the packaging. I melt mine stopping every 15 seconds to stir. A teaspoon or two of milk can help smooth out caramel.
- Stir in the green food coloring while the caramel is still warm.
- While the apples are still cold, use a spoon to cover the tops of each apple with caramel.
- Place the apples back on to the parchment paper at top with the sprinkles.
- Refrigerate the apples until the caramel is set (about 5-10 minutes).
- I store mine in the refrigerator.
Expert tip 👉When you spoon the melted caramel over the top of the apples, it is best to move quickly because the warm caramel can melt the chocolate.
Chocolate Coated Cauldron Halloween Apples, a simple and delicious idea for making candy apple treats with a Halloween theme.

Table of contents for this cauldron apple idea.
Chocolate Coated Cauldron Halloween Apples,
Equipment
Ingredients
Instructions
- Melt the chocolate as directed on the packaging in a shallow microwave safe bowl.
- Line a rimmed baking sheet or similar item with parchment paper. Take the apples out of the refrigerator and dip each individual apple into the melted chocolate, Then place the apples on to the parchment paper lined baking sheet.Transfer the apples to your refrigerator for at least 15 minutes to set.
- Remove the apples from your refrigerator.Melt the caramels according the packaging. Stir in the green food coloring while the caramel is still warm.
- While the apples are still cold, use a spoon to cover the tops of each apple with caramel.Place the apples back on to the parchment paper at top with the sprinkles. Refrigerate the apples until the caramel is set (about 5-10 minutes).
Recipe Notes
Also, please see the actual recipe post for further details on this recipe. Nutritional Information is only an estimate and can vary especially with ingredients that are used. See DiyandFun.com for details on this recipe.
originally posted:
September 14, 2022*As an Amazon Associate I earn from qualifying purchases. This means that the links on this website, and specifically on this post, that lead to other sites may be affiliate links.
Nutrition
Please note: Nutritional data has been calculated using a tool that comes with this recipe card and not by me. This means that Nutritional Information is only an estimate and can vary especially with ingredients that you use. The accuracy of this tool may differ from other tools as expected. Also note that there is no instructional value to the video that may be attached to this recipe. It is only there for visual pleasure. For more information about the images in this recipe, please refer the the recipe instructions. Thank you!
Follow Me