
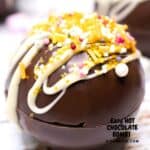
Easy Hot Chocolate Bombs are especially perfect on a cold winter day.
I like that just about everything you need to make this warm beverage comes in a ball or bomb.

Easy Hot Chocolate Bombs
This is a simple method for making this chocolate beverage treat.
You can enjoy these bombs on your own or share them with others!
Have you tried my Peppermint White Hot Chocolate recipe?
That peppermint hot chocolate is more involved than this basic one.
I like that there are plenty of choices for enjoying a warm beverage on a cold day!!
To make this recipe you will need Silicone Molds. You can find Silicone Molds for bombs here.
What exactly is a chocolate bomb is something that you may be wondering.
Obviously, this is a chocolate bomb.
It is also NOT a bomb that has anything to do with destruction (thank goodness!).
Beverage bombs get their name not just because they look kind of like a bomb.
The name has something to do with (most) everything you need to make the beverage being contained within the chocolate coating. When the bomb is placed in hot milk or other liquid, it explodes like a bomb, in yummy goodness.
You may be wondering how do you use hot chocolate bombs.
These hot chocolate bombs are intended to be used to make a warm beverage with the ingredients that are inside of it.
You simply add one bomb to your mug and stir.
What kind of liquid should you use to drop the bomb into?
Hot or very warm milk is the preferred beverage.
The warmth of the milk will help to break down the bomb and as a result, release all of that yummy chocolate etc.

Tips for making bombs.
As mentioned, using really warm milk is to drop the bomb into is how to make the beverage.
While whole milk is preferred, you can use most any kind of milk include vegan options.
More tips for you
- How much warm milk should you use per bomb? For a richer hot chocolate, use one cup (8 ounces). However, using up to 10 ounces will still yield a tasty beverage.
- Decorating the bombs makes them pretty. It is really optional as what you are decorating with ill have little impact on the flavor of your beverage.
- When you connect the mild halves together, it is a good idea to hold the top half on with your hands for a few moments. This will help the bombs halves to set in place.
Personalize your bombs.
This is a simple recipe for how to make hot chocolate bombs.
It is great just the way that it is.
However, you can try some of these ideas too.
- Add a teaspoon or two of booze of your choice to make the bombs boozy.
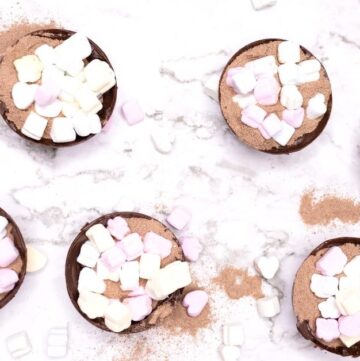
- Use colorful marshmallows instead of white ones to add color.
- Use holiday inspired sprinkles to make your bombs festive.
You may also be interested in these ideas.


About this recipe for hot chocolate bombs.
This recipe is for making the bombs, or the balls, that contain the dry ingredients needed to make hot chocolate.
To make the hot chocolate, simply drop a bomb in a mug with hot or warm milk and stir.
Subscribe to DIYandFun
Silicon molds are used to make these bombs.
We will simply melt chocolate to coat the molds.
Then we will fill half of the molds with the ingredients and secure the other half on top.

Ingredients needed to make chocolate bombs.
- Chocolate Chips- 12 ounces (1 package- most packages). You can find sugar free chocolate chips here. Use the chocolate of your choice.
- Hot Cocoa Mix- ⅓ cup. Feel free to add an extra tablespoon or to fit for added flavor. You can find sugar free hot cocoa mix here.
- Mini Marshmallows- 1 cup. Sugar free marshmallows can be found here.
- Sprinkles and toppings as desired. Sugar free sprinkles can be found here.

How to make Easy Hot Chocolate Bombs
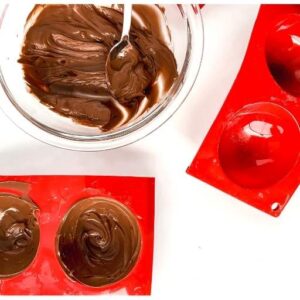
Step One: melt the chocolate.
You can melt the chocolate using a microwave-safe bowl to melt it. I suggest that you stop every 30 seconds to stir the chocolate so that it melts evenly.
Option two- use a double boiler method on the stove. Heat the chocolate on low-medium, stirring, until melted.
option three- follow the directions on the packaging.
Step Two: fill the molds with chocolate.
I like to first place my molds on a rimmed baking sheet that can fit into a freezer.
Carefully, use a pastry brush to paint the inside of each of the molds. Start by placing about 2-3 teaspoons per mold into the bottom of the mold (depending on the size of your molds). Then use the pastry brush to brush the chocolate all the way up to the top of each of the molds. You can add additional chocolate as needed to coat each entire half-sphere.
Transfer the molds to a freezer or refrigerator to harden.
Step Three: fill the bombs.
Once the chocolate has set, you can fill the bombs.
Tip: if the chocolate is not evenly spread inside of the spheres, simply repeat the painting melted chocolate and then setting process until you reach the perfect bomb shell.
Fill half of the hardened chocolate sphered with the cocoa mix and marshmallows.
Step Four: Finish the bombs
To assemble the bombs, you will need to secure each of the empty chocolate spheres to a filled one.
You can use melted chocolate (you may need to reheat) or frosting to do this. Another option is to heat a plate in the microwave and set the edges of the empty sphere on to the warm plate to slightly melt the edges.
Carefully transfer the bombs to a refrigerator to set (about 10 minutes). Then remove the bombs from their molds and decorate as desired.
Easy Hot Chocolate Bombs, a simple recipe idea for making delicious individual hot chocolate bombs. Sugar Free option.

Easy Hot Chocolate Bombs
Equipment
Ingredients
- 12 oz Chocolate Chips
- ⅓ cup Hot Cocoa Mix
- 1 cup Mini Marshmallows
- Sprinkles
Instructions
- You can melt the chocolate using a microwave-safe bowl to melt it. I suggest that you stop every 30 seconds to stir the chocolate so that it melts evenly.Carefully, use a pastry brush to paint the inside of each of the molds. Start by placing about 2-3 teaspoons per mold into the bottom of the mold (depending on the size of your molds). Then use the pastry brush to brush the chocolate all the way up to the top of each of the molds. Transfer the molds to a freezer or refrigerator to harden

- Fill half of the hardened chocolate sphered with the cocoa mix and marshmallows.To assemble the bombs, you will need to secure each of the empty chocolate spheres to a filled one. You can use melted chocolate (you may need to reheat) or frosting to do this. Carefully transfer the bombs to a refrigerator to set (about 10 minutes). Then remove the bombs from their molds and decorate as desired.
Recipe Notes
Please see recipe post for further details on this recipe.
Nutritional Information is only an estimate and can vary especially with ingredients that are used. See diyandfun.com for details on this recipe.
originally posted:
January 5, 2022*As an Amazon Associate I earn from qualifying purchases. This means that the links on this website, and specifically on this post, that lead to other sites may be affiliate links.
Nutrition
Please note: Nutritional data has been calculated using a tool that comes with this recipe card and not by me. This means that Nutritional Information is only an estimate and can vary especially with ingredients that you use. The accuracy of this tool may differ from other tools as expected. Also note that there is no instructional value to the video that may be attached to this recipe. It is only there for visual pleasure. For more information about the images in this recipe, please refer the the recipe instructions. Thank you!
Follow Me