
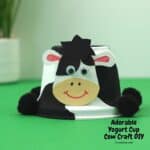
This Adorable Yogurt Cup Cow Craft DIY is really easy to do.
I like how cute these cows are too!

About this upcycled yogurt cup cow diy project.
This is a simple project for decorating a yogurt or similar cup in to a cow.
While this project is suitable for most ages, some folks may need a bit of assistance as needed.
Did you see my Mickey and Minnie Craft Stick DIY ?
That is another project that is adorable and easy to make.
While this project uses a yogurt cup, that project uses jumbo craft sticks.
Most yogurt cups are coated and may need some kind of primer in order to hold the paint. You can find a variety of primers here.

These plastic cups are easily recyclable. However, they are also perfect for projects.
This project takes a simple yogurt cup, turns it upside down, paints and then decorates it. The result is a cut cow that you can display on a shelf or give to someone as a gift.
This cow craft can easily be used as a decorations. It can also be part of a project for a party or gathering.
Here are some ways that you can use this cow as a decoration.
✔Write a name on each cow to use it as part of a place setting.
✔Attach balloons to it and use as a centerpiece.
✔Hide prizes under the cows for fun.
Tips for making this craft diy.
Many of the materials used in this project can be found at your local dollar store. They may also be available at big box stores.
More tips for you
- You will need to wash your yogurt cup before painting it. Make sure that the cup is fully dry before you start painting it.
- Anything that is attached to the cup should be removed. Stickers can usually be soaked off if needed.
- I am providing you with a template for making much of the details. You can skip this by simply using markers or paint to add these details.
Personalize this diy cow project.
This cow project is really cute just the way it is. You could make yours even cuter.
Try one of these ideas.
- Make your cow upside down so that it can hold things.
- Use colors other than black and white to make your cow colorful.
- You and alternatively use a container other than a yogurt container to make a cow of a different size.
You may also be interested in these ideas.


About this homemade Adorable Yogurt Cup Cow Craft DIY.
This is a simple upcycling project for turning a used yogurt cup into a cute cow.
The cow can be used for display on a shelf, desk, or part of something else.
Subscribe to DIYandFun
To make this project you will first need to clean the cup and allow it to dry.
Then the cup will need to be painted. When the paint has dried, you can glue on the details after tracing them on paper and cutting them out.

Materials needed to make this cow craft.
- Empty yogurt or similar cup.
- Bonding Primer for crafts.
- Acrylic Craft Paint- white and black.
- Markers- pink and black.
- Construction paper for the face and ears. White, black and beige.
- Ribbon.
- Black pompoms.
- Googly craft eyes.
- Paintbrush, scissors, and glue stick.
- Download the Template

How to make this Adorable Yogurt Cup Cow Craft DIY
This project should take about 20 minutes plus drying time. If you are using a different sized cup, you may need to adjust your materials.
Step One: prepare.
Prepare your workspace and materials.
- Clean and dry your cup and remove anything that may be stuck to it.
- Apply bonding to the cup if needed.
- Download the template.
- Prepare your materials for use.
Step Two: Paint the cup.
- Paint the yogurt cup white and allow the paint to dry. Add an additional layer of paint if needed.
- Use the black acrylic paint to paint the spots on the cow.
- Allow the spots to dry.
Step Three: trace the template pieces.
Download the template first.
- First trace the head and ears on white construction or cardstock paper. Then cut them out.
- On black construction paper, you can trace the hair and the spots that go on to the head. Then cut them out.
- Next, on tan or brown construction paper, trace the face, and then cut it out out.
- Lastly, color the inside of the ear with pink marker.
Step Three: Put the cow together.
This where you will attach the elements to the cow.
- Glue the face, spots, hair and ears on to the cows head. Then glue on the googly craft eyes.
- Glue four black pompoms for the legs. There should be two pompoms on each side.
- For the tail you can use a piece of string or use a marker to draw a tail on piece of white paper. Then attach the tail to your cow.
- Enjoy!
Adorable Yogurt Cup Cow Craft DIY, a simple project idea for turning a yogurt or similar cup into a cute cow.

Adorable Yogurt Cup Cow Craft DIY
Materials
- Empty yogurt or similar cup.
- Bonding Primer for crafts.
- Acrylic Craft Paint- white and black.
- Markers- pink and black.
- Construction paper for the face and ears. White, black and beige or brown.
- Black pompoms.
- Googly craft eyes.
Instructions
- Paint the yogurt cup white and allow the paint to dry. Add an additional layer of paint if needed.Use the black acrylic paint to paint the spots on the cow. Allow the spots to dry.
- Trace the head and ears on white construction or cardstock paper. Then cut them out. On black construction paper, you can trace the hair and the spots on the head. Then cut them out.
- Now ,on tan or brown construction paper, trace the face, and then cut it out out. Lastly, color the inside of the ear with pink marker.
- Glue the face, spots, hair and ears on to the cows head. Then glue on the googly craft eyes.Glue four black pompoms for the legs. There should be two pompoms on each side.For the tail you can use a piece of string or use a marker to draw a tail on piece of white paper. Then attach the tail to your cow.
Video
You may also be interested in these ideas.
Easy instructions.
- Prepare.
Clean and prep your yogurt cup.
Gather the materials. - Paint.
Follow the directions for painting the cup.
Repeat with an extra coat if needed. - Decorate the cow cup.
Follow the detailed instruction for decorating the cow.