
This Mickey and Minnie Craft Stick DIY is an easy project that is suitable to most ages.

About this Craft Stick Project inspired by Mickey and Mini.
This is a simple craft project that was inspired by a recent vacation trip.
You will probably like that is a cute idea that has quite a few uses.
Did you try My Painted Rock project?
Painted rocks is another simple project that can be done by most ages.
Like with this project, those painted rocks can be done using materials from a dollar or similar store.
To make this project you will need jumbo craft sticks. You can find a selection of Jumbo Sized Craft Sticks here.

Most people know Mickey and Minnie as popular Disney characters. These characters are fictitious yet, very well known.
It is unclear about Mickey and Minnie's relationship.
However, some folks believe that they are a couple who may have been married, but, privately. They are fictitious cartoon characters however. 😉
In this project, Mickey and Minnie are an inspiration.
That is, we are simply making a craft project that reminds us of the actual characters.
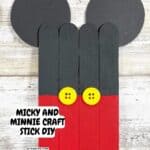
The reminders of the popular characters are the red and black colors used to pant the sticks with. Then we have added round ears, a bow to Minnie, and buttons for Mickey.
Tips for making this jumbo craft stick project.
I mentioned that many of the materials in this project can easily be found at dollar or similar store. You can also look in the craft department of your local big box store too for materials.
More tips for you
- My craft stick project was made using a glue gun and glue sticks. However, you can use a craft glue instead, but keep in mind that you will have to wait for it to dry.
- The ears on my mice were made using black cardstock. While cardstock is the perfect weight for the ears, you could however also try using cardboard if needed.
- The white dots are made using a sponge dabber dabbed in white paint. Round circles can be used instead.
- Using a sealer can be a good idea if you want your project to stand up to elements such as water. You can find craft sealers to choose from here.
Personalize your Mickey and Minnie Craft Stick DIY.
This is a simple project that is really cute the way it is.
However, you can make yours even better.
Try one of these ideas.
- Paint or write a name or phrase on the sticks to use as a sign.
- Decorate your with decals.
- Attach a craft magnet to the back to hang on your refrigerator or somewhere else.
You may also be interested in these ideas.


What to know about this Mickey and Minnie Craft Stick project.
To make this craft stick project we will first paint the craft sticks. Once the sticks have dried we will glue them together and then add the decorations.
Here are some uses for this Mickey and Mini Craft idea.
- Use it as a bookmark
- Make a sign out of it.
- Give this as a gift to someone.
- Make this as a group project for a party, meeting, or gathering.

Materials needed to make this craft DIY.
Subscribe to DIYandFun
- Craft Sticks, Jumbo
- Acrylic Craft Paint – White, Red, Black.
- Cardstock - Black
- Ribbon – Red with White Polka Dots
- Buttons – Yellow
- Circle Template or Circle Punch – 2” in diameter
- Glue Gun and Glue Sticks
Also needed;
Paintbrush
Sponge Dabber
Scissors
Pencil

How to make Mickey and Minnie Craft Stick DIY
This project takes about 30 minutes, depending on how long it takes for the paint and glue to dry.
STEP ONE: make the base
To create each of the Mickey and Minnie bases, line up four jumbo craft sticks on your work surface next to one another with the tops and bottoms in an even line.
Next, using two additional sticks, make the cross bars that will be used to hold the four sticks in place. You may need to first trim the two sticks as they may be too long. Glue the cross bar sticks in place.
STEP TWO: Paint the sticks.
Paint the top 2.5” of the glued craft sticks with the black acrylic craft paint. Set aside to dry and then apply a second coat, if necessary.
Paint the bottom 3.5” of the craft stick Mickey and Minnie with red acrylic craft paint. Set aside to dry and apply a second coat, if necessary.
STEP THREE: prepare the detail elements.
For the ears- Trace four 2” circles onto black cardstock with a pencil. Use a circle template or find a round object in your house that is the correct size. Carefully cut the circles out.
Minnie's Dress. Create a polka dot pattern on the bottom of Minnie’s dress using a sponge dabber and white acrylic craft paint.
STEP FOUR: Assemble the parts.
To assemble Mickey, glue two ears to the top right and left of the back of the craft sticks. Attach two yellow buttons to the intersection of the black and red paint using a glue gun and glue sticks.
To assemble Minnie, glue two ears to the top right and left of the back of the craft sticks. Tie the red with white polka dot ribbon into a bow and attach to the top center of the craft sticks using a glue gun and glue sticks.
Mickey and Minnie Craft Stick DIY, a fun do it yourself craft idea suitable for most ages made with dollar store materials.

MICKEY AND MINNIE CRAFT STICK DIY
Equipment
- Glue Gun and Sticks
Materials
- Craft Sticks, Jumbo
- Acrylic Craft Paint – White, Red, Black.
- Cardstock - Black
- Ribbon – Red with White Polka Dots
- Buttons – Yellow
- Circle Template or Circle Punch
Instructions
- To create each of the Mickey and Minnie bases, line up four jumbo craft sticks on your work surface next to one another with the tops and bottoms in an even line.Next, using two additional sticks, make the cross bars that will be used to hold the four sticks in place.Glue the cross bar sticks in place.
- Paint the top 2.5” of the glued craft sticks with the black acrylic craft paint. Set aside to dry and then apply a second coat, if necessary.
- Paint the bottom 3.5” of the craft stick Mickey and Minnie with red acrylic craft paint. Set aside to dry and apply a second coat, if necessary.
- For the ears- Trace four 2” circles onto black cardstock with a pencil. Use a circle template or find a round object in your house that is the correct size. Carefully cut the circles out.
- Create a polka dot pattern on the bottom of Minnie’s dress using a sponge dabber and white acrylic craft paint.
- To assemble Mickey, glue two ears to the top right and left of the back of the craft sticks. Attach two yellow buttons to the intersection of the black and red paint using a glue gun and glue sticks.
- To assemble Minnie, glue two ears to the top right and left of the back of the craft sticks. Tie the red with white polka dot ribbon into a bow and attach to the top center of the craft sticks using a glue gun and glue sticks.
Time needed: 30 minutes
Quick Directions for making this project.
- Glue the sticks together.
Use two cross sticks to glue four sticks together side by side.
- Paint the sticks.
Once the glue has dried you can paint the glued sticks with the red and black paint.
- Add the details.
Finish by gluing on the ears, bow for Minnie, and the other remaining details.