
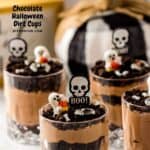
Chocolate Halloween Dirt Cups Dessert in a jar are so easy to make!
I like how chocolaty and fun these yummy treats are to eat!
image

Chocolate Halloween Dirt Cups Dessert
This is a simple dessert in a jar recipe especially for the Halloween season.
Kids especially love to dig into the tasty Halloween treat!
Did you try myEasy Nutter Butter Chocolate Mummies?
That recipe is another fun Halloween inspired treat that is also easy to make. Those mummies would look cute in a dirt cupe dessert such as this one.
These dirt cup desserts can be made ahead and store in a small mason jar that also has a lid. You can find small mason jars here.

Contrary to what their name says, dirt cups do not actually have dirt in them.
Instead, dirt cups are intended to be edible desserts.
Dirt cups are called dirt cups because they are intended to look like a cup of dirt.
These cups are then topped with fun decorations such as candy worms to make them fun to look at and eat.
When you first see a dirt cup, you will probably look like they are fun.
That is, dirt cups are a cute idea or presentation.
What makes dirt cups so good beyond what they look like is the ingredients that go into making them so cute looking. Because they are intended to look like dirt, these individual desserts are usually layered with chocolate sandwich cookies, that have been crushed, pudding, and plenty of sweet toppings such as candy worms.
Tips for making dirt cup desserts.
Using premade brownies, that is, brownies that you do not have to bake for this recipe, is a great time saving hack. The brownies will already be cooled and are perfect for this recipe when they are a day old.
More tips for you
- Oreo cookies are used to create the dirt topping. Feel free to use any sandwich cookie if you desire to.
- Use a mason jar to make this dessert in a jar as a gift for someone. Simply tie a ribbon with a spoon to the jar to make it even better looking!
- While using a small glass or a mason jar makes for a great appearance, you could use something unique. Be on the lookout for cute jars, jars that you have washed out after using what came in them, or even something that you may have picked up at a sale somewhere.
Personalize your Halloween dirt cup desserts.
This is a cute, simple, and tasty dessert just the way it is.
However, you can make yours even better.
Try one of these ideas.
- Instead of brownies, use crushed cookies or cake instead.
- Add some crunch to your jars using chocolate chips, nuts, candy, or pretzels.
- Use a vanilla pudding with a bit of food coloring to make a colorful creamy layer.


Subscribe to DIYandFun
About this recipe for Chocolate Halloween Dirt Cups.
This is a simple layered jar dessert recipe that is especially for Halloween.
The layers in these dirt cup jars are made using crushed brownies and pudding.
These dirt cup jars can be made ahead of time or served right away.
To store this dirt cup dessert, simply store them in a refrigerator. You can add the toppings just before serving.

Ingredients needed to make Chocolate Halloween Dirt Cups Desserts.
- Chocolate Brownies. The bronwies should be baked, fully cooled, and then broken up into smaller pieces.
- Pudding . Use a four serving instant chocolate pudding.
- Whipped Topping. This should be thawed to room temperature.
- Sandwich Cookies. Such as Oreo cookies. These should be crushed.
- Halloween dessert toppers and candy such as candy worms.

How to make Chocolate Halloween Dirt Cups Dessert
Step One : prepare.
- Clean and dry your glasses or jars as needed.
- Bake the brownies according to the packaging if needed, using a square baking pan. Allow the brownies to cool.
- Break the brownies apart into smaller pieces (you can use your hands to do this.
- To crush the sandwich cookies you can use a food processor or place the cookies in a zip top bag and use a rolling pin or mallet to crush them.
Expert Tip 👉While it is easiest to simply break the brownies apart to make their layers, you could alternatively make a cleaner layer by using a cookie cutter to cut each layer into one piece rather than using smaller pieces.
Step Two: make the pudding.
- Make the instant pudding, according to the directions on the packaging, in a large mixing bowl.
- Once the pudding has set, you can fold in the thawed whipped topping.
- Refrigerate the pudding mixture for 15-20 minutes to further set.
Step Three: make the dirt cups.
- On the bottom of each jar or glass, add a layer of brownie crumbs. Depending on the size of the jar or glass, this should be about ⅕th of the jar. Sprinkle a few cookie crumbs on top for a bit of crunch.
- Use a spoon to dollop a layer of the pudding on top of the brownie layer.
- Repeat the layering process until you are about a half inch away from the rim.
- For the top layer, add larger pieces of the sandwich cookie so that it looks like dirt. The add your decorations and serve.
Table of contents for this dirt cup dessert.
Chocolate Halloween Dirt Cups Dessert, a simple and delicious dessert recipe made with brownies and pudding for fall.

Chocolate Halloween Dirt Cups Dessert
Materials
- Chocolate Brownies.
- Pudding
- Whipped Topping
- Sandwich Cookies.
- Halloween dessert toppers and candy such as candy worms.
Instructions
- Bake the brownies according to the packaging if needed, using a square baking pan. Allow the brownies to cool.Break the brownies apart into smaller pieces (you can use your hands to do this.
- To crush the sandwich cookies you can use a food processor or place the cookies in a zip top bag and use a rolling pin or mallet to crush them.
- Make the instant pudding, according to the directions on the packaging, in a large mixing bowl.Once the pudding has set, you can fold in the thawed whipped topping.Refrigerate the pudding mixture for 15-20 minutes to further set.
- On the bottom of each jar or glass, add a layer of brownie crumbs. Depending on the size of the jar or glass, this should be about ⅕th of the jar.
- Sprinkle a few cookie crumbs on top for a bit of crunch.Use a spoon to dollop a layer of the pudding on top of the brownie layer.Repeat the layering process until you are about a half inch away from the rim.
- For the top layer, add larger pieces of the sandwich cookie so that it looks like dirt. Then add your decorations and serve.