
Easy Peanut Butter Spider Cookies that are fun to eat.
I like that the cookies are a crunchy and flavorful base for the chocolaty toppings.

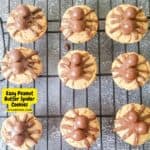
Easy Peanut Butter Spider Cookies
This is a simple recipe for topping a tasty cookie with a chocolaty spider.
The spiders head and body are made using chocolate candy.
Did you try my Chocolate Spider Web Pretzels?
That chocolate spider web pretzel recipe is another fun idea for the Halloween season. You could easily serve the spider pretzel webs with the spider peanut butter cookies as a snack or dessert.
My spiders were made with malted milk balls. You can find a selection of malted milk balls here.
Some cookie recipes call for crunchy peanut butter while others call for creamy.
Creamy peanut butter tends to be smoother lending to a more moist and consistent cookie texture. However, crunchy peanut butter does come with those chopped nuts lending to a 'crunch in every bite'. What I do suggest is using a peanut butter with little if any added ingredients to keep your recipe more pure.
If this recipe required a lot of piping that would also need to be pretty accurate, I would suggest using a piping bag with a tip. However, because this is a simple recipe and intended to be more 'fun' than 'accurate', you can go the simple route.
The simple route entails filling a zip top bake about half way full. Then, simply snip off one of the corners (¼-1/2" or so) and use that open hole to pipe your chocolate.

Tips for making spider cookies.
I am providing you with a basic yet, delicious peanut butter cookie recipe. You could however, use a peanut butter cookie mix instead to make your cookies.
More tips for you
- Peanut butter cookies are usually topped with a crisscross which helps them get crunchy. This recipe however, does not use a crisscross top as it would affect the chocolate spider that goes on top.
- After scooping the cookie dough from the bowl, use your hands to form them into a ball. Use the palm of your hand to flatten the cookies about ⅔rds of the way down.
- To apply the legs on to the cookie you could use a simple piping bag with tip. However, it may be even easier to just place the cooled melted chocolate into a zip top bag, cut a corner of the bag off, and use that to make the legs.
Personalize your spider peanut butter cookies.
These cookies are tasty and cute just the way they are.
However, you can make yours even better.
Try one of these ideas.
- Experiment with other kinds of candy such as peanut butter cups instead of the malted milk balls.
- Add edible eyes to your spiders.
- Use another kind of cookie such as chocolate chip or sandwich cookie.


About this spider covered cookie recipe.
Subscribe to DIYandFun
This is a simple two part recipe. The first part of this recipe is making the peanut butter cookies.
After the cookies have cooled, we will add the spider.
To make the spider, we will use two malted milk balls to make the body and head. Then the legs will be made using melted chocolate.

Ingredients needed to make this spider and peanut butter cookie recipe.
- Flour. All purpose flour can be used.
- Baking powder and Baking Soda are used to give our cookies a bit of air.
- Peanut Butter. The cookie portion of this is a peanut butter cookie.
- Butter. This helps with the moisture.
- Sugar and Brown Sugar. To balance the flavors and hold on to moisture.
- Egg. Holds the cookie ingredient together.
- Malted Milk Balls or Peanut Butter Cups
- Chocolate Chips To make the spiders legs.
- coconut oil or shortening. This can be used to thin out the texture of the melted chocolate chips as needed.
- Optional-Edible Eyes so that your spider can see 🙂 .

How to make Easy Peanut Butter Spider Cookies
Step One Bake the cookies.
- In a medium bowl, use a whisk or fork to mix together the flour, baking powder, and baking soda.
- Next, in a mixing bowl, beat together the peanut butter, butter, white sugar and brown sugar until creamy.
- Stir in the egg and then stir in the dry ingredients until combined.
- Refrigerate the dough until ready to use.
- When you are ready to make the cookies, preheat your oven to 350. While using a nonstick to prep your cookies sheets is not required, it is a good idea to prep the sheets with parchment paper for easy clean up.
- Use a 1" cookie scoop to scoop out balls of dough, place each ball of dough on to the cookie sheet(s). Then gently press the cookie dough down in using the palm of your hand (about ⅔ of the way in).
- Bake the cookies for 8-10 minutes or until they begin to brown.
- Allow the cookies to cool before topping them with the decoration.
Expert Tip👉 Refrigerate the cookie dough before scooping out the cookies. This will help keep the cookies together while baking.
Step Two: melt the chocolate.
Melt the chocolate according to the directions on the packaging. I use a microwave safe bowl and stop to stir every 30 seconds until melted. Then stir in the coconut oil until smooth. Allow the chocolate to cool a bit before transferring to a piping bag or zip top bag.
Step Three: make the spider .
To make the spider, pipe a line of melted chocolate down the center of each cookie. Then draw out 4 more chocolate lines on each side of the cookies to create the spider legs. Place two whopper balls on the each of the center lines on the cookies. You can also add optional eyes . Allow to the chocolate to set before serving..
Table of contents for this recipe.
Easy Peanut Butter Spider Cookies, a simple Halloween inspired dessert recipe idea for peanut butter cookies topped with chocolate spiders.

Easy Peanut Butter Spider Cookies
Ingredients
- 1 ½ cup Flour
- ½ tsp Baking powder
- ½ tsp Baking Soda
- ¾ cup Peanut Butter.
- ½ cup Butter.
- ¾ cup Sugar
- ¼ cup Brown Sugar
- 1 Egg.
- 24 Malted Milk Balls
- ½ cup Chocolate Chips - plus additional as needed
- 1 tsp Coconut Oil - or as needed to smooth chocolate
- Optional-Edible Eyes
Instructions
- In a medium bowl, use a whisk or fork to mix together the flour, baking powder, and baking soda.
- Next, in a mixing bowl, beat together the peanut butter, butter, white sugar and brown sugar until creamy. Stir in the egg and then stir in the dry ingredients until combined. Refrigerate the dough until ready to use.
- When you are ready to make the cookies, preheat your oven to 350. While using a nonstick to prep your cookies sheets is not required, it is a good idea to prep the sheets with parchment paper for easy clean up.
- Use a 1" cookie scoop to scoop out balls of dough, place each ball of dough on to the cookie sheet(s). Then gently press the cookie dough down in using the palm of your hand (about ⅔ of the way in).Bake the cookies for 8-10 minutes or until they begin to brown.Allow the cookies to cool before topping them with the decoration.
- Melt the chocolate according to the directions on the packaging. I use a microwave safe bowl and stop to stir every 30 seconds until melted. Then stir in the coconut oil until smooth. Allow the chocolate to cool a bit before transferring to a piping bag or zip top bag.
- To make the spider, pipe a line of melted chocolate down the center of each cookie. Then draw out 4 more chocolate lines on each side of the cookies to create the spider legs. Place two whopper balls on the each of the center lines on the cookies. You can also add optional eyes . Allow to the chocolate to set before serving..
Recipe Notes
Also, please see the actual recipe post for further details on this recipe. Nutritional Information is only an estimate and can vary especially with ingredients that are used. See DiyandFun.com for details on this recipe.
originally posted:
September 23, 2022*As an Amazon Associate I earn from qualifying purchases. This means that the links on this website, and specifically on this post, that lead to other sites may be affiliate links.
Nutrition
Please note: Nutritional data has been calculated using a tool that comes with this recipe card and not by me. This means that Nutritional Information is only an estimate and can vary especially with ingredients that you use. The accuracy of this tool may differ from other tools as expected. Also note that there is no instructional value to the video that may be attached to this recipe. It is only there for visual pleasure. For more information about the images in this recipe, please refer the the recipe instructions. Thank you!
Follow Me