
Paper Bag Witch DIY Craft is a simple project for most ages.
I like that these witches can be made with dollar store materials too!

Paper Bag Witch DIY Craft
This is a simple project for turning a paper bag into a cute Halloween witch.
There is a template included below that can be used to help guide you make this project.
Did you see my Halloween Pirate Craft DIY?
That is another Halloween inspired craft project suitable for most ages.
Like with this witch project, that project is as simple as downloading and glueing on the parts.
To make this project you will need googly eyes. You can find a selection of googly eyes here.
This bag craft as shown is intended to be for display.
You can hang the bag on your refrigerator or use it as a puppet.
Here is what else you can do with this project.
✅Make this project as a group project (scouts, art class, etc.)
✅Use these witches for a party decoration.
✅Give these witch bags away to friends, family, or neighbors.

Tips for making this Halloween bag craft.
I suggest that you use a sturdy paper bag. 'Cheaper' bags can often tear easily and thus, ruin your efforts.
More tips for you
- This project is suitable for most ages. However, there are some folks who may need help with cutting and glueing in this project.
- This witch was made using a hot glue gun to glue on the elements. An (safer for kids) alternative to a hot glue gun is to use regular glue or tacky glue and then waiting for the glue to dry.
- When you print out the template, print it on a cardstock or similar heavier paper. This will hold up better for you when tracing the elements.
Personalize this craft diy.
Yes, this paper bag witch is a cute idea.
However, you can also make yours even better.
Try one of these ideas.
- Use other colors for the witch or her elements.
- Or use a Halloween themed lunch bag.
- Allow small kids to place Halloween stickers on the witch.


About this decorated lunch bag craft.
Subscribe to DIYandFun
This is a simple craft project for turning a paper lunch bag into a witch.
It is suitable for most ages.
I will provide you with a template.
The template contains the main elements for the witch. Simply cut out the elements, trace them on to paper, and glue them on to your paperbag.

Materials needed to make this Witch DIY Craft.
- Paper Lunch Bag.
- Construction paper (green, black, orange, yellow, and blue).
- Googly eyes
- Scissors, Pen/pencil, and Glue gun/glue.

How to make a Paper Bag Witch DIY Craft.
Step One: prepare.
Witch-Paperbag-Template
Download the template on to cardstock or similar paper. Cut the elements out for tracing.
Step Two: trace and cut out the elements.
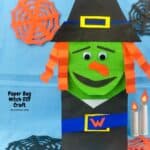
- Black- hat, mouth, eyebrows and outfit.
- Green- face and neck.
- Orange- hair, nose, and W.
- Yellow- hat element.
Step Three: glue the elements on to the bag.
- Using glue, cover the upper part of the paper bag with the green colored paper. Shape
the upper part into a face shape by cutting its sides. - The lower part of the paper bag should be covered with the black construction paper.
- For the hair, simply cut strips from the orange paper and then fold them in an accordian style. Glue them on to the bag.
- Glue the hat elements on to the hat. Then glue the hat on to the witch.
- Finish gluing on the remaining elements. Follow the image of my witch to finish gluing elements in place if you are unsure.
Paper Bag Witch DIY Craft, a simple project for most ages, includes free download. Turn a lunch bag into a Halloween witch.

Table of contents for this project.
Paper Bag Witch DIY Craft
Materials
- Paper Lunch Bag.
- Construction paper
- Googly eyes
- Scissors, Pen/pencil/marker, and Glue gun/glue.
Instructions
- Download the template on to cardstock or similar paper. Cut the elements out for tracing
- Trace and cut out elements.(see photo of completed project for details).Black- hat, mouth, eyebrows and outfit.Green- face and neck.Orange- hair, nose, and W.Yellow- hat element.
- Carefully glue the elements on to the paper bag.