
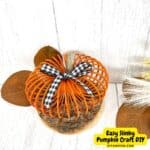
You will probably like this Easy Slinky Pumpkin Craft DIY.
Not only is this a cute and simple idea, it is also inexpensive to make!

Turn a 'Slinky' into a Pumpkin.
This do it yourself craft idea is perfect for the fall season.
Most of the materials needed in this project can be found at a dollar or similar store.
Did you see my Easy DIY Fabric Covered Pumpkin ?
That diy craft idea is another easy way to make a pumpkin. Really, both this slinky inspired pumpkin and that fabric covered pumpkin could look great when displayed together.
To make this project you will need a 'slinky' or similar spring toy. You can find plastic magic spring toys here (like the kind used in my pumpkin).
A 'Slinky' is a classic yet, simple, toy that resembles a large spring. It has been around forever.
While most of these spring toys are made with metal, plastic works best for this project as it is easier to paint effectively. You can find inexpensive plastic spring toys at dollar stores.

Tips for making a spring toy pumpkin.
While you could use a typical metal spring toy, it is best to use a plastic one. Not only is the plastic version easier to work with, it also has more and better workspace for a pumpkin.
More tips for you
- The 'stem' for this pumpkin is basically a stick that was found outside. When selecting a stick, make sure that it is dry, clean, and is of a size that looks uniform to the entire pumpkin.
- When spray painting the spring, rotate the pumpkins to ensure that all sides of the spring get painted. Also, do this in a well ventilated location.
- This craft idea really works best when you use a glue gun and sticks. However, you could probably get away with using a craft glue if you have the time and possibly clamps or cloths pins that can hold things together while they dry.
Personalize this do it yourself craft pumpkin.
This is really a simple and a cute idea.
However, you can make yours even better.
Try one of these ideas.
- Paint the slinky red and the stem green to make it an apple.
- Make a bunch of these pumpkins and display them in a basket.
- Add some googly eyes and triangles for the eyes.
You may also be interested in these ideas.


About this pumpkin craft idea.
This is a simple project for turning a spring-like toy into a pumpkin.
To make this pumpkin you should use a plastic version of the toy.
Subscribe to DIYandFun
We will start by spray painting the spring toy.
Then we will attach the ends together.
Lastly, we will add the final touches to the pumpkin.

Materials Needed to Make a Slinky Spring Toy Pumpkin.
- Non-wire slinky or similar toy. You can find plastic magic spring toys here
- Spray Paint White, Bright Orange, and Burnt Orange. While you could use another kind of paint, spray paint gives this the best coverage. Also, make sure that you are using paint that will adhere to the plastic.
- Glue Gun and Glue Sticks.
- Twig or similar item for the stem.
- Scissors, ruler, clothes pin, drop cloth or paper cover for work area.

How to make this Easy Slinky Pumpkin Craft DIY.
This project takes about a half hour to make.
Plus there may be additional time as needed for drying.
Step One: Paint the spring toys.
- Remove the spring toy from any packaging and make sure that it is clean and dry.
- In a well-ventilated area, or outside, apply a basecoat to the spring using the white spray paint. Set aside to dry.
- Next, apply the orange spray paints in very light coats. Alternate with the bright orange and burnt orange spray paint.
- Allow the orange paint to dry before adding additional layers as needed.
.
Expert Tip 👉Rotate the pumpkins while spray painting to ensure that all sides of the spring get painted. Lay down cardboard or a drop cloth to protect your surface.
Step Two: put together the pumpkin.
- To attach the ends of the spring, apply a thin line of hot glue along the end of the plastic coil.
- Be sure to match up the opposite ends of the spring while the glue is wet then secure them with a clothespin until the glue cools.
- Allow the glue to set and reapply glue as needed.
Step Three: finish making the pumpkin.
For the stem: cut or break the twig as needed so that it fits into the center of the pumpkin.
You can glue the stem in place if needed.
Tie the ribbon around the stem and any additional decorations as desired.
Easy Slinky Pumpkin Craft DIY, a simple Fall Halloween decor idea for turning a spring toy into a pumpkin. Dollar store materials.

Easy Slinky Pumpkin Craft DIY,
Equipment
- Scissors, ruler, clothes pin, drop cloth or paper cover for work area.
Materials
- Non-wire slinky or similar toy.
- Spray Paint White, Bright Orange, and Burnt Orange.
- Glue Gun and Glue Sticks.
- Twig
Instructions
- In a well-ventilated area, or outside, apply a basecoat to the spring using the white spray paint. Set aside to dry.
- Next, apply the orange spray paints in very light coats. Alternate with the bright orange and burnt orange spray paint.Allow the orange paint to dry before adding additional layers as needed.
- To attach the ends of the spring, apply a thin line of hot glue along the end of the plastic coil.Be sure to match up the opposite ends of the spring while the glue is wet then secure them with a clothespin until the glue cools.Allow the glue to set and reapply glue as needed.
- For the stem: cut or break the twig as needed so that it fits into the center of the pumpkin. You can glue the stem in place if needed.Tie the ribbon around the stem and any additional decorations as desired.
You should check out these ideas too!
Quick instructions for this project.
- Paint the spring toy.
First apply a layer of white spray paint as a base.
After the paint has dried, apply the orange paint. - Make the pumpkin.
Glue the ends of the spring toy together to make the pumpkin.
Use a clothespin to secure the ends while they dry. - Finish the pumpkin.
Add the stem and the ribbon to the pumpkin.