
Apple Pie Crescent Roll Recipe is a quick and easy recipe idea that can be made in about a half hour.
These tasty rolls combine together the flavors of apple pie with the convenience of crescent dough, making them the perfect idea for breakfast, brunch, or even for dessert!

Crescent Roll Ups with Apples.
These delicious rolls combine together the buttery and flaky texture of crescent rolls with the flavors of apple pie.
When these rolls are baked, the apples become soft and sweet while the rolls get slightly crisp and golden brown.
Did you try my Easy Apple Pie Twists Recipe?
That easy recipe is a simple fall inspired dessert or treat recipe made with apples and puff pastry. Both this recipe for crescent roll ups and that recipe for pie twists are delicious and easy recipes that can be made with apples.
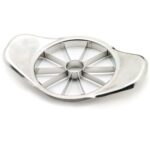
To make this recipe you will need to use apples that have had the skin removed. You can find apple peelers here.

Tips for making Apple Pie Crescents.
To make this recipe you will need apple wedges. I recommend using an apple corer/wedge cutter as this will make the wedges into a uniform size while easily removing the core.
More tips for you
- Tart apples that can hold up to baking work best in this recipe. Granny Smith apples work best.
- If you have trouble sealing up the dough after rolling it up, simply add a small amount of water using your fingertips. This will help the dough stick together better.
- Leftover apple pie crescent rolls should be stored in an airtight container and refrigerated. If properly stored, they should keep for about five days.
Personalize these easy apple pie crescents.
This recipe is delicious just the way it is.
You can however make yours even better.
Try one of these ideas.
- Use another fruit in place of or with the apples. Pears or berries may work in this recipe.
- Drizzle a simple glaze over the rolls (1 cup powdered sugar + 2-½ tbsp milk or water).
- Try using another kind of dough such as an actual pie crust dough cut into wedges.


Be sure to follow DIYandFUN on Facebook and on Pinterest. We also have a weekly newsletter that you can subscribe to.
About this recipe for crescent roll apple pie.
This is an easy recipe made with premade crescent roll dough and a simple filling.
An apple filling is inside of the rolled up crescents which are then brushed with a sweet topping before baking.
Subscribe to DIYandFun
How to serve crescent rolls with apple pie filling.
- Serve these rolls just out of the oven with a cup of coffee or glass of milk.
- Top these apple pie rolls with a bit of whipped topping.
- Add a scoop of ice cream next to these tasty rolls and serve it for dessert.

Ingredients needed to make crescent roll with cream cheese and apple pie filling.
- Apple. Use a fresh apple, such as a Granny Smith, that has been peeled as well as sliced and cored.
- Crescent Roll Dough While any refrigerated crescent roll dough could work, a buttery one really makes this recipe even better.
- Cream Cheese. Used to make the filling creamy.
- Brown Sugar. The sweetener used to make the filling. This should be softened to room temperature.
- Apple Pie Spice. Cinnamon can alternatively be used but, apple pie spice is preferred.
- For the topping you will need melted butter, light brown sugar and flour.

How to make this Apple Pie Crescent Roll Recipe.
Yield: 8 rolls.
Prep time: 5 minutes.
Bake Time: 20 minutes.
Step One: prepare.
- Preheat your oven to 350 and prepare a baking dish or baking sheet for nonstick. A baking mat or parchment paper work well in this recipe if you are using a baking sheet.
- Remove the skin from the apple and slice (eight evenly sized wedges) and remove the core it.
- Place the apples in a bowl with cold water.
- Unroll the dough on a clean work area and carefully use a knife to separate the dough into triangles, cutting along the lines that are already there.
Expert Tip 👉 Soaking the apples in cold water helps to keep the apple slices from turning brown. You can also add a teaspoon of lemon juice, however this can affect the flavor of the rolls.
Step Two: make the filling.
- In a medium mixing bowl, blend together the cream cheese, brown sugar, and pumpkin pie spice until the mixture seems pasty.
- Use a butter knife to spread the filling on to each of the roll triangles to about ¼-1/2" on the edges.
- Place an apple wedge on the opposite side of the triangle from the point (not the even sides or the pointy side) so that the apples backside is about a half an inch from the edge of the dough).
- Wrap the end closest to backside of the apple wedge around the apple wedge and continue to to roll the apple wedge and dough until you hit the point end.
- Place the rolled up crescent on the prepared baking sheet or baking dish and continue until all of the wedges have been rolled up in crescent roll dough.
Step Three: finish making the roll ups.
- To make the topping, in a saucepan on medium-low heat, melt the butter. When the butter has melted whisk in the brown sugar and flour and then whisk the ingredients until dissolved.
- Remove the saucepan from the heat and carefully use a pastry brush to brush the mixture over the roll ups. You can pour any remaining topping over the roll ups.
- Lastly, bake the roll ups for 20-25 minutes until it becomes bubbly and the rolls turn golden brown. Note that baking times can vary depending on what you are baking your roll ups in.
Expert Tip 👉Leftover apple pie crescent rolls should be stored in an airtight container and refrigerated. If properly stored, they should keep for about five days.


In case you missed something.
Apple Pie Crescent Roll Recipe, an easy breakfast or dessert idea combining the flavors of apple pie with the convenience of crescent dough.


Apple Pie Crescent Roll Recipe


Ingredients
- 1 Apple -peeled, cored, sliced
- 1 Crescent Roll Dough
- 4 tbsp Cream Cheese
- 2 tbsp Brown Sugar
- 1 tsp Apple Pie Spice
For the topping you will need melted butter (½ cup), light brown sugar (¾ cup) and flour (1 ½ tbsp).
Instructions
- Preheat your oven to 350 and prepare a baking dish or baking sheet for nonstick.
- Remove the skin from the apple and slice (eight evenly sized wedges) and remove the core it. Place the apples in a bowl with cold water.
- Unroll the dough on a clean work area and carefully use a knife to separate the dough into triangles, cutting along the lines that are already there.
- In a medium mixing bowl, blend together the cream cheese, brown sugar, and pumpkin pie spice until the mixture seems pasty. Use a butter knife to spread the filling on to each of the roll triangles to about ¼-½" on the edges. Place an apple wedge on the opposite side of the triangle from the point so that the apples backside is about a half an inch from the edge of the dough . Wrap the end closest to backside of the apple wedge around the apple wedge and continue to to roll the apple wedge and dough until you hit the point end.
- Place the rolled up crescent on the prepared baking sheet or baking dish and continue until all of the wedges have been rolled up in crescent roll dough.
- In a saucepan on medium-low heat, melt the butter. When the butter has melted whisk in the brown sugar and flour and then whisk the ingredients until dissolved.
- Remove the saucepan from the heat and carefully use a pastry brush to brush the combined mixture over the roll ups. You can pour any remaining topping over the roll ups. Lastly, bake the roll ups for 20-25 minutes until it becomes bubbly and the rolls turn golden brown.
Recipe Notes
Also, please see the actual recipe post for further details on this recipe. Nutritional Information is only an estimate and can vary especially with ingredients that are used. See DiyandFun.com for details on this recipe.
originally posted:
August 17, 2023*As an Amazon Associate I earn from qualifying purchases. This means that the links on this website, and specifically on this post, that lead to other sites may be affiliate links.
Nutrition
Please note: Nutritional data has been calculated using a tool that comes with this recipe card and not by me. This means that Nutritional Information is only an estimate and can vary especially with ingredients that you use. The accuracy of this tool may differ from other tools as expected. Also note that there is no instructional value to the video that may be attached to this recipe. It is only there for visual pleasure. For more information about the images in this recipe, please refer the the recipe instructions. Thank you!
Follow Me