
This Love Bug Popsicle Craft for Kids is an easy project that is suitable to most ages.
I like that this craft can be made with dollar store materials!

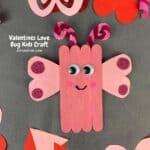
Easy Love Bug Popsicle Craft for Kids.
This simple craft idea is perfect for Valentines day.
You will probably like that is a cute idea that has quite a few uses.
Did you see my Mickey and Minnie Craft Stick DIY?
That craft stick idea is another easy and cute project that is suitable for most ages. Both this love bug and the Mini and Mickey craft stick ideas are nice and easy ideas especially for kids.
To make this project you will need jumbo craft sticks. You can find a selection of Jumbo Sized Craft Sticks here.
Frequently asked questions about Kids Crafts.
There are craft ideas for kids of most ages. However, it is a good idea to find the right craft idea for the specific child, which usually has to do with their age and capabilities.
This homemade craft stick idea is suitable for most ages.
However, some folks may need help with certain steps such as when it comes to painting or cutting.
While there are insects referred to as 'love bugs' this love bug is purely fictional.
The love bug depicted in this project is especially inspired by Valentines Day.
While you could make this project as a decoration or as a gift for Valentines day, it can easily be enjoyed any time of the year.

Tips for making this easy craft stick project .
All or many of the materials in this project can easily be found at dollar or similar stores. You can also look in the craft department of your local big box store too for material
More tips for you
- My craft stick project was made using a glue gun and glue sticks. However, you can use a craft glue instead, but keep in mind that you will have to wait for it to dry.
- While my love bug is pink, you can use the color of your choice. Red or white are nice choices, for example.
- Using a sealer can be a good idea if you want your project to stand up to elements such as water. You can find craft sealers to choose from here.
Personalize this love bug craft idea.
This is a simple project that is really cute the way it is.
However, you can make yours even better.
Try one of these ideas.
- The wings on my love bug are made by tracing two sticks side bay side. If you want two hearts for your wings, trace hearts using a cookie cutter to make the wings .
- Decorate your love bugs with Valentines day stickers.
- Make this into a puppet by attaching a paint stir stick to the backside.


About this Love Bug Popsicle Stick Craft .
To make this project we will first attache together four popsicle craft sticks together.
Then we will paint the sticks.
While the paint is drying, you can prepare the features to attach to the bug.
Pipe cleaners are used for the antennae. The wings are made from tracing two sticks or any similar shaped object.
Subscribe to DIYandFun

Materials needed to make a Love Bug Popsicle Craft for Kids.
- Craft Sticks, Jumbo sized. One cut in half (adults should cut the stick).
- Acrylic Craft Paint - pink or desired color.
- Construction Paper. light pink and dark pink paper
- Pipe cleaners two dark pink two light pink
- Googly eyes
- Also needed- glue or glue gun and sticks, black marker, pink marker (for cheeks).

How to make a Love Bug Popsicle Craft
This project takes about 20 minutes, depending on how long it takes for the paint and glue to dry.
Step One: make the base
To make the love bug's body, line up four jumbo craft sticks on your work surface next to one another with the tops and bottoms in an even line.
Next, using the two halves of the cut stick, make the cross bars that will be used to hold the four sticks in place. Glue one half on the top (about ½" from the edge) and the other on the bottom to hold the sticks together
Expert tip👉 use two rulers, one on top and one on the bottom of the lined up sticks. to even the sticks out.
Step Two: paint the love bug.
Once the glue has dried, flip the love bug over. Paint the front side of the glued sticks using the acrylic craft paint While the paint dried you can make the wings and antennae.
Step Three: make the wings and antennae.
For the wings- trace two sticks side by side or something similar size on to the light pink paper and then cut the wings out. You can trim the ends to cut off the corners. For the dots, on the darker pink paper, trace a quarter for two circles and a nickel for the other two. Use a marker to make the spots on the cut out circles. Then glue a large dot on one end on the wings and a small dot on the others.
For the antennae twist a light and a dark pipe cleaner together. Then swirl the tops of the twisted pipe cleaners over to form a "P". Repeat with the remaining pipe cleaners.
Step Four: Finish up the love bug.
- Attach the wings- glue these on to the upper half of the backside of the bug so that the circles are facing front.
- The antennes should also be attached to the upper backside so that the "p's" are back to back facing outward.
- For the face, use a black marker to draw a mouth on the center two sticks. Then use a pink marker to draw the circles for the cheeks. Lastly, glue on the wiggly eyes about a quarter way down from the top and side by side on the two center sticks.
In case you missed it.
Love Bug Popsicle Craft for Kids, a fun do it yourself craft idea suitable for most ages made with dollar store materials.

Love Bug Popsicle Craft for Kids
Materials
Also needed- glue or glue gun and sticks, black marker, pink marker (for cheeks).
Instructions
- To make the love bug's body, line up four jumbo craft sticks on your work surface next to one another with the tops and bottoms in an even line.
- Next, using the two halves of the cut stick, make the cross bars that will be used to hold the four sticks in place. Glue one half on the top (about ½" from the edge) and the other on the bottom to hold the sticks together
- Once the glue has dried, flip the love bug over. Paint the front side of the glued sticks using the acrylic craft paint While the paint dried you can make the wings and antennae.
- For the wings- trace two sticks side by side or something similar size on to the light pink paper and then cut the wings out. You can trim the ends to cut off the corners. For the dots, on the darker pink paper, trace a quarter for two circles and a nickel for the other two. Use a marker to make the spots on the cut out circles. Then glue a large dot on one end on the wings and a small dot on the others.
- For the antennae twist a light and a dark pipe cleaner together. Then swirl the tops of the twisted pipe cleaners over to form a "P". Repeat with the remaining pipe cleaners.
- Attach the wings- glue these on to the upper half of the backside of the bug so that the circles are facing front.
- The antennes should also be attached to the upper backside so that the "p's" are back to back facing outward.
- For the face, use a black marker to draw a mouth on the center two sticks. Then use a pink marker to draw the circles for the cheeks.
- Lastly, glue on the wiggly eyes about a quarter way down from the top and side by side on the two center sticks.